by Craig
Patchett
By having the
object appear
behind some things and in
front of others, we can easily
create a realistic
three-dimensional effect.
behind some things and in
front of others, we can easily
create a realistic
three-dimensional effect.
Now that you have the PMG basics down, it's time to move forward and take a look at some enhancements. The first enhancement that we'll look at is a really easy one to do. What it does is allow you to make each or all of the players wider. Unfortunately, this doesn't mean that you get more dots to use. Instead, the dots that you already have are made wider, so it's really the equivalent of changing graphics modes. In any case, locations 53256, 53257, 53258, and 53259 are used to adjust the width of the players, and location 53260 is used for the missiles. Here's how they're used:
PLAYER n:
POKE 53256+n,0 for normal widthPOKE 53256+n,1 for double width
POKE 53256+n,3 for quadruple width
MISSILE 0:
POKE 53260,0 for normal1 for double
3 for quadruple
3 for quadruple
MISSILE 1:
POKE 53260,0 for normal4 for double
12 for quadruple
12 for quadruple
MISSILE 2:
POKE 53260,0 for normal16 for double
48 for quadruple
48 for quadruple
MISSILE 3:
POKE 53260,0 for normal64 for double
192 for quadruple
192 for quadruple
In case you're wondering about the missiles, you should pick the value you want for each missile, add those four values together, then POKE the result into location 53260. So, for example, if you wanted Missile 0 to be normal, 1 and 2 to be double, and 3 to be quadruple, you would use the command POKE 53260,212 (0+4+16+192). Try adding the following line to our last spaceship program from last month:
195 POKE 53256,1
Now change it to:
195 POKE 53256,3
Finally, get rid of it or change it to:
195 POKE 53256,0
Now you've seen the effect of changing the width of the players.
Way, way back, I said that PMG was useful for moving an object around the screen without affecting the background. What I didn't mention was that the background could either be behind the object or in front of it. What difference does it make? Well, by having the object appear behind some things and in front of others, we can easily create a realistic three-dimensional effect. The question is, just how do we go about telling the computer what to put in front and what to put behind? It's really quite simple, through the use of location 623. Atari lets you mix things up to four different ways with this location, as summarized below:
|
GPRIOR (623)
|
|||||||||
| HIGH |
1 |
2 |
4 |
8 |
|||||
P
R I O R I T Y |
 |
|
|||||||
| LOW |
|||||||||
P = PLAYER #
PF = PLAYFIELD #
BAK = BACKGROUND
PF = PLAYFIELD #
BAK = BACKGROUND
What does all this mean? At the top of the chart you'll see the numbers 1, 2, 4 and 8. These correspond to the values we POKE into location 623. Under these numbers are a list of PFs and Ps, which correspond to the various playfields and players (remember that playfields are anything on the screen that isn't a player or a missile). Anything in this list will appear in front of whatever is below it in the list if the two are on the screen at the same place. So, for example, if we were to POKE 623 with a 1, Player 0 would appear in front of Player 1, which would appear in front of Player 2, which would appear in front of Player 3, which would appear in front of Playfield 0, and so forth.
Time for an example. Let's set location 623 to 8, which puts the players in front of some of the playfield colors, and behind the rest. This will give us a chance to see the threedimensional effect mentioned earlier. We'll then draw some simple playfield and move our spaceship around in it. Make sure you add the following program lines to the last spaceship program you typed in last month:
130
GRAPHICS 19
131 SETCOLOR 0,0,2:SETCOL
OR 1,0,4:SETCOLOR 2,0,6
132 FOR REG=1 TO 3:COLOR
REG:ST=2+10*REG-15*(REG=3
)
133 FOR X=0 TO 4:PLOT ST+
X,4+(REG=3):DRAWTO ST+X,1
9-(REG=3):NEXT X
134 NEXT REG
195 POKE 623,8
131 SETCOLOR 0,0,2:SETCOL
OR 1,0,4:SETCOLOR 2,0,6
132 FOR REG=1 TO 3:COLOR
REG:ST=2+10*REG-15*(REG=3
)
133 FOR X=0 TO 4:PLOT ST+
X,4+(REG=3):DRAWTO ST+X,1
9-(REG=3):NEXT X
134 NEXT REG
195 POKE 623,8
This kind of effect should get your creative juices running; now you can move spaceships behind planets, or make people appear to walk into houses, with hardly any effort at all!
Here's something that you may want to play around with, but which I won't really go into too deeply. If we POKE 623 with any combination of 1, 2, 4 and 8 (such as 3, 7, etc.), then the computer will get confused every now and then as to what should be in front of what, and will just give up and make the confused region black.
To see an example of this, change Line 195 to:
195 POKE 623,15
There's even more that can be done with location 623. First of all, we mentioned before that the four missiles can be combined to make a fifth player. All we have to do is position them alongside each other and move them all together, right? Not quite, since each missile is a different color. As you might have guessed, location 623 takes care of this also. We simply add 16 to whatever value we're POKEing into 623 and the four missiles will each take the color of Playfield 3 (as in SETCOLOR 3). But that's not all. You also get this beautiful set of kitchen knives. Oops, wrong spiel!
There is one more feature of location 623, however, which allows us to add two more colors to the screen when using PMG. If we add 32 to the value we're POKEing into location 623, then when Players 0 and 1 overlap, there will be a new color in the parts that overlap. The same is true for Players 2 and 3, but not for any other combinations.
Where do these new colors come from? The Atari does what is called a "logical OR" of the colors of the two players. This just means that it takes the binary representation of each of the two colors and blends them together to get a third. We'll see an example of this later in the chapter, along with a better explanation of exactly what the OR does.
So, what do you think so far? Pretty impressed by PMG? Believe it or not, there's still more to come. I'm sure that by now you've realized how convenient it is to move an object around the screen without having to worry about what's behind or in front of it. But sometimes you need to know whether two or more things are in the same place. For example, what if there were two spaceships on the screen and they ran into each other? We would probably want to know about it so that we could make them bounce off each other. Or what if we were moving people around the screen and they ran into a wall? We wouldn't want them to just walk right through it (unless they were ghosts!). So, what it comes down to is that we need some way of knowing when collisions occur between objects on the screen.
Fortunately, Atari supplies us with a whole bunch of memory locations to do just that. Before we start to look at them, however, we should warn you that they may look familiar. Why? Because we already used them to do other things. How is it that we come to have memory locations that do two different things? Well, these particular memory locations are in a special part of memory called the GTIA chip. The GTIA chip is different than regular memory in that the locations in it have different meanings depending on whether you POKE or PEEK them. That means that we can POKE a location to set a player's width, and then PEEK it to see whether a missile has collided with a player. This can be a little strange at first, but you get used to it after a while.
Sometimes.
Detecting collisions between the various objects on the screen is not the easiest thing to do, although it will seem easy at first.
Before I discourage you though, let's take a look at the locations that are involved. Basically, there are 16 memory locations that keep track of who has hit whom, and one location that clears these 16. Here's a complete list of which does what:
| 53248: M0PF- | Detects collisions between Missile 0 and the playfield. |
| 53249: M1PF- | Detects collisions between Missile 1 and the playfield. |
| 53250: M2PF- | Detects collisions between Missile 2 and the playfield. |
| 53251: M3PF- | Detects collisions between
Missile 3 and
the playfield. |
| 53252: P0PF- | Detects collisions between Player 0 and the playfield. |
| 53253: P1PF- | Detects collisions between Player 1 and the playfield. |
| 53254: P2PF- | Detects collisions between Player 2 and the playfield. |
| 53255: P3PF- | Detects collisions between
Player 3 and
the playfield. |
| 53256: M0PL- | Detects collisions between Missile 0 and the players. |
| 53257: M1PL- | Detects collisions between Missile 1 and the players. |
| 53258: M2PL- | Detects collisions between Missile 2 and the players. |
| 53259: M3PL- | Detects collisions between
Missile 3 and
the players. |
| 53260: P0PL- | Detects collisions between
Player 0 and
other players. |
| 53261: P1PL- | Detects collisions between Player 1 and other players. |
| 53262: P2PL- | Detects collisions between Player 2 and other players. |
| 53263: P3PL- | Detects collisions between
Player 3 and
other players. |
| 53278: HITCLR- | Sets all of the above locations to zero (clears all collisions). |
Right now you should be wondering how one location can detect up to four possible collisions, since that's what each of the collision locations does. For example, M0PF (location 53248) detects collisions between Missile 0 and the playfield. But, as we know, there are four types of playfields (five if we include the background, which we won't here). How do we use one memory location to record four different collisions? Quite simply, we use the lower four bits, one for each type of playfield. Since a collision has either occurred or not occurred, one bit is all we need for it. This diagram should help clarify things a little:
| 7
6 5 4 |
3 |
2 |
1 |
0 |
Bit
# |
| not
used |
PF3 | PF2 | PF1 | PF0 |
(In case you're wondering, PFn stands for Playfield n.)
If one of these four bits is set (equal to one), then the corresponding collision has occurred. So, for example, if Missile 0 had collided with Playfield 2, M0PF would have a binary value of 00000100, which corresponds to a decimal value of four.
This same principle applies to all of the collision registers. For those registers that keep track of collisions with players, the layout is as follows:
| 7
6 5 4 |
3 |
2 |
1 |
0 |
Bit
# |
| not
used |
P3 | P2 | P1 | P0 |
(Pn, of course, stands for Player n.) Now let's look at something that tends to trip people up a lot of the time. What would happen if, say, Missile 0 collided with Playfield 2, and then passed over and collided with Playfield 0? Which of the following values would M0PF have?
A 00000101 B 00000001 C 00000100
The answer is A, because a collision is not cleared until you POKE any value into HITCLR at location 53278. That means that the collision registers will keep track of all collisions that have occurred since the last time a value was stored in HITCLR. So, make sure you remember to POKE HITCLR after you look at any of the collision registers
A little side note before we look at an example. After the collision registers have been cleared, it takes the computer at least a sixtieth of a second to check for all collisions, and sometimes almost a thirtieth of a second. So what, right? Well, if you POKE HITCLR and then immediately check the collision registers, you may not get a proper value. What you want to do is the following everytime you use HITCLR:
240
POKE 53278,0:POKE 20,
0
250 IF PEEK(20)<2 THEN 11
0
0
250 IF PEEK(20)<2 THEN 11
0
You can use your own line numbers, of course. What these lines do is to clear the real-time clock at location 20, then wait for two-sixtieths of a second to pass before continuing. This makes sure that the collision registers will have the correct values when you go to look at them.
Try adding the following lines to the PMG program we've been putting together to see the collision registers at work. All they do is use P0PF to set the pitch of sound register 0. This makes the sound change as the player passes over different types of playfield.
Sometimes you
need to know
whether two or more things
are in the same place. For
example, what there were
two spaceships on the screen
and they ran into each other?
whether two or more things
are in the same place. For
example, what there were
two spaceships on the screen
and they ran into each other?
Notice how we clear the collision registers after each SOUND statement.
Take out the POKE 53278,0 in Line 240 and see what happens if we don't.
230
SOUND 0,10*PEEK(53252
)+50,2,8
240 POKE 53278,0:POKE 20,
0
250 IF PEEK(20)<2 THEN 25
0
260 GOTO 230
)+50,2,8
240 POKE 53278,0:POKE 20,
0
250 IF PEEK(20)<2 THEN 25
0
260 GOTO 230
There is one more technical detail to cover. It has to do with double-line resolution and isn't really used that often, but you may want to know about it anyway. VDELAY, at location 53276, allows you to move a double-line resolution player or missile down one scan line. "So what," you say? "I can do that by moving the data in memory. " No, you can't, because the dots in double-line resolution are two scan lines high, not one. So, to help you get around that problem, Atari kindly supplied VDELAY Each bit in VDELAY controls a player or missile. If a bit is on, then the corresponding player/missile is moved down one scan line. If it's off, then the player/missile is in its regular position.
Here's the way the bits are assigned:
| 7 |
6 |
5 |
4 |
3 |
2 |
1 |
0 |
Bit
# |
| P3 |
P2 |
P1 |
P0 |
M3 |
M2 |
M1 |
M0 |
Let's suppose you want to move a player down one scan line at a time. Here's what you would do:
- Set the appropriate bit to one.
- Move the data down one and set the bit back to zero.
- Go back to Step 1.
- Move the data up one and set the appropriate bit to one.
- Set the bit back to zero.
- Go back to Step 1.
Now that you know how to handle PMG, we can take a different approach and look at it from the outside. In other words, we can try and answer a few questions about it, such as, "When and where do we use PMG?" Let's do this by considering its advantages and disadvantages. PMG does have both, and it's important to be aware of them. We've already discussed most of the advantages, but I'll summarize them below:
PMG Advantages
1. Independent movement with priorities.
2. Ability to detect collisions.
3. Easy movement and animation.
Believe it or not, that's about it. The biggest advantage, of course, is that PMG allows us to move objects around the screen without disturbing what's already there. The other two major advantages, while still important, are somewhat secondary to this.
Let's move on to the disadvantages:
PMG Disadvantages
1. Only five players at once.
2. Only one color per player.
3. Each player is only eight dots wide.
4. Takes a lot of code to exploit the capabilities.
The big disadvantage is that there are only five players. Why? Because we can easily use two or more players to get more than one color, or to create a wider object. For example, we could draw a face in one player and give it a flesh color, then draw a hat in another player and color it white. If we then position these two players in the same place on the screen, we have a two-color head. Similarly, we can draw half an object in one player, the other half in another, and then position the two side-by-side to get an object that's sixteen dots wide instead of eight.
But there's nothing we can do to get more than five players. Well, that's not quite true. It is possible to use machine language to "cut" the players up so that there are as many as 940 objects at once (each only one dot high though)! The only problem with this is that you can only have five of these objects on each scan line at any given time. If you're interested in how this is done, take a look at the chapter on display-list interrupts.
We've now seen all the good things and all the bad things about PMG, and should be ready to decide when to use it and when not to. The big clue comes from the advantage list. After all, there's no point in going out of your way to do something unless there's an advantage in doing so, right? The main thing that should cause your mind to click and think, "Hey, I should use PMG here," is the need to move something over or under something else. Once you're in this kind of situation, PMG is really the only way out, at least from BASIC. Actually, once you're in a situation where anything needs to be moved, period, assuming it's small enough to fit in a player (or up to five players side by side), use PMG. The other time PMG comes in handy is when you need to add an extra color or two. After all, PMG does come with four extra colors, and nobody said a player had to move!
Would you believe that we're still not through? Although it's true that we've now covered all the technical details, there's a lot more to life than just the technical. Right now you know enough about PMG to get players up on the screen and moving around. Simple players, that is. What if you wanted a player to do more than just move, though? What if, for example, you wanted to make a robot walk through a tunnel instead of just move through it? In other words, how do you go about animating a player?
Actually, it's really not that hard. We've already seen how to animate using characters, by replacing a character with another that's slightly different. We can use the same technique with PMG, by storing different versions in different players and then switching between these versions. That's the easiest way, but it uses a lot of players. Another way is to keep redrawing one player with the different versions. This method is preferable, but it's too slow from BASIC.
So what? Remember the machine language routine MOVMEM from earlier? Well, there's no reason why we can't use it again here. The following program will take a robot and make him walk.
We'll store the player data in strings so we know where to find it (using BASIC's ADR instruction), then use MOVMEM to shift it around.
Anyway, try it out for yourself and then we'll take a closer look at exactly what's going on: Type NEW, then:
110
DIM CHARSET$(152)
120 GOSUB 290
130 DIM MOVMEM$(41):FOR X
=1 TO 41:READ A:MOVMEM$(X
,X)=CHR$(A):NEXT X
140 DIM MEMCLR$(36):FOR X
=1 TO 36:READ A:MEMCLR$(X
,X)=CHR$(A):NEXT X
150 PB=PEEK(740)-8:POKE 1
06,PB-8:PMBASE=PB*256:GRA
PHICS 23
155 POS=30
160 SETCOLOR 4,2,10:5ETCO
LOR 2,14,2:5ETCDLOR 1,14,
4:SETCOLOR 0,14,6
170 X=USR(ADR(MEMCLR$),PM
BASE+768,1279):POKE 54279
,PB:POKE 53277,3:POKE 623
,8:POKE 559,62
180 COLOR 1:PLOT 99,64:DR
AWTO 99,41:DRAWTO 72,41:P
0SITION 72,64:POKE 765,1:
XIO 18,#6,0,0,"S:"
190 COLOR 2:PLOT 98,40:DR
AWTO 85,32:DRAWTO 63,32:P
OSITION 71,40:POKE 765,2:
XIO 18,#6,0,0,"S:"
200 COLOR 3:PLOT 63,33:PO
SITION 63,51:POKE 765,3:X
IO 18,#6,0,0,"S:"
204 POKE 704,15:POKE 705,
15:POKE 706,15:POKE 707,1
5
205 FOR Z=0 TO 2
210 FOR X=0 TO 2:Y=USR(AD
R(MOVMEM$),ADR(CHARSET$)+
8+Z*48+X*16,PMBASE+1146+8
*X,7)
220 Y=USR(ADR(MOVMEM$),AD
R(CHARSETS)+16+Z*48+X*16,
PMBA5E+1402+8*X,7):NEXT X
230 POS=POS+2+2*(Z=2):IF
POS>225 THEN POS=30
240 POKE 53248,POS:POKE 5
3249,POS+8:NEXT Z:GOTO 20
5

400 DATA 104,104,133,207,
104,133,206,104,133,209,1
04,133,208,104,170,160,25
5,138,208,2,104,168,177,2
06,145
410 DATA 208,136,192,255,
208,247,230,207,230,209,2
02,224,255,208,233,96
420 DATA 104,104,133,204,
104,133,203,104,170,169,0
,160,255,224,0,208,4,104,
168,169,0,145,203,136,192
430 DATA 255,208,249,230,
204,202,224,255,208,234,9
6
120 GOSUB 290
130 DIM MOVMEM$(41):FOR X
=1 TO 41:READ A:MOVMEM$(X
,X)=CHR$(A):NEXT X
140 DIM MEMCLR$(36):FOR X
=1 TO 36:READ A:MEMCLR$(X
,X)=CHR$(A):NEXT X
150 PB=PEEK(740)-8:POKE 1
06,PB-8:PMBASE=PB*256:GRA
PHICS 23
155 POS=30
160 SETCOLOR 4,2,10:5ETCO
LOR 2,14,2:5ETCDLOR 1,14,
4:SETCOLOR 0,14,6
170 X=USR(ADR(MEMCLR$),PM
BASE+768,1279):POKE 54279
,PB:POKE 53277,3:POKE 623
,8:POKE 559,62
180 COLOR 1:PLOT 99,64:DR
AWTO 99,41:DRAWTO 72,41:P
0SITION 72,64:POKE 765,1:
XIO 18,#6,0,0,"S:"
190 COLOR 2:PLOT 98,40:DR
AWTO 85,32:DRAWTO 63,32:P
OSITION 71,40:POKE 765,2:
XIO 18,#6,0,0,"S:"
200 COLOR 3:PLOT 63,33:PO
SITION 63,51:POKE 765,3:X
IO 18,#6,0,0,"S:"
204 POKE 704,15:POKE 705,
15:POKE 706,15:POKE 707,1
5
205 FOR Z=0 TO 2
210 FOR X=0 TO 2:Y=USR(AD
R(MOVMEM$),ADR(CHARSET$)+
8+Z*48+X*16,PMBASE+1146+8
*X,7)
220 Y=USR(ADR(MOVMEM$),AD
R(CHARSETS)+16+Z*48+X*16,
PMBA5E+1402+8*X,7):NEXT X
230 POS=POS+2+2*(Z=2):IF
POS>225 THEN POS=30
240 POKE 53248,POS:POKE 5
3249,POS+8:NEXT Z:GOTO 20
5
400 DATA 104,104,133,207,
104,133,206,104,133,209,1
04,133,208,104,170,160,25
5,138,208,2,104,168,177,2
06,145
410 DATA 208,136,192,255,
208,247,230,207,230,209,2
02,224,255,208,233,96
420 DATA 104,104,133,204,
104,133,203,104,170,169,0
,160,255,224,0,208,4,104,
168,169,0,145,203,136,192
430 DATA 255,208,249,230,
204,202,224,255,208,234,9
6
It is
possible to use machine language
to "cut" the players up so that there
are as many as 940 objects at once!
to "cut" the players up so that there
are as many as 940 objects at once!
The following program will create Lines 290 and 300 for you. RUN it and then move the cursor up to the two lines it prints out and ENTER them. Then get rid of the original program (or LIST Lines 290 and 300 to disk, type NEW, and ENTER them back in).
100
DIM CHARSET$(152)
110 FOR CHAR=1 TO 152:REA
D DAT:CHARSET$(CHAR,CHAR)
=CHR$(DAT):NEXT CHAR
120 FOR LINE=0 TO 1
130 START=LINE*76+1:PRINT
290+10*LINE;" CHARSET$("
;START;",";START+75;")=";
140 PRINT CHR$(34);
150 FOR CHAR=0 TO 75:PRIN
T CHR$(27);CHARSET$(START
+CHAR,START+CHAR);:NEXT C
HAR
160 PRINT CHR$(34)
170 NEXT LINE
1000 DATA 0,0,0,0,0,0,0,0
,0,3,5,11,11,11,5,3,0,240
,232,212,244,132,232,240,
4,9,11,19,19,17
1010 DATA 16,31,16,200,20
0,136,200,200,8,248,1,3,7
,14,28,56,60,60,128,192,1
92,224,96,112,60,60,7,11,
23,23
1020 DATA 23,11,7,8,224,2
08,168,232,8,208,224,16,9
,17,17,17,16,16,31,3,208,
200,200,232,232,8,248,192
,3,3
1030 DATA 15,62,120,112,5
6,24,192,192,192,192,192,
192,240,240,7,11,23,23,23
,11,7,8,224,208,168,232,8
,208,224,16
1040 DATA 9,9,17,16,16,16
,31,3,200,200,232,248,120
,8,248,192,3,7,7,7,15,15,
15,15,224,224,192,128,128
,192,192,0
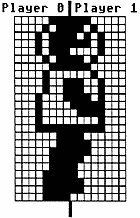
Pretty neat, eh? Let's take a closer look at how it's all done. First of all, the different versions of the robot look something like Figure 1.
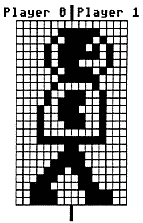 Figure 1
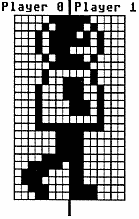
With that in mind, let's break down the program line by line.
110: CHARSET$ will hold the data for our robot versions.
120: First we set up CHARSET$.
130-140: Sets up machine-language strings. 150: Sets up player/missile memory.
155: POS is the horizontal position of the robot.
160-170: These lines should be familiar to you.
180-200: These lines set up a "tunnel" on the screen.
204: Set up the player colors.
205: This loop counts off each version of the robot.
210: We load the robot data in three sections: the head, body and legs. This is to allow us to do multi-color players in the next example. The X loop counts off each section. The USR instruction in this line moves the current section from CHARSET$ to Player 0.
220: This USR instruction moves the other side of the section to Player 1.
230: We now update the horizontal position and move the robot back to the left side of the screen if it has moved off the right.
240: Finally, we position the two players, move onto the next version, and then repeat the process all over again.
290-300: This is the routine to set up CHARSET$.
400-430: This is the data for MOVMEM$ and MEMCLR$.
Not that difficult after all, was it? Now let's try something a little different: multi-color players. We mentioned earlier that we can combine two or more players to get more than one color, but there's actually a way to combine two players to get three colors instead of just two.
How? GPRIOR, location 623, is used to set player/missile priorities; that we already know. We also know that it has other uses. One of these uses is to give the four missiles a common color. But the use that matters now is to create a third color when two players overlap. Specifically, when Players 0 and 1 or 2 and 3 overlap, then the area in which they overlap will be given a third color. To make this happen, simply add 32 to the value you're POKEing into GPRIOR (this is the equivalent of turning on bit 5).
The question remains, though, as to what the third color will be. Actually, it depends on what colors the players are. What the computer will do is OR the two colors together. In English, this means that the computer will look at the binary representations of the two color values and create a third value with the bits turned on wherever at least one of the other two values has a bit turned on. That was English?!
Let's look at a few examples:
01010101 OR 10101010 = 11111111
11010010 OR 10111010 = 11111010
Now let's apply this new knowledge (even if we still don't quite understand it) to our robot friend. We'll divide him up so that the head and body are both in Players 0 and 2, and the body and legs in Players 1 and 3. That way, the bodies will overlap to create the third color. Here are the necessary changes to the previous program:
170
X=USR(ADR(MEMCLR$),PMB
ASE+768,1279):POKE 54279,P
B:POKE 53277,3:POKE 623,40
:POKE 559,62
204 POKE 704,154:POKE 705,
101:POKE 706,154:POKE 707,
101
210 FOR X=0 TO 1:Y=USR(ADR
(MOVMEM$),ADR(CHARSET$)+8+
Z*48+X*16,PMBASE+1146+8*X,
7)
220 Y=USR(ADR(MOVMEM$),ADR
(CHARSET$)+16+Z*48+X*16,PM
BASE+1658+8*X,7):NEXT X
226 FOR X=1 TO 2:Y=USR(ADR
(MOVMEM$),ADR(CHARSET$)+8+
Z*48+X*16,PMBASE+1402+8*X,
7)
227 Y=USR(ADR(MOVMEM$),ADR
(CHARSET$)+16+Z*48+X*16,PM
BASE+1914+8*X,7):NEXT X
240 POKE 53248,POS:POKE 53
250,POS+8:POKE 53249,POS:P
OKE 53251,POS+8:NEXT Z:GOT
O 205
Notice how the colors tend to flicker somewhat. This is because we're not changing things quite fast enough. We can, however, clean it up a little bit by changing the colors so that there's less of a contrast.
Try these changes:
160
SETCOLOR 4,2,0:SETCOL
OR 2,14,4:SETCOLOR 1,14,6
:SETCOLOR 0,14,8
OR 2,14,4:SETCOLOR 1,14,6
:SETCOLOR 0,14,8
Next month, we'll install player/missile graphics into the BASIC Invaders game we were working on. (Remember that game? It's been two months since we've looked at it!) Also, because it's been so long since we've worked on the games, next month's column will include the game's listing up to this point. That'll help refresh your memory or help people catch up who may have missed the first few installments of Game Design Workshop.