DREIDEL
BY D.A. BRUMLEVE
One thing that makes the ST an ideal computer for children and preferable to many others on the market is its use of plastic-encased 3.5-inch disks. While more expensive than other floppies, these disks are very durable and can be handled by children with relatively little likelihood of damage.
Even so, there are still some hazards to disks and the data they contain, and it helps to make children aware of them. The major hazards include dust, liquid, magnetic fields and heat; but in the hands of children, additional threats to data can arise. A few simple rules and some education can do much to prevent damage.
An obvious way to protect the disk against dust accumulation is to keep the metal "window" on the disk closed at all times. I advise young children not to touch the metal parts of the disk at all. When observed, these precautions protect the disk not only from dust, but from prying fingers and probing ballpoints as well. Children can be curious about the contents of the plastic disk case, however, and sometimes this curiosity gets the better of them. If you have a disk that cannot be reused, instead of just tossing it in the trash, pry open the case and show your child what's inside.
Drinks and food are banned from the computer room at our house. (This protects the disks and the computer.) It is also a good idea to insist that children wash and dry their hands before using the computer.
My oldest son once boasted, "I bet I can pick up that disk without touching it!" and he proceeded to do so-using a magnet. Of course, the data on the disk was ruined. Children enjoy experimenting with magnets, but the computer room is not the place to do this. Although it is impossible to eliminate all hazards from magnetic fields (there are magnets in your TV set, in your vacuum cleaner, and even in your ST's monitor), making children aware of the danger will do much to reduce the risk.
There are other ways to protect data as well. The 3.5-inch disk has a little hole in the upper right-hand corner. A plastic tab can be slid up or down to open or close this hole. When the hole is open, data cannot be deleted from the disk. Nor can data be written to disk, and thus this procedure is called "write-protection." It is a good idea to write-protect all children's disks unless a program on the disk allows the child to save data. Children should also know that they must not remove a disk from the drive while the drive's "busy" light is on. The busy light is red like a stop sign and, at our house, it means "Stop!"
Adults protect their disks by keeping them in a disk box or wallet. It's a good idea for children to have a special dry, protective place to store their disks too. Adults use various kinds of filing systems to catalog, locate and differentiate their disks. These systems may include the use of colored disks, colored labels and disk-box dividers. Disks may be sorted according to the type of application or by a numbering system or both. Children can benefit from some disk organization too, and some of these methods will prove useful. Effective labeling, in particular, will help your child identify the disk he or she wants.
The single most important factor in the easy identification of disks is that each be distinctively different from the others. A group of identically colored disks with labels prepared in exactly the same way and with the same typeface, etc., makes for a handsome disk box, but not a very practical one. Using a variety of colored labels and colored disks with different handwriting or pen colors on the labels can make the disks more distinct from one another and thus make it easier to identify a particular disk quickly.
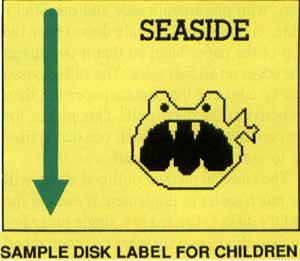
Nonreading children will especially appreciate pictures on disk labels. For example, a picture of a shark tells my daughter that the disk contains her favorite matching game, Seaside (by Frank M. Hundley, October '89 ST-LOG). A picture of a Christmas tree identifies the disk with O Tannenbaum! (by this author, November '89 ANALOG).
The simplest way to provide pictures of this kind is, of course, to draw them with a marker on a blank label. This can be effective in differentiating disks, especially when colored permanent markers are used. The resulting disk label withstands handling and, depending on the abilities of the artist, can be attractive as well as useful.
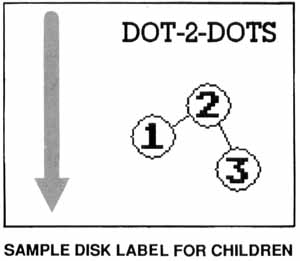
The director of my youngest's preschool had asked for picture labels with large-type titles and arrows indicating the proper position of the disk when inserting it into the drive. I used a paint program to draw icons for the pictures and then loaded them into a desktop-publishing program to add the title and arrow. It would also be possible to use a paint program such as DEGAS for the entire process. The resulting labels were printed out on an 8½ "x11" sheet (with several labels to a page). I then took the sheet to a copy shop where it was duplicated on sticker-backed paper. The labels were then cut out and mounted on the classroom's disks. While the ink from labels printed on a printer sometimes will smear, copier "ink" normally does not, so the resulting labels are hardy, even in the hands of children.
Instead of going to a copy shop, one could also cut the labels from the sheet of ordinary printer paper and mount them on the disks using clear Contac paper, available at very little cost from art and educational supply stores and from discount stores where shelf paper is sold. This thin plastic material, with one smooth side and one sticky side, is placed (sticky side down) over the top of the paper label so that it overhangs the edges on all four sides. The still-exposed sticky edges of the contact paper are then adhered to the disk itself. This makes for an even more durable label, one that is likely to outlast the disk itself.
The labeling method outlined above will be much easier to implement if each of the child's disks is limited to a single program. In fact, this is exactly what I'd recommend for children who are too young to use the ST's desktop. One of the best ways to promote independent use of the computer and boost your child's ego is to provide selfbooting program disks. Each such disk contains only one program. When the selfbooting disk is placed in Drive A and the computer is turned on or rebooted, the program on the disk is automatically loaded into memory and play can begin. The child need not open a program from the desktop, and the procedure is so simple that the child doesn't need to ask a parent for help.
A public-domain program (STARTGEM.PRG by Rick Flashman) that will allow you to provide such self-booting disks is included in the ARCed file with this month's kidprog, Dreidel. Setting up a self booting disk requires a few simple steps If you are unfamiliar with this process please refer to the accompanying sidebar entitled "Using STARTGEM."
|
Using
STARTGEM
(Please note that the procedure described below for
preparing
selfbooting disks Is intended for use when the computer is booted from
Drive A.)In order to use STARTGEM.PRG, you'll need to create an AUTO folder on your child's program disk. Place the disk in Drive A and double-click on the Drive A icon on your ST's desktop. The directory window will open. Then select New Folder from the File menu. A dialog box will appear, asking for the name of the folder. Type AUTO and press Return. A new folder named AUTO will appear in your disk's directory. Now copy START GEM.PRG to the AUTO folder. When the disk is booted, STARTGEM.PRG is loaded immediately. The program causes the computer to look for a file named STARTGEM.INF in the root directory (not in a folder) of the boot disk. The STARTGEM.INF file, in turn, gives the computer the name and directory of the program you want to run on your child's selfbooting disk. A STARTGEM.INF file for this month's kidprog is included in the ARCed flle, so if you are creating a self-booting disk for this selection, simply copy STARTGEM.INF to the root directory of your Dreidel disk. To create STARTGEM.INF files for other programs, you will need to use a word processor that can make ASCII-format text files. I use 1st Word for this purpose. STARTGEM.INF must contain the pathname of the file you want automatically loaded; so if the disk is being prepared to load DRAW_IT.PRG automatically, and DRAW_IT.PRG is in the root directory of Drive A, you would type: A:\DRAW_IT.PRG
If DRAW_IT.PRG is in the DRAWINGS folder, you would type: A:\DRAWINGS\DRAW_IT.PRG
Do not press Return after you have typed the line. Save the file in the root directory of your self-booting disk in ASCII format with the name STARTGEM.INF (To save an ASCII file in 1st Word, you need to make certain that WP mode in the Edit menu is not selected.) The STARTGEM.INF provided in DREIDEL.ARC contains the following line: A:\DREIDEL.PRG
STARTGEM.PRG will automatically load Dreidel when DREIDEL.PRG is in the root directory of the disk in Drive A and the computer is turned on or rebooted. |
Once a disk has been prepared for selfbooting from Drive A, it is possible to provide additional protection from unwanted damage to data. On disks used by my youngest children, I remove the drive icons from the desktop and save the DESKTOP.INF file. To do this, place the self-booting disk in Drive A. Click once on the Drive A icon on the desktop so that it is highlighted in black, and then select the Install Disk Drive option from the Options menu. A dialog box will appear. Choose "Remove." Repeat the process with the Drive B icon and any other drive icons that may be on the desktop. Then choose Save Desktop from the Options menu. If the child using this disk exits the program and returns to a desktop, there will be no directory window and no drive icons, so the child will not be able to drag data to the trash can or format the disk.
This
Month's Program
Dreidel (pronounced "dray-dle") is a game of chance
traditionally played during Hanukkah, the Jewish "Celebration of
Candles." The dreidel itself is a spinning top with four sides. Each
side is decorated with a Hebrew letter (nun, gimmel, heh and shin).
These initials stand for the message "nais gadol hayah sham," which
means "a great miracle happened there." The dreidel may be made from
any number of materials, including cardboard, wood and clay.A version of Dreidel for your Atari ST is on this month's disk. While this program is aimed at young readers, it can be played by nonreaders. It may also be enjoyed by adults; however, lest your expectations exceed the program's potential, I ought to point out that success (or failure) in this game requires no strategy whatsoever. The outcome is determined solely by chance.
Dreidel is a gambling game, so, as in poker, players contribute tokens (or coins, or peanuts, or whatever they are playing with) to a "pot." There are many versions of the game, but in the one presented here, the pot must always have at least two tokens. Each player contributes a token at the beginning of a round. Players take turns spinning the dreidel. When the dreidel stops spinning, it falls over onto one of its sides. The letter on the side facing up determines the outcome of the spin, as follows:
nun-the player does nothing (no tokens are gained or lost).
gimmel-the player takes all the tokens in the pot.
heh-the player takes half the tokens in the pot, or, if the pot contains an odd number of tokens, the player takes half the tokens plus one more.
shin-the player puts two tokens in the pot.
The object of the game, of course, is to win as many tokens as you can. The game ends when one player must put more tokens in the pot than he has in his own pile, or when one player has all the tokens.
Getting
Started
To try your luck at Dreidel, first follow the disk
instructions to deARC the file DREIDEL.ARC. The ARCed file contains
DREIDEL.DAT, SPIN.DAT, DREIDEL. PRG and DREIDEL.LST. (DREIDEL.LST
contains the GFA BASIC 2.0 source code for the program; it will be
needed only if you want to examine the program's construction.)Copy DREIDEL.PRG, DREIDEL.DAT and SPIN.DAT onto a freshly formatted disk. (For your convenience in creating an autobooting disk as described above, the files STARTGEM.PRG and STARTGEM.INF are also provided. If you want to create an autobooting Dreidel disk, also copy STARTGEM.INF to the disk, then create an AUTO folder as explained in the sidebar accompanying this article and copy STARTGEM.PRG into that folder.)
If autobooting is not desired, the program will run from a folder, so long as the . DAT files are in the same directory as the program. The program can be run from a hard drive. Dreidel requires a color monitor in low resolution.
Playing
the Game
Double-click on DREIDEL.PRG to run the program. (If
you have prepared the disk for autobooting, simply put the disk in
Drive A and reboot your computer.) A title screen will introduce you to
the dreidel and the names of each of the four letters. A little tune is
played. You will hear this tune whenever a player wins a game. Children
may enjoy singing the dreidel song whenever it is played. The words are
as follows:Dreidel, dreidel, dreidel,
I made it out of clay.
And when my dreidel's ready,
Oh, dreidel I will play!
Following the title screen, a white box appears with a request for the names of each of two players. Type each of the players' names, pressing Return after each.
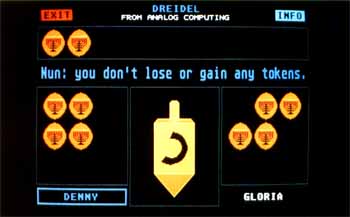
The main screen is divided into several areas. EXIT and INFO boxes appear at the top corners of the screen. Dark grey boxes separate the areas below them. The top box represents the pot; it is empty as the game begins. Below the pot is the instructions area; it is here that you will see messages telling each player what to do next. Lower on the screen are three grey boxes in a row. The leftmost box holds the first player's pile of tokens. The box on the right holds the second player's tokens. The names of the players are written below the token boxes. The middle box holds the dreidel itself. As the game begins, each player holds five tokens. Each of the players is advised in turn to put a token in the pot. This is done by clicking the mouse on a token in the player's pile. The token is automatically moved to the pot.
The player to begin is chosen at random by the computer. That player then spins the dreidel by clicking the mouse in the dreidel area. It will spin a random number of times and then fall over on one side. The instructions area will announce the outcome of the spin. If the spin is a gimmel or a heh, the player moves tokens from the pot to his own pile. This is done by clicking the mouse directly on the tokens in the pot; they are then automatically moved to the current player's pile. If the spin results in a nun, the player does nothing. If the spin is a shin, the player must move two tokens from his own pile to the pot.
Whenever the number of tokens in the pot drops below two, both players must add a token. If a player's pile runs out of tokens, the player may still spin the dreidel, but if the outcome of the spin requires him to put tokens in the pot, he will lose the game.
Concessions
to Nonreaders
This computer version of Dreidel has many written
instructions that advise players of their next move. Several techniques
have been employed to provide other kinds of cues for nonreaders,
making the game accessible to younger children as well.Each player's name is associated with a color. The name of the player on the left is written in blue, and all instructions for that player are blue as well. The name of the player on the right and instructions for that player are written in white. When it is time for the player on the left to take action, his name is surrounded by a thick blue box at the bottom left-hand corner of the screen. When it is the turn of the player on the right, his name is boxed in thick white lines. Information in gold text (or multiple colors) appears in the instructions area to report the game's progress to both players at once.
Whenever action must be taken with the mouse, a box (with thinner lines) appears around the area in which the mouse must be clicked (the player's pile, the pot, or the dreidel). The box will be of the color that is associated with the current player. Thus, when the player on the right must take tokens from the pot, a white box appears around the pot. When the player on the left must spin the dreidel, a blue box is drawn around the dreidel.
All selections with the mouse can be made by clicking either mouse button or both mouse buttons simultaneously. The mouse (in the shape of a hand) is available on the screen only when it can be used.
Representations of actual tokens have been used to indicate the number of tokens in the pot and in the players' piles. Very young children do not need to recognize a "7" to know that they have seven tokens in their pile, Children may enjoy counting the tokens and moving them. Care has been taken to ensure that a child can choose any token in his or her pile when putting tokens in the pot; likewise, any token in the pot can be moved to the player's pile. There is no need to learn to click on the tokens in a particular sequence.
For the benefit of young readers, and especially of nonreaders, the computer will place tokens in the pot and in the piles from left to right; that is, the first token to be placed in the pot will be placed at the far left in the grey pot box. The resulting practice with left-to-right eye movements aids the development of prereading skills in young children.
Sounds provide an additional cue that a player is out of tokens or has won the game. A low sound lets the player know he is clicking the mouse in the wrong area of the screen.
When the program asks for a name, the player may follow the instructions and type in his or her name and press Return, or may simply press Return. If the players don't type their names, the computer will name them PLAYER 1 and PLAYER 2. Many young children enjoy typing their names. Those who don't or can't can identify the Return key easily.
While intended for two players, the game can also be enjoyed by one player (who takes both roles). Two-year-olds who do not even understand the concept of a game may prefer to use the program in this way.
If your preschooler is made aware of these cues, he or she will be able to compete on an equal footing with older siblings or adults.
I hope you'll enjoy Dreidel with your children this holiday season!
D.A. Brumleve, M.A., is involved with children and computers in a variety of ways. The mother of five children, ages two to ten, she serves as the adult facilitator of the Children's ST Users' Group in Urbana, Illinois. An avid programmer, she has developed a beginner's course in GFA BASIC and is the author of PreSchool KidProgs (MichTron) and numerous freely distributed programs for young ST users. Her daughter, Catherine, is a student at Creative Discovery School.