
Massaging Your MegaFile
Upgrading Your MegaFile 20
Upgrading Your MegaFile 20
by Gregg Anderson
Remember the good old days? When having 64K of RAM and a 127K disk drive was heaven? Now we have four-megabyte Ataris with 20-megabyte hard disks, and we're not satisfied. There's not much we can do about the four-megabyte limit on the ST, but there is a cure for the MegaFile 20-a quick, painless and relatively inexpensive cure. What is it? Read on.
Twenty megabytes of storage sounds like a lot when you're first starting out, but after a while it quickly becomes obvious that even that much storage isn't going to cut it for serious graphics, drafting or desktoppublishing work. Supra, ICD and even Atari have recognized this and expanded their product lines beyond 20 megabytes. Atari joined the bandwagon by ending production of their MegaFile 20 and adding the MegaFile 30 as their bottom-line unit. As their top-end systems they've introduced the new MegaFile 60 and 44.
The original MegaFile 20 (at least, my unit) utilizes a 20-megabyte Seagate ST-225 disk mechanism with a modified Adaptec 4000 controller (MFM) and host adapter (interface) on a single PC board. This unit operates at an advertised 65Msec access rate and a 625K data-transfer rate. Using ]CD's RATEHD.PRG, I found a "real world" rating of 86Msec and a 305K transfer rate (the difference between the raw data-transfer rate and the real-world rate is not unusual). Though far from being the fastest kid on the block, the unit is quite serviceable and a major improvement over the original Atari SH204 hard drive, with fewer bugs in its controller.
This is all well and good, but where does that leave the thousands of us who purchased MegaFile 20s? Are we stuck with a (relatively) slow 20-megabyte drive? Is our only solution the purchase of a brandnew (and expensive) hard drive? Fear not. There is an alternative.
First, I have to make a few statements to keep the lawyers out of my hair. Any modification you make to your hard drive will void whatever warranty existed for that unit; just the act of opening the case is enough. Also, while I had no problems with my conversion, I can't promise that yours will go as smoothly. In other words, I can't take responsibility for problems or mistakes if you try this procedure. I've every confidence that this is a sound and easily done upgrade, but the final responsibility is yours and yours alone.
Before we start, let's list the ground rules for our project.
1) Since few of us are electronic engineers, the upgrade has to be a fairly simple one involving no complex rewiring on soldering.
2) It has to be affordable. If it's too expensive, it would be easier to simply replace the unit with something newer and sell the MegaFile.
3) We want something that will fit in with our system. In other words, something that looks like it belongs there rather than like a refugee from the IBM research labs or something stolen from the Queen Mary.
4) We don't want to give up performance while increasing our storage. If possible, we want to increase our system's data-transfer speed.
I've done some research and made a few interesting discoveries about the MegaFile 20 and hard drives in general. Did you know the MFM controller in the MegaFile can accept any MFM-type drive? It doesn't seem to matter what size it is; the Adaptec 4000 will handle it. How about mounts for the hard-disk mechanism itself? No problem! Assuming it abides by standard Seagate construction, any half-height drive will fit in the MegaFile's case with no modifications whatsoever. Does this give you any ideas? It gave me a few.
You guessed it. I started looking into upgrading the MegaFile's drive hardware as an option to simply replacing the entire unit. I could find only one drawback to upgrading the MegaFile. Due to the limited size of the case, you're restricted to a single internal-drive mechanism. So unlike the units offered by Supra, ICD and Tech Specialties, it won't be internally expandable. Even so, I considered this a minor limitation, given the simplicity and low cost of the upgrade and the ability to daisy chain other drives via the DMA port.
What about the controller? Everybody's going to RLL for their new systems. Doesn't that mean RLL is better? Well, yes, there's some truth to that. RLL is becoming popular as it allows (on average) slightly higher transfer speeds and up to 50% greater storage capacity than an MFM drive of the same physical size. But there is a small problem with going RLL: cost. On average, an RLL controller can cost you up to $70 more than an MFM unit. RLL-drive mechanisms are also more expensive than MFM units, though by a smaller margin. Besides, we've got a perfectly good MFM controller in the MegaFile already. Changing over to an RLL unit could add as much as $250 to the cost of our upgrade since we'd also have to replace the host adapter. Then there's the board's mounting to consider. While an ICD controller and host adapter might fit in a MegaFile case, it would require modifying the mounts more than a little. By the way, it seems that Atari agrees that RLL is the way to go as well; their new MegaFile 30, 60 and 44 units are all RLL.
So while an RLL-based system is superior to an MFM system and is preferable in an all-new drive, I don't feel its advantages outweigh the additional costs when upgrading a MegaFile 20.
By the way, there has been some talk of using an RLL controller with an MFM drive to gain the advantage of greater storage without paying for the RLL drives. I have a few doubts about the long-term reliability of this combination. I'm not saying it can't be done; there are reports on the BBSs indicating that it has been done with some success. It seems that most RLLcertified drives are little more than MFM units that have passed a more stringent QC check and are thus cleared for the higher-density formatting. This appears to be the same way manufacturers determine single-and double-sided floppies. If it passes the double-sided Quality Control test, it's sold as a double-sided disk; if not, it's sold as single-sided.
Since the units in question have not passed the factory test, there is the chance of bad sectors appearing and the loss of critical data if the drive is formatted as RLL. So if you've already got an RLL controller, and you're willing to take the chance of losing data now and then, it might be worth trying. But if any bad sectors appear after your format, or if there is any question as to the quality of the drive, I strongly suggest you let it remain MFM and try a different mechanism.
Okay, so I'm keeping the controller. Great, what about the drive itself? Well, I'm not going to tell you which drive you should use. That will depend entirely on your needs and budget. You'll have to stay with an MFM drive though, unless you want to spend the money upgrading to an RLL controller and new host interface.
I strongly suggest you stay with a unit that draws less than 25 watts. The MegaFile's power supply is limited to 50 watts, and any attempt to push your drive close to that is sure to end in failure. I recommend staying as close to the power needs of the original mechanism as possible-under 15 watts. Be sure to stay with half-height drives too; fullheight drives won't even come close to fitting in the MegaFile case.
You'll want a drive without the built-in SCSI interface. After all, why spend money on something you've already got? Look for the "Auto-Park" feature in anything you buy. Auto-Park is cheap insurance against power failures as it returns your heads to the park position whenever power is removed and eliminates the need for a separate park utility. Make sure whatever you order is designed with the same mount holes/brackets as a Seagate ST-225; if you tell them you want something to fit in a MegaFile 20, they're just going to look at you funny. Seagates they'll know about, but MegaFiles?
In my case, I chose the Seagate ST-251 drive (purchased from ABCO Computer Consultants). It offers 42 megabytes of storage, auto-parking, an advertised access speed of 40 ms and about the same power needs as the MegaFile's original drive. I needed to limit my spending to less than $400, and the ST-251 fit that requirement perfectly. While 40 megabytes seems to be the most common large MFM drive, there are mechanisms available from a variety of manufacturers in somewhat larger sizes. Unless you're looking for something really big, you can usually find MFM drives that offer storage and speeds that match their RLL counterparts in the 5¼-inch disk size.
So why did I choose a Seagate unit when I could have gotten a Miniscribe or Microscience of larger capacity for less? In a word: reputation. Seagate is famous for building low noise and long-term reliability into their units and has developed a sizable following based on that. But, as I said earlier, the decision is up to you.
So let's get on with it.
Before you do anything else, make a complete backup of your present hard disk's contents! You'll need this to rebuild your new disk. Constant backups are always a good idea, but for this they're vital. Use a file-copy utility, such as Turtle; do not use an image-copy utility. Image utilities are faster, but they will duplicate your current disk exactly as it now exists to your new drive. In other words, they'll make your new 40 Meg unit think it's a 20, and you'll lose that extra storage you wanted.
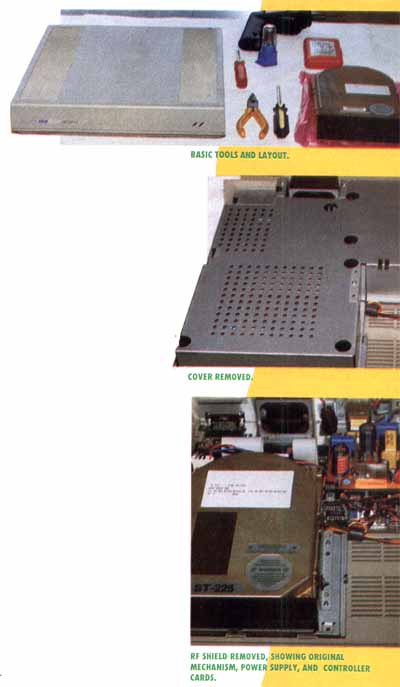
1) Find a quiet, well-lighted area with lots of clear table space. Ground yourself to avoid damaging your equipment with stray static charges. Prepare a No. 1 and a No. 2 Phillips screwdriver, a pair of needlenosed pliers and a soft towel or work cloth (lint-free).
2) Park the heads of your MegaFile 20 before starting anything else; if you're able to sell the present mechanism, you can cut your out-of-pocket expenses. (I sold mine to a friend with a Tech Specialties unit.) Use the SHIP. PRG program that came with the MegaFile 20 for this.
3) Carefully disconnect the MegaFile 20 and place it on your work cloth upside down.
4) Remove the nine gold-colored screws from the bottom of the case. Don't touch the four silver screws yet. (Note: You've now voided your warranty. Don't you feel wicked?) Keep the screws in a separate container.
5) Holding the case together with both hands, turn the unit over and place it right side up on the work cloth.
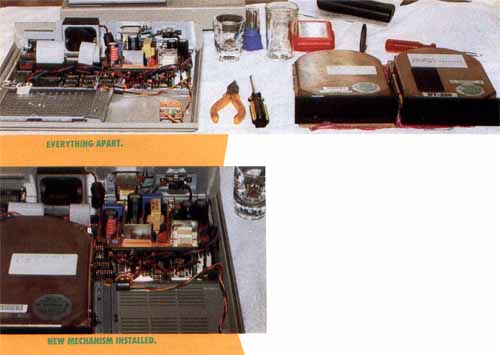
6) Gently lift the case off the base and place it to one side.
7) With the needlenosed pliers, very gently straighten the eight tabs holding the RF shield to the motherboard. Don't damage these if at all possible.
8) Carefully lift the shielding off the base. You should now be able to see the host adapter/controller board, power supply and the disk mechanism.
9) Holding the drive mechanism securely in its mount with one hand, tilt the base so you can see the bottom and the four remaining silver screws holding the drive to the case.
10) With the screwdriver, remove the four silver screws and gently return the unit to an upright position. Make sure the drive doesn't slip out of place as you do this.
11) Without touching the board or any of its contacts or components, carefully lift the drive an inch or so from its mount. Do not touch the bottom of the drive! This is where the drive's circuit board is located, and it's not insulated against static.
12) Gently pull the three connectors from the back of the drive. There are two data cables and a power cable here. Don't worry about getting them confused, as they are quite different from each other.
13) Inspect the connectors on the back of the drive and make sure they're identical to the connectors on your replacement drive. If not, put everything back together and reorder a different drive. This shouldn't be a problem if you're using a Seagate or Seagate-compatible drive though. If they are identical, continue.
14) Gently lift the drive mechanism from the case and place it on your work cloth. Try not to bump or shake the unit.
15) Using the Phillips screwdriver, carefully remove the two screws holding the mounting brackets to each side of your old drive. Once these are off, you can place the original drive aside (use the padded box your new drive came in).
16) Now install the mount brackets on your new drive. Be sure to keep them aligned to the same side/direction as they were on the original drive. Don't overtorque them. Again, be careful not to touch the circuit board on the bottom of your drive.
17) By the way, don't mess with the resistor-termination pack (on the drive's motherboard). For a single-drive system, just leave it as it sits. Also, make sure the drive-select jumper is identical to the one you're replacing (it should come that way). These are used mainly to configure IBM-type systems. Your new drive will come with directions on these things if you decide to change your present configuration.
18) Holding the drive just above its mount, gently connect the three jumper cables. You may find the power connector a little tight. If so, be sure not to apply too much pressure without supporting it from below.
19) Carefully place your new drive in the case, aligning the mount holes to match those of the original mechanism. The unit should fit perfectly, with less than a '/a-inch gap between the drive's connectors and the connectors on the motherboard.
20) Again holding the drive in place with one hand, tilt the base so you can see the four screw holes that hold the drive's mount bracket in place.
21) Replace the four silver mounting screws.
22) Now we have a choice. If your drive came preformatted and partitioned, you can hook it up to your computer and test it out, or you can continue to reassemble the case. Let's go ahead and assemble the beast.
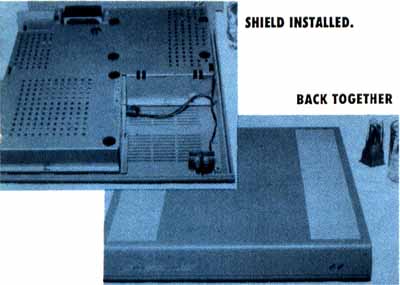
23) Gently replace the RF shielding onto the base. Make sure you've not trapped any wires or cables under the shielding's edge and that all the tabs are in their slots. With the needlenosed pliers, push the tabs back to their original positions.
24) Place the case on the base (poetic, isn't it?) and, again with both hands, turn it upside down on the work cloth.
25) Install the nine gold screws that hold the unit together, again being careful not to overtorque them.
26) Return the unit to an upright position, and you're finished. All you have to do is hook it up to your ST and start formatting.
That's all there is to the hardware end of the upgrade, but I'd be remiss in not touching on the software end of the process as well. Just like a floppy, hard disks must be formatted before use, and since the current TOS has serious problems with handling hard disks larger than 16 megabytes, you'll have to divide (or partition) your new disk into smaller "logical" drives. (The new TOS 1.4 seems to have fixed this limitation and now allows partitions of up to 32 megabytes.) Be sure to keep your FOLDERXXX.PRG handy; with more storage available, you're more likely to run into the dreaded 40-folder limit. For those of you with TOS 1.4, you'll want to use the new CASHE90.PRG that replaces FOLDERXXX.PRG for the new TOS and speeds up your disk-accessing as well.
So what are our choices for formatting software these days? Unless you're willing to try one of the older packages downloaded from a BBS, there are only three.
Atari's formatting/partitioning software is easy to use and free (you got it when you bought your MegaFile), but it was designed with Atari drives in mind. Because of that it can recognize only 20-, 30- and 60-megabyte mechanisms. If you have one of these sizes, you're off and running, but if you have a 40-megabyte (or other "odd" size), you're out of luck.
ICD has an excellent utility for formatting and partitioning a hard drive, but their most recent releases contain a rather sneaky routine that looks for ICD's own host adapter/controller boards. If it doesn't find them, it won't do anything. Unless you've replaced your host adapter and controller with ICD units, you won't be able to use their utility for this upgrade.
Supra's software is the utility of choice here. Designed with flexibility in mind, it will operate with almost any combination of host adapter/controller and drive mechanism. Best of all, at $39.95, it's available separately from Supra and is easy to operate. As you may have guessed by now, this was the utility I chose for my upgrade.
Start your system with a blank disk in Drive A. You need to do this because any hard-disk auto-boot files on Drive A will lock everything up with an unformatted hard drive attached. Once everything is up and running, insert your Supra hard-disk utilities disk and click on the SUPFMT.PRG file.
From the SUPFMT.PRG display, select "Hard Disk Type" or "Controller Type" from the primary menu. You'll be given a display showing a variety of hard disks and controllers. Scroll down this display until you find the exact name of the hard disk you've installed, then select it.
When you do this, the "Specifications" display will change to list the details of your new drive. If needed, you can alter these settings. However, unless you know exactly what you're doing, I strongly urge you not to mess with them unless you enjoy courting disaster. On the "Controller Type," you'll need to click on Adaptec 4000. This is the controller installed in your MegaFile 20. If you can't find your hard disk listed in the display, Call Supra customer service for assistance.
Once you've selected the appropriate hard disk and controller, click on OK and follow the directions on the screen as they appear. The process is painless as you select the number and size of partitions you want and start formatting. Be forewarned that the process will take close to 40 minutes from start to finish.
After formatting, select the SUPUTL.PRG to map out any bad sectors and install your auto-boot. I suggest that you take the time to run the "map" utility; it can save you much future pain. With these tasks completed, you've finished your upgrade and are ready to start reloading your data.
Congratulations! You've doubled your storage and noticeably increased your data-transmission rate. I ran RATE.HD on my upgrade and found the seek rate was reduced to 42Msec and the transmission rate increased to 382K/sec.
A warning: While the Seagate ST251 is generally a quiet drive, it makes a sound like a diesel throwing a rod when you power it down. This is the auto-park engaging, so you don't need to worry about it. For the same reason, the unit's startup is a little noisier than usual. I wasn't expecting it and almost had a heart attack when I powered down for the first time.
So there you have it: 42 megabytes of high-speed hard disk for a cash outlay of only $405 ($350 for the drive, $15 for shipping and $40 for Supra's software). Deduct the $125 I made selling the original mechanism, and my total cost was $280. Purchasing a new 40-megabyte hard-disk system from Supra, ICD or any of the "build it yourself" folks could easily run $800 and up. So how does it feel to have just saved $520? I don't know about you, but this little miser feels just great!

Gregg Anderson, a captain in the United States Air Force with a background in electronics repair, has been an avid Atari user since 1982.
Companies
Mentioned in This Article:
| ABCO Computers P.O. Box 6672 Jacksonville, FL 32236 (904) 783-3319 ICD 1220 Rock Street Rockford, IL 61101 (815) 968-2228 Seagate 920 Disc Drive Scotts Valley, CA 95066 (800) 468-3475 |
Atari Corp. 1196 Borregas Avenue Sunnyvale, CA 94086 (408) 745-2000 Supra Corp. 1133 Commercial Way Albany, OR 97321 (503) 967-9075 Tech Specialties 909 Crosstimbers Houston, TX 77022 (713) 691-4527 |