Flipping Your Disk
M. G. Sieg
If you own an APPLE DISK II, you can double the storage capacity of a single mini-floppy at virtually no cost. The only things you need are at least two floppies, a hand held hole punch, and a colored pencil that will show on black.
The trick is simple, make your single sided floppy into a dual sided "flipped" floppy.
First, let's get acquainted with the anatomy of a floppy disk. Externally there is a black jacket with several holes cut into it. The inside of the jacket is lined with a white fabric which can only be seen by prying the jacket apart a bit at the center hole. Through the holes, the rust colored disk can be seen. The rust color is a coating on a mylar surface enabling the drive to read and record information much the same as the tape for your cassette recorder.
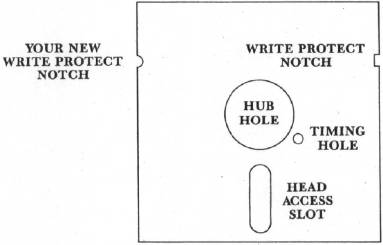
The hole in the center of the jacket is the hub hole. This permits the disk drive motor to engage the disk and spin it. The long wide slot just below the hub hole is called the head access slot. It permits the read/write head and the pressure pad to access the spinning disk. IMPORTANT: Avoid touching the disk surface through this slot. Fingerprints on the recording surface in this area can cause I/O errors. Just to the right of the hub hole is a small hole through which the disk surface can be seen at times or, at other times, a hole completely through the other side of the jacket appears. This is the timing hole. Finally, in the upper right corner (if you consider the head access slot the bottom) of the jacket, there is a rectangular slot. This is the write protect notch. When the floppy is inserted into the drive, a mechanical switch can slip into this notch signalling the drive that it is OK to write on this disk. If the notch is not present or is covered with a piece of tape the disk is "write protected" thereby preventing the APPLE from writing anything on this disk — even the initialization information.
By duplicating this write protect notch at the same position on the left side of the jacket, the disk can be turned over and the DISK II may write on the "flip" side. The APPLE DISK is different than most other drives because it ignores the timing hole, using the motor and ‘soft’ timing techniques instead.
If you follow these instructions carefully, a good 90% of major brand mini-floppies can be turned into "flipped" floppies. Place two disks in front of you face up on a very clean surface. Once again you are cautioned not to touch the recording surface through the head access slot. Take one of the disks and place it flipped over on top of the other, such that the head access slots are at the bottom. Align them both exactly and, with a light colored pencil, make a mark on the bottom disk along the inside edge of the flipped floppy's write protect notch. With a standard hole puncher, punch a half hole (i.e. no further into the jacket than your pencil mark) completely through both sides of the jacket at your pencil mark. This half hole is now the write protect notch for the flip side. The fact that this hole is round is of no consequence, since the only thing of importance is that the mechanical switch inside your drive can drop into a notch of some type.
Test your "flipped" floppy by inserting it into the drive (flipped side up naturally) and doing the normal INIT procedure. If you get several groans from your drive followed by an I/O ERROR, you may not have your notch deep enough or you may have run into one of the 10% or so disks that have flaws in the flipped surface. If you suspect your notch may not be deep enough, very carefully cut away a little more of the jacket. You must be careful not to cut into the disk surface, for that may ruin the disk completely. Assuming you have reasonable quality disks, the flipped surface having a flaw will be a rare problem but has no solution. If you should be unlucky enough to have this occur first time out, don't be discouraged; try another disk.
These flipped floppies may now be used exactly as you use all the normal disks in your collection.
Editor's Note: While we've printed this article as a reader service, you should be well aware of the risks involved. Disks made for single sided use may contain flaws on the reverse side. We can't vouch for the author's 10% figure. In essence, try this at your risk! RCL