ATARI
FONTBYTER
Orson Scott Card
It's hard to tell, when you're using "Fontbyter," whether this is a utility or a game. You can easily create graphics displays many times the size of the screen and save them to disk, using the ROM character set - or character sets you have designed yourself. And because Fontbyter allows you to use two "hidden" character modes, ANTIC modes 4 and 5, you get all the high-resolution color of Graphics 7 with the convenience and memory usage of Graphics 0.
Once you have a character set designed and a picture drawn on the screen using "Fontbyter," changing an 8-by-8-pixel character block takes only one POKE. This allows easy, almost instant animation; your programs can be shorter than they would be if you tried to get the same effect with Graphics 7; and you have more memory available to you because the screen displays take up less room.
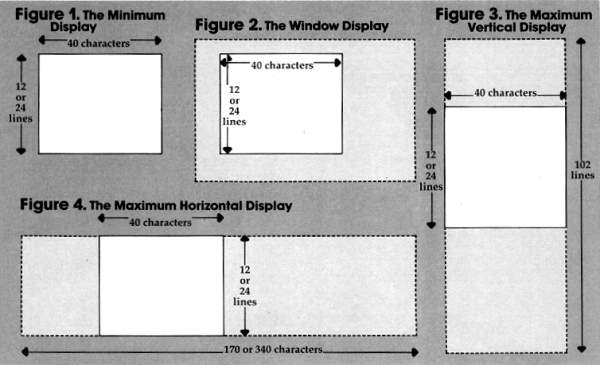
The problem is creating the actual display. In ANTIC 4, you have 24 lines of 40 characters; in ANTIC 5, 12 lines of 40 characters. Laying out the screen display and writing the DATA statements can be a long, tedious, painful process. You have to remember what each character looks like and make sure that the characters are in the right order in the DATA statements you create. And when you want to change a display, you have to go back and find the right DATA statement and alter it.
Fontbyter lets you create and edit in ANTIC 4 or 5 right on the screen. You don't have to write down the number of the character and POKE it into memory; you only have to press a key or combination of keys, and your character will be displayed exactly where you want it on the screen. Simple commands allow you to fill large areas with a single character, insert or delete lines, scroll around the screen to view large areas quickly, or change the colors on the screen. And Fontbyter will scroll horizontally and vertically, so you can use the screen as a window onto a very large display - up to 4K.
Best of all, you can save your screen to disk at any point and return to continue editing it. Using a simple subroutine, you can then load your screen into memory in your own program. The first eight bytes of every file Fontbyter creates contain the mode number, the display width, the display height, and the five colors of the screen display.
Starting Fontbyter
Character set. When you RUN Fontbyter, the program accesses your disk and shows you a directory of all the files with the filetype ".SET". Fontbyter assumes that these are all character sets. The program then asks you to choose which one you want to use. Or, if you wish to use the built-in ROM character set, enter the character "@" as the filename.
There is only one custom character set included with Fontbyter, but by using a character editor you can create as many different sets as you want.
If the character set you ask for is not on the disk in drive 1, the program will prompt you to either insert the correct disk or ask for a different set. Also, whenever Fontbyter asks you for a filename, you don't need to enter more than the eight-character name - Fontbyter always supplies the device name "D1:" and the extender ".SET" or ".SCR". If you use an illegal name, Fontbyter will ask you to try again.
Screen files. When you have chosen your character set, Fontbyter displays a directory of all the files with the filetype ".SCR". Fontbyter as sumes that these files contain screen displays created and saved by Fontbyter. If no directory is displayed, it means that there are no files with the filetype ".SCR" on the disk.
At the end of the directory, you will be told the number of sectors left on the disk. Be sure that the disk you use for saving screens has enough room for the screen you intend to save. A maximum-size display is almost 4K; which will create a file of 33 sectors. Disks can fill up pretty fast at that rate.
Save file. The program asks you what name your saved screen file should have. When you are through editing and want to save your finished screen, this is the filename that Fontbyter will use to create the save file. You can use a filename that you used before, but saving the new file will erase the old one.
Load file. The program asks you if you want to edit a screen that was previously saved. If you do, you will be asked the name of the file you want to load from.
Notice that this system allows you to load from a file and then save your edited version back to the same file, erasing the old version; or you can choose to save the file under a different filename, so that both versions will exist. There is an added safeguard, too. When you save the screen display, it is first saved under the name "D1.TEMPFILE.SCR". Then Fontbyter asks you if you want to save it under the name you chose at the beginning of the program. If you change your mind about the save filename then, you can exit Fontbyter and use DOS to change "D: TEMPFILE.SCR" to whatever name you want.
Load file parameters. If your load file is found, Fontbyter immediately opens it and reads the first three bytes. Then it reminds you of the ANTIC mode, width (in characters), and height (in lines) of the file as it was saved. If you don't want to change those parameters, you can proceed directly to the final check; if you do want to change them, Fontbyter will ask you to choose the mode, width, and height of the file as if you were creating a new screen.
ANTIC mode. Fontbyter asks you to choose which ANTIC mode you want. The only choices are 2 (Graphics 0), 4, or 5. Mode 4 has shorter, squarer characters, and fits 24 lines on a screen. Mode 5 has tall, thin characters and fits only 12 lines on a screen. This means that a display file a hundred lines from top to bottom will give you more than eight distinct screen displays in ANTIC 5, but only just over four distinct displays in ANTIC 4. ANTIC 2 (Graphics 0) is included, even though it is not a four-color mode, so that you can use Fontbyter to create displays using the built-in ROM character set.
If you own an XL model (600XL, 800XL, 1200XL, 1400XL, or 1450XLD), ANTIC 4 and 5 correspond to Graphics 12 and 13.
Display width. The minimum width of a line is 40 characters. If you enter a number less than 40, Fontbyter will change it to 40. The maximum width depends on the mode. The limiting factor here is that all screen displays must fit within 4K. Because of this, the wider a screen display you choose, the fewer vertical lines you can have. You cannot have a line so wide that it would not allow the minimum number of lines. Since you will not be allowed any fewer than 24 screen lines in ANTIC 2 or 4, you naturally can't have as wide a screen as in mode 5, which has a minimum of 12 lines per screen.
Display height. The minimum height, in number of lines, is 12 lines for ANTIC 5 and 24 lines for ANTIC 2 and 4. The maximum height depends on the line width you chose. If you ask for more lines than the allowable maximum, Fontbyter will change the figure to the maximum.
Final check. Fontbyter clears the screen and then displays what your choices were: the character set, the file in which to save your screen, the file (if any) to load from, the mode, the width (in characters), and the height (in lines). If you want to make any changes, press OPTION. If you are satisfied with your choices, press START.
Fontbyter will display a wait message for a few moments, and then the screen will go completely blank. This is so that the setup operations will run faster. When Fontbyter is ready to go on - and it won't be long- either the load screen you asked for will appear or a cursor will appear in the upper-left-hand corner of a blank screen. The cursor is whatever the ESCAPE character looks like in the character set you chose.
Also, part of the character set will be displayed on the bottom four lines of the screen. The characters are arranged in the same order as the computer keyboard, so that you can easily figure out which key to press in order to display a particular character.
Editing Features
To use the keyboard. The character set is divided into three groups: regular, shifted, and control. You can change from one to another using the CAPS/LOWR key. To get the regular character group, press CAPS/LOWR. To get the shifted character group, press SHIFT and CAPS/LOWR at the same time. To get the control character group, press CONTROL and CAPS/LOWR at the same time. As soon as you make the change, the character keyboard display at the bottom of the screen will change to show you the characters now available.
Instead of the usual computer keyboard system of locking only the alphabetic keys into shifted and control functions, Fontbyter shifts the entire keyboard. After you press SHIFT and CAPS/ LOWR, you can press any key on the keyboard and get the shifted character - without pressing SHIFT again. The same applies to CONTROL with CAPS/LOWR.
Some keys, of course, don't have a shifted or control value (ESC, DEL, and RETURN, for instance), and others usually display only the inverse of another character (SHIFT-TAB, for instance). Since these don't display a separate character, pressing them only produces the same character that you would get if you pressed the space bar - a blank. In addition, if your character set redefines the space bar character, that character will fill your display when it first comes up, and will appear on the screen whenever you enter a nonprinting character.
The keys do not produce their normal clicking sound, except for the command keys, which are described next.
Command keys. No matter which character group you are using, there are some key combinations that Fontbyter interprets as commands. Pressing INSERT and SHIFT together will insert a blank line on the screen. Pressing DELETE and SHIFT together will delete a line. Pressing CONTROL and an ARROW key together will cause the cursor to move.
Remember, to print the character represented by the CONTROL-ARROW combination, press only the ARROW key while the control group is locked in. To move the cursor, press CONTROL and ARROW at the same time, regardless of which group is locked in.
Inverse video (Atari logo) key. This key is a toggle. Pressing it switches between inverse and regular video. In ANTIC 2 (Graphics 0), this will cause all the characters you enter to be reversed, as the computer normally does. In ANTIC 4 and 5, however, this will cause Color 3 to take its value from color register 4 (memory location 711 instead of 710). It will affect, therefore, only one of the colors, and if a character does not contain any dots of Color 3, inverse mode wont have any effect at all.
CONTROL-ESC. This key combination is a toggle. It will switch between Still and AutoAdvance modes. In Still Mode, pressing noncom mand keys will display a new character in the same place on the screen. In Auto-Advance Mode, pressing noncommand keys will display a new character and then advance the cursor to the next position to the right, unless doing so would take the cursor beyond the edge of the display.
To move the cursor. Either move the joystick in the direction you want to move, or press the appropriate CONTROL-ARROW key combination. Only the joystick allows diagonal movement.
When the cursor reaches the edge of the screen, the display will begin to scroll until it reaches the limits of display height and width you specified during start-up. If you are at the edge of the display, the cursor simply won't move any farther that direction.
Fast-fill function. Sometimes you will have large areas or lines to fill with the same character. Instead of entering the character by typing it in each space where it is to appear, you can use the joystick and fire button. First maneuver the cursor until it is on top of the character you want to copy, or move it to the place where you want to begin the fast-fill operation and enter the character from the keyboard. Then press down the joystick button and hold it down while you use the joystick to move the cursor. From then on, until you let up on the button, wherever you move the cursor using the joystick, a trail made up of that character will be left behind.
You can also use this function to erase areas of the screen fairly quickly. Just move the cursor to a blank, press down the button, and the cursor will leave blanks behind it wherever you make it go.
Clear screen function. To erase the entire display, press CONTROL-SHIFT-CLEAR.
Delete line function. To delete an entire line of your screen, move your cursor to the line you want to delete and press SHIFT-DELETE. The line will vanish, and the entire display below that line will move upward one line on the screen. Whether the very bottom of your display is visible on the screen or not, a line of blanks will be inserted as the last line in your display.
Insert line function. To insert a blank line in your display, move the cursor to the position where you want the new line. Then press SHIFT INSERT. The line that the cursor was on will move down, as will all the other lines below it in the display, and the cursor will now be on a blank line. At the bottom of the display, whether it is visible on the screen or not, the last line of your display will be deleted completely.
With both the delete and insert line functions, the line that disappears is irrecoverably lost. To get it back, you will have to enter all the characters just as you did before. So take care when using these two functions.
By using the delete and insert functions in succession, you can quickly blank large areas of the screen, a line at a time. Simply move to the top of the area you want to blank out, and press SHIFT-DELETE as often as it takes to erase all the lines you wanted to get rid of. Then press SHIFTINSERT until the desired number of blank lines appears.
You can also use these functions to move the entire picture up or down in the display. For instance, suppose you loaded a display that had been created and saved with only 24 lines, and you want to add another 24-line picture above it. At the beginning of the editing session, simply specify 48 lines as the height of the display. Fontbyter will put the 24 new blank lines at the end of the display. To move the old picture down into that blank area, start at the top of the screen and press SHIFT-INSERT 24 times.
Three joystick modes. We've already gone over the use of the joystick in Cursor Mode. The joystick can also be toggled into two other modes. If you press the START button while in Cursor Mode, the joystick will change to Scroll Mode. If you press the START button in Scroll Mode, the joystick will shift to Color Mode. And pressing the START button in Color Mode will shift you back to Cursor Mode again.
1. Scroll Mode. This mode enables you to scroll the TV screen window around the entire display by moving the joystick in the appropriate direction. When you move, the cursor character will disappear. When you return to Cursor Mode, the cursor will come back to the middle of the screen.
2. Color Mode. In this mode, the joystick controls the color registers as follows:
- Forward and back: Color register 1 (Memory location 708)
- Left and right: Color register 2 (709)
- Forward and back with joystick button depressed: Color register 3 (710)
- Left and right with joystick button depressed: Background color register (712)
- Forward and back with SELECT depressed: Inverse color register (711)
| Summary
Of Command Keys START. Cycle from Cursor Mode to Scroll Mode to Color Mode and back to Cursor Mode. SELECT. Save the current display without interrupting the edit. In Color Mode, moving the joystick forward and back with SELECT pressed will change the inverse color. OPTION. Save the current display and stop the editing session. CONTROL-ARROW. Move the cursor. SHIFT-INSERT. Insert a blank line where the cursor is, and delete the bottom line of the display. SHIFT-DELETE. Delete the cursor line, and add a blank line at the bottom of the display. Atari logo key. Toggle back and forth between inverse and regular characters. SHIFT-CAPS/LOWR. Select the shifted character group. CONTROL-CAPS/LOWR. Select the control character group. CONTROL-ESC. Toggle between Still and Auto-Advance modes. CONTROL-SHIFT-CLEAR. Erase the entire display. |
As you press the joystick forward or to the right in Color Mode, that particular color will get brighter and brighter until it reaches maximum brightness; then it will jump to the next color at its darkest value and get brighter and brighter with that color. Pushing leftward or backward cycles through the colors from bright to dark. There are 16 colors, each with eight levels of brightness. You can cycle through the colors endlessly in either direction.
When you start editing with a new display, the colors are the system default colors. When you load a previously saved display, however, you start with the colors saved with that display. You can change the colors however you like, and whatever the colors are when you save your display, those values will be saved with it.
Ending And Saving
There are two ways to save a screen.
1. You can press the SELECT button when the joystick is in Cursor Mode, and the display will be saved as "D1:TEMPFILE.SCR". The screen is not changed, and you can resume editing as soon as the joystick or keyboard respond again.
2. You can press the OPTION button. Fontbyter will save the entire display in a file named "D1:TEMPFILE.SCR". The screen then clears, and Fontbyter asks if you want to save the display in the save file you asked for at the beginning of the edit. If you answer yes, "TEMPFILE" is renamed with the save filename you chose at the beginning. If a file with the same name already exists on the disk, it will be erased at this time.
If you are merely saving a half-done file to make sure some catastrophe doesn't lose it for you, then "TEMPFILE.SCR" should be security enough - if the system crashes, you'll know that the screen as you last saved it is in that file.
You will then be asked if you want to return to edit the same screen. If you say yes, your saved screen will quickly be reloaded into memory, and the program will reinitialize. If you say no, you will be asked whether you want to quit or start Fontbyter over again. If you choose the quit option and change your mind, don't worry. Just give the direct command RUN, and Fontbyter will begin again with the setup prompts.
Using Fontbyter Screens In Your Programs
Just because Fontbyter scrolls doesn't mean you have to make one continuous scrolling display. You can create many different screen displays in one file, "stacking" them vertically, and then use page flipping in your own program to move instantly from one to another. The advantage of using Fontbyter is that while you are creating them, you can scroll from one to the other to compare them and make sure that any animation effects you are trying for are working properly.
The diagrams will show you the variety of display configurations you can choose.
Here are subroutines you can include in your own programs to use the displays you have created with Fontbyter.
Loading files. To use Fontbyter displays, your program will need to load a character set and the display file. Subroutine 1 loads slowly, entirely from BASIC. Subroutine 2 loads quickly, using a machine language routine that accesses an operating system fast-load program.
Subroutine 1. Slow Load
10 REM Slow load (character set)
100 OPEN #1,4,0,"D1:CHARACT.SET":FOR
I=0 TO 1023:GET #1,N:POKE CH,N:
NEXT I:CLOSE #1:RETURN
190 REM Slow load (display file)
200 OPEN #1,4,0,"D1:DRAWING.SCR":GET
#1,MD:GET #1,WD:GET #1,LN:IF MD
>5 THEN MD=MD-10:WD=WD+256
205 FOR I=708 TO 712:GET #1,N:POKE I
,N:NEXT I:FOR I=0 TO WD*LN-1:GET
#1,N:POKE SC+I,N:NEXT I:CLOSE #
1:RETURN
Subroutine 2. Fast Load
10 REM Set up variables
20 X=16:ICCOM=834:ICBADR=836:ICBLEN=
840:REM See text for meaning of v
ariables SP and CHBAS
90 REM Fast load (display file)
100 OPEN #1,4,0,"D1:DRAWING.SCR":GET
#1,MD:GET #1,WD:GET #1,LN:IF MD
>5 THEN WD=WD+256:MD=MD-10
110 SZ=WD*LN:FOR I=708 TO 712:GET #1
,N:POKE I,N:NEXT I
120 POKE ICBADR+X+1,SP:POKE ICBADR+X
,0:POKE ICBLEN+X+1,1+INT(SZ/256)
:POKE ICBLEN+X,6
130 POKE ICCOM+X,7:I=USR(ADR("hhh{REV}+{OFF}LV
{REV)d{OFF}"),X):CLOSE #1:RETURN
190 REM Fast load (character set)
200 OPEN #1,4,5,"D1:CHARACT.SET":POK
E ICBADR+X+1,CHBAS:POKE ICBADR+X
,0:POKE ICBLEN+X+1,4:POKE ICBLEN
+X,0
210 POKE ICCOM+X,7:C=USR(ADR("hhh{REV}+{OFF}LV
{REV)d{OFF}"),X):CLOSE #1:POKE 756,CHBAS:R
ETURN
Display list setup. Subroutine 3 sets up an ANTIC 2 or 4 display list that can be horizontally or vertically scrolled. Subroutine 4 sets up an ANTIC 5 display list that can be horizontally or vertically scrolled. Subroutines 5 and 6 set up display lists that cannot be horizontally scrolled - use these only to load displays that were created with the minimum line width.
On XL models, the simple display list can be set up with the BASIC statements Graphics 12 + 16 and Graphics 13 + 16, making the non-scrolling display list subroutine unnecessary. For horizontally scrolling displays, however, these subroutines are still needed.
Subroutine 3.
Horizontal Scroll Display List, ANTIC 2 or 4
10 REM Lines 20 and 30 are just a de
monstration. Change the value of
SC and see what happens!
20 DL=PEEK(88)+256*PEEK(89):SC=DL:MO
DE=4:WIDE=40:GOSUB 100
30 FOR I=6 TO 1000:NEXT I:SC=0:MODE=
2:GOSUB 100:FOR I=6 TO 1000:NEXT
I:GOTO 20
90 REM This ANTIC 2 or 4 display lis
t can be horizontally scrolled.
Just set the values of SC,DL,MODE
, and WIDE.
100 FOR I=0 TO 2:POKE DL+I,112:NEXT
I:N=0:M=MODE+64
110 FOR I=DL+3 TO DL+72 STEP 3:C=SC+
N:POKE I,M:POKE 1+2,INT(C/256):P
OKE I+1,C-256*PEEK(I+2):N=N+WIDE
:NEXT I
120 POKE I,65:DLHI=INT(DL/256):DLLO=
DL-DLHI*256:POKE I+1,DLLO:POKE I
+2,DLHI:POKE 561,DLHI:POKE 560,D
LLO:RETURN
Subroutine 4. Horizontal Scroll Display List, ANTIC 5
10 REM Lines 20 and 30 are just a de
monstration. Change the value of
SC and see what happens!
20 DL=PEEK(88)+256*PEEK(89):SC=PEEK(
106)*256:MODE=5:WIDE=40:GOSUB 100
30 FOR I=0 TO 1000:NEXT I:SC=0:GOSUB
100:FOR I=0 TO 1000:NEXT I:GOTO
20
90 REM This ANTIC 5 display list can
be horizontally scrolled. Just
set the values of SC,DL,MODE, and
WIDE.
100 FOR I=0 TO 2:POKE DL+I,112:NEXT
I:N=0:M=MODE+64
110 FOR I=DL+3 TO DL+36 STEP 3*C=SC+
N:POKE I,M:POKE I+2,INT(C/256):P
OKE I+1,C-256*PEEK(I+2):N=N+WIDE
:NEXT I
120 POKE I,65:DLHI=INT(DL/256):DLLO=
DL-DLHI*256:POKE I+i,DLLO:POKE I
+2,DLHI:POKE 561,DLHI:POKE 560,D
LLO:RETURN
Subroutine 5. Regular Display List, ANTIC 2 or 4
10 REM The actual subroutine is line
s 100-120. You set the value of
DL,SC,MODE,and WIDE.
20 DL=PEEK(88)+256*PEEK(89):MODE=2:W
IDE=40
30 SC=0:MODE=2+2*(MODE=2):GOSUB 100
40 TRAP 30:ON PEEK(753)<>3 GOTO 40:S
C=SC+480:SP=INT(SC/256):POKE DL5,
SP:POKE DL4,SC-256*SP
50 FOR I=0 TO 30:NEXT I:GOTO 40
90 REM This ANTIC 2 and 4 display li
st can be page flipped from BASIC
. POKE the screen address into D
L4 and DL5.
100 FOR I=0 TO 2:POKE DL+I,112:NEXT
I:DL4=DL+4:DL5=DL+5
110 POKE DL+3,64+MODE:POKE DL5,INT(S
C/256):POKE DL4,SC-256*PEEK(DL5)
:FOR I=DL+6 TO DL+28:POKE I,MODE
:NEXT I
120 POKE I,65:DLHI=INT(DL/256):DLLO=
DL-DLHI*256:POKE I+1,DLLO:POKE I
+2,DLHI:POKE 561,DLHI:POKE 560,D
LLO:RETURN
Subroutine 6. Regular Display List, ANTIC 5
10 REM The actual subroutine is line
s 100-120. You set the value of
DL,SC,MODE,and WIDE.
20 DL-PEEK(88)+256*PEEK(99):MODE=5:W
IDE=40:GOSUB 100
30 SC=0
40 TRAP 30:ON PEEK(753)<>3 GOTO 40:S
C=SC+480:SP=INT(SC/256):POKE DL5,
SP:POKE DL4,SC-256*SP
50 FOR I=0 TO 30:NEXT I:GOTO 40
90 REM This ANTIC 5 display list can
be page flipped from BASIC. Jus
t POKE the screen address into DL
4 and DL5.
100 FOR I=0 TO 2:POKE DL+I,112:NEXT
I:DL4=DL+4:DL5=DL+5
110 POKE DL+3,64+MODE:POKE DL5,INT(S
C/256):POKE DL4,SC-256*PEEK(DL5)
:FOR I=DL+6 TO DL+16:POKE I,MODE
:NEXT I
120 POKE I,65:DLHI=INT(DL/256):DLLO=
DL-DLHI*256:POKE I+I,DLLO:POKE I
+2,DLHI:POKE 561,DLHI:POKE 560,D
LLO:RETURN
These routines use the following variables:
TOP is the page number of the top of memory. The Atari will not touch anything located above the top of memory - but anything below it is fair game. The display list, character set, screen memory, and machine language routines should all be placed above SP. So the load routines find out where the top of memory is and move it down enough pages to leave room for all the protected program areas. SC is the absolute address of the top of memory (SP*256); it is also the start of screen memory, so that it is POKEd into both the display list and location 106.
How much room should you leave? The character set takes 1K (four pages) and must start on a 1K boundary. Screen memory will never take more than 4K (16 pages), and should start on a 4K boundary, since ANTIC has problems when screen memory crosses that line. If your display is less than 2K, you can probably skip back from the top of memory a mere 4K (16 pages, or PEEK(106)16), place screen memory at the new top of memory, and put the display list, machine language routines, and character set above it. If your display list is 3K or more, you should probably skip back 6K (24 pages, or PEEK(106)-24), place the character set at the new top of memory, followed by the display list, machine language subroutines, and then screen memory beginning at the 4K boundary line, 16 pages before the old top of memory. This routine assumes that arrangement.
SP is the page number of the start of screen memory, and SC is the absolute address of the start of screen memory (SP*256).
DL is the start of the display list. For page flipping, DU is DL + 3, and DL4 is DL + 4. These will contain the low byte and high byte of screen memory, and POKEing new values into these locations will flip screen memory.
CHBAS is the page number of the character set, and CH is the absolute address (CHBAS* 256). MODE is the ANTIC mode number - either 2, 4, or 5. Adding 64 to MODE each time it is POKEd in tells the computer to look for a new screen memory address in the next two bytes in the display list.
WIDE is the width, in characters, of the entire horizontal line, not just the 40-character portion visible on screen at any one time. Thus, every MODE instruction is followed by a two-byte address, C, which tells it where to find the start of the next horizontal line.
POKEing 560 and 561 with 0 and DL/256 is what actually makes the display list start working. Until that moment, the display list is just a series of numbers in memory. But once 560 and 561 contain the address of the start of your display list, the TV screen is under your program's control.
ICBADR, ICBLEN, and ICCOM are the addresses of key locations in the IOCB handler. ICCOM must contain the number of the operation to be performed (7 to load, 11 to save). ICBADR must contain the low byte of the starting address of the area in memory to be saved from or loaded to (ICBADR+ 1 will contain the high byte). ICBLEN must contain the low byte of the length of the file to load (ICBLEN + 1 will contain the high byte). The variable X represents the offset into the IOCB area. If you OPEN #1, then X=16. If you OPEN #2, then X = 32. And so on, in multiples of 16. You might not get good results using OPEN #0 or OPEN #6 - those are reserved for system use.
With screen files created by Fontbyter, remember that the first eight bytes always contain the following information:
- ANTIC mode number (plus 10, if width is greater than 255 characters)
- width, or number of characters per line (low byte only, if width is greater than 255 characters)
- display height, or number of lines in the entire display
- colors to POKE into locations 708 through 712
Typing The Program
The bulk of the program is written in BASIC. The shortest machine language routines are included as string constants. The longer routines, however, DISPLAY, EXPAND, and DELETE, and two data files, MENU.DAT and CHARDATA.DAT, are listed after the main program. These should be entered using the BASIC loader program provided and saved on disk with exactly the filename specified. Fontbyter will look for these files and load them into strings or particular areas or memory during the run of the program.
Since Fontbyter works most efficiently with a disk drive, the program as written assumes a disk drive. However, a patient cassette user can remove all the routines related to choosing and testing filenames, and simply assign the value "C:" to all filename variables. All machine language routines could be added as DATA statements. You may also want to add prompts to tell the user what file the program is asking for. The biggest problem arises with load files during initialization, when the program tests the saved screen file once, then loads it again later. If you decide not to revise the program, make sure that you rewind the cassette containing the screen file after that initial test, so the file will be complete when it is loaded by the screen load subroutine.
Program 1: Fontbyter
5 DIM F$(20),FSAVE$(20),FLOAD$(20),F
L$(40),FLLS(20),DELETE$(124),EXPAN
D$(124),CLEAR$(33),C(255)
10 GRAPHICS 0:X=16:ICCOM=834:ICBADR=
836:ICBLEN=8443
15 COL1=708:COL2=709:COL3=710:COL4=7
11:COL5=712:SHIF=64:SCON=PEEK(559
):POKE 16,112:GOTO 440
20 OPEN #1,4,0,FL$:GET #1,MD:GET #1,
WD:GET #1,LN:IF MD>5 THEN WD=WD+2
56:MD=MD-10
25 SZ=WD*LN:FOR I=COL1 TO COL5:GET #
1,N:POKE I,N:NEXT I
30 SC=SP*256:POKE ICBADR+X+I,SP:POKE
ICBADR+X,0:POKE ICBLEN+X+1,1+INT
(SZ/256):POKE ICBLEN+X,0
35 POKE ICCOM+X,7:I=USR(ADR("hhh{REV}+{OFF}LV{REV}d{OFF}
"),X):CLOSE #1-RETURN
40 OPEN #1,8,0,"D1:TEMPFILE.SCR":WD=
WIDE:MD=MODE:IF WIDE:=255 THEN WD=
WIDE-256:MD=MODE+10
45 PUT #1,MD:PUT #1,WD:PUT #1.LINE:F
OR I=COL1 TO COL5:PUT #1,PEEK(I):
NEXT I
50 POKE ICBADR+X+1,SP:POKE ICBADR+X,
0:POKE ICBLEN+X+1,1+INT((LINE*WID
E)/256):POKE ICBLEN+X,0
55 POKE ICCOM+X,11:I=USR(ADR("hhh{REV}+{OFF}LV
{REV}d{OFF}"),X):CLOSE #1:RETURN
60 IF ((LINE*WIDE-PIX)<WIDE) THEN RE
TURN
65 LOWAD=SC+WIDE*INT(PIX/WIDE)-1:HIA
DD=LOWAD+WIDE:POKE 206,INT(HIADD/
256):POKE 205,HIADD-PEEK(206)*256
70 POKE 204,INT(LOWAD/256):POKE 203,
LOWAD-PEEK(204)*256:POKE SC+PIX,O
LD
75 POKE 207,INT((LINE*WIDE-PIX)/WIDE
):POKE 208,WLO:POKE 209,WHI
80 C=USR(ADR(DELETE$))
85 OLD=PEEK(SC+PIX):POKE SC+PIX,91:R
ETURN
90 IF ((LINE*WIDE-PIX)"WIDE) THEN RE
TURN
95 HIADD=SC+WIDE*(LINE-1)-1:LDWAD=HI
ADD-WIDE:POKE 206,INT(HIADD/256):
POKE 205,HIADD-PEEK(206)*256
100 POKE 204,INT(LOWAD/256):POKE 203
,LOWAD-PEEK(204)*256:POKE SC+FIX
,OLD
105 POKE 207,INT((LINE*WIDE-PIX)/WID
E):POKE 208,WLO:POKE 209,WHI
110 C=USR(ADR(EXPAND$))
115 OLD=0:POKE SC+PIX,91:RETURN
120 OLD=PEEK(SC+PIX):POV:E SC+PIX,91:
POKE 559,SCON:POKE 16,112
125 MV=0:V=0:H=0:OPT=PEEK(53279):DI=
PEEK(632):T=PEEK(644):E=0
130 IF OPT=6 THEN GOSUB 870:GOSUB 26
0:GOTO 125
135 IF DI<15 THEN GOSUB 155:GOTO 125
140 IF PEEK(753)=3 THEN GOSUB 220:ON
MV GOSUB 165:GOTO 125
145 ON OPT=3 GOTO 705:IF OPT=5 THEN
GOSUB 40:POKE SC+PIX,91:GOTO 125
150 GOTO 125
155 V=WIDE*((DI=9 OR DI=13 OR DI=5)-
(DI=10 OR DI=14 OR DI=6)):POKE 7
7,0
160 H=(DI=6 OR DI=7 OR DI=5)-(DI=10
OR DI=11 OR DI=9)
165 UD=INT(PIX/WIDE):IF UD-(V<0)<0 O
R UD+(V>0)=LINE THEN V=0
170 LR=PIX-WIDE*UD:IF LR+H<0 OR LR+H
>WIDE-1 THEN H=0
175 IF H=0 AND V=0 THEN 215
180 WH=0:WV=0:W=PEEK(DL4)+256*PEEK(D
L5)-SC
185 U=INT(W/WIDE):IF V<>0 THEN WV=(U
D-U-(V<0)<0)+2*(UD-U+(V>0)>8+12*
(MODE<>5))
190 IF H<>0 THEN L=W-U*WIDE:WH=(LR+H
-L<0)+2*(LR+H-L>39)
195 IF WH>0 OR WV>0 THEN POKE DL+114
,WH:POKE DL+115,WV:C=USR(DISPLAY)
200 POKE SC+PIX,OLD:PIX=PIX+H+V:POKE
53279,1
205 IF T=1 THEN OLD=PEEK(SC+PIX):POK
E SC+PIX,91:GOTO 215
210 POKE SC+PIX,OLD
215 RETURN
220 GOSUB 785:ON (C=134)+(C=135)+(C=
142)+(C=143)+2*(C=116)+:3*(C=119)
+4*(C=246) GOTO 250,60,90,645
225 IF C=156 THEN AV=1*(AV=0):GOTO 9
20
230 IF N=60 THEN SHIF=4+C-64:POKE 53
279,4:GOSUB 930:RETURN
235 IF N=39 THEN VERS=128*(VERS=0):G
OTO 920
240 OLD=C(N+SHIF)+VERS:POKE SC+PIX,O
LD:ON AV GOTO 245:RETURN
245 C=135
250 V=WIDE*((C=143)-(C=142)):H=(C=13
5)-(C=134):MV=1:RETURN
255 GOSUB 920:POKE SC+PIX,91:RETURN
260 GOSUB 920
265 DI=PEEk:(632):T=PEEK(644):DI=DI+5
*(DI=7):DI=DI-10:OPT=PEEK(53279)
:IV=(OPT=5):IF OPT=6 THEN 255
270 IF DI<l OR DI>4 THEN 265
275 ON (4*T)+DI GOSUB 280,285,290,29
5,300,3005,310,320: GOTO 265
280 POKE COL5,PEEK(COL5)-2+256*(PEEK
(COLS)<2):RETURN
285 POKE COLS,PEEK(COLS)+2-256*(PEEK
(COLS)>253):RETURN
290 POKE COL-,PEEK (COL3)-2+256*(PEEK
(COL3)<2):RETURN
295 POKE COL 3,PEEK(COL3)+2-256*(PEEK
(COL3)>253):RETURN
300 POKE COL2,PEEK(COL2)-2+256*(PEEK
(COL2)<2:RETURN
305 POKE COL2,PEEK(COL2)+2-256*(PEEK
(COL2)>253):RETURN
310 IF IV THEN POKE COL4,PEEK(COL4)-
2+256*(PEEK(COL4)<2):RETURN
315 POKE COL1,PEEK(COL1)-2+256*(PEEK
(COL1)<2):RETURN
320 IF IV THEN POKE COL4,PEEK(COL4)+
2-256*(PEEK(COL4)>253):RETURN
325 POKE COL1,PEEK(COLl)+2-256*(PEEK
(COL1)>253):RETURN
330 FLL$=FL$:FOR I=1 TO LEN(FL$):N=A
SC(FL$(I,I)):ON N=58 GOSUB 370:N
EXT I:FL$=FLL$
335 FLL$=FL$:FOR I=1 TO LEN(FL$):N=A
SC(FL$(I,I)):ON N=46 GOSUB 375:N
EXT I:FL$=FLL$
340 IF LEN(FL$)>8 THEN FL$=FL$(1,8)
345 IF LEN(FL$)<1 THEN 390
350 N=ASC(FL$(1,1)):IF N:90 OR N<65
THEN 385
355 IF LEN(FL$)<2 THEN GOTO 365
360 FOR I=2 TO LEN(FL$):N=ASC(FL$(I,
I)):ON (N>90 OR N<65) AND (N>57
OR N<48) GOTO 380:NEXT I
365 FLL$="D1:":FLL$(4)=FL$:N=0:RETURN
370 FLL$=FL$(I+1,LEN(FL$)):RETURN
375 FLL$=FL$(1,I-1):RETURN
380 POP :? "{CLEAR}":? "Illegal char
acters in ";FL$:GOTO 390
385 ? "{CLEAR}":? FL$;" must start w
ith a capital":? "letter.":GOTO
390
390 ? "Let's try that name again.":N
=1:RETURN
395 TRAP 400:OPEN #1,4,0,FL$:N=0:CLO
SE #1:RETURN
400 ? :? FL$;" isn't on disk in":? "
drive 1":? "Insert disk. with ";F
L$;"and":? "press RETURN.":CLOSE
#1
405 ? "Or to try another file name,
press anyother key."
410 ON PEEK(753)<>3 GOTO 410:GOSUB 7
85:ON N=12 GOTO 395:N=1:RETURN
415 TRAP 435:OPEN #1,4,0,FL$:? FL$;"
is already on disck.":? "Unless
you change the name, the old"
420 ? "file will be lost. To change
the namepress RETURN":? "Or pre
ss any other key to continue.":C
LOSE #1
425 ON PEEK(753)<>3 GOTO 425:GOSUB 7
85:ON N=12 GOTO 430:N=0:RETURN
430 N=1:RETURN
435 CLOSE #1:N=0:RETURN
440 ? "{13 SPACES}{REV}Fontbyter{OFF}":? :? ?
:GOSUB 905
445 GOSUB 850:? "What is the name of
your character{4 SPACES}set? (E
nter '@' for ROM set)":POKE 764,
255:INPUT F$
450 IF F$="@" THEN 465
455 FL$=F$:GOSUB 330:ON N GOTO 445:F
$=FLL$:F$(LEN(FLL$)+1)=".SET"
460 FL$=F$:GOSUB 395:ON N GOTO 445
465 GOSUB 840:? :? "What file should
hold your finished{3 SPACES}scr
een"? (Eight characters)":POKE 76
4,255:INPUT FSAVE$
470 FL$=FSAVE$:GOSUB 330:ON N GOTO 4
65:FSAVE$=FLL$:FSAVE$(LEN(FLL$)+
1)=".SCR"
475 FL$=FSAVE$:GOSUB 415:ON N GOTO 4
65
480 FLOAD$="":? :? "Would you like t
o edit a screen you{3 SPACES}hav
e already saved? (Y or N) "
485 GOSUB 785:ON N=35 GOTO 535:ON N=
43 GOTO 490:GOTO 485
490 ? :? "What is the name of the sa
ved screen file? ":POKE 764,255
:INPUT FLOAD$
495 FL$=FLOAD$:GOSUB 330:ON N=0 GOTO
500:GOTO 480
500 FLOAD$=FLL$:FLOAD$(LEN(FLL$)+1)=
".SCR"
505 FL$=FLOAD$:GOSUB 395:ON N GOTO 4
80:OPEN #1,4,S,FLOAD$:GET #1,MD:
GET #1,WD:GET #1,LN:CLOSE #1:FLO
AD=1
510 IF MD>5 THEN MD=MD-10:WD=WD+256
515 ? :? FLOAD$;" was saved as:":? "
Mode ";MD.",":" ? "with ";LN;" lin
es":? "of ";WD." characters per
line."
520 ? "If you wish to {REV}change{OFF} these p
arameterspress RETURN.":? "To le
ave them {REV}unchanged{OFF} press any
{5 SPACES}other key."
525 ON PEEK(753)<>=3 GOTO 525:GOSUB 7
85:IF N=12 THEN 540
530 MODE=MD:WIDE=WD:LINE=LN:GOTO 585
535 FLOAD=0
540 ? :? "What Antic mode will you w
ork: in?":? "(Antic 2 4, OR 5) "
:POKE 764,255
545 GOSUB 785:ON N<>30 AND N<>24 AND
N<>29 GOTO 545
550 MODE=C(N)-16
555 ? :? "How wide a line?":? " (Mi
nimum 40 characters":? "
{3 SPACES}maximum ";170+170*(MOD
E=5);" characters)".
560 POKE 764,255:TRAP 560:INPUT WIDE
:WIDE=INT(WIDE):ON WIDE<40 OR WI
DE>170 GOSUB 790
565 ? :? "How many lines do you want
to edit?{5 SPACES}(Minimum ";12
+12*(MODE<>5);:? {3 SPACES}Maxi
mum ";INT(4096/WIDE);")"
570 TRAP 570:INPUT LINE
575 LINE=INT(LINE):IF LINE>INT(4096/
WIDE) THEN LINE=INT(4096/WIDE)
580 IF LINE<12+12*(MODE=4) THEN LINE
=12+12*(MODE=4)
585 ? "{CLEAR}":? "You have chosen:"
:? "Character set--";F$:`? "Save
file--";FSAVE$:? "Load file--";F
LOAD$
590 SZ=LINE*WIDE-1:? "Mode ";MODE:?
LINE;" lines of ";WIDE;" charact
ers"
595 ? "If this is right, press {REV}START{OFF}
{9 SPACES}To make changes, press
{REV}OPTION{OFF}"
600 ON (PEEK(53279)=6)+(2*(PEEK(5327
9)=3)) GOTO 605,440:GOTO 600
605 A=PEEK(106):TOP=A-24:CHBAS=TOP:C
H=CHBAS*256:SP=TOP+8:SC=SP*256:P
OKE 106,TOP:OLDCHBAS=224:GRAPHIC
S 0
610 ? "Just a minute while I get mys
elf{16 SPACES}together . . ."
615 IF F$="@" THEN CHBAS=224:CH=CHBA
S*256:GOTO 630
620 OPEN #1,4,S,F$:POKE ICBADR+X+1,C
HBAS:POKE ICBADR+X,O:POKE ICBLEN
+X+1,4:POKE ICBLEN+X,0
625 POKE ICCOM+X,7:C=USR(ADR("hhh{REV}+{OFF}LV
{REV}d{OFF}"), X):CLOSE #1
630 POKE 559,0:GOSUB 640:GOSUB 655:G
OSUB 810:GOSUB 635:ON FLOAD GOSU
B 650:GOSUB 925:GOTO 120
635 POKE 756,CHBAS:RETURN
640 OPEN #1,4,0,"D1:CLEAR.SUB":FOR I
=1 TO 33:GET #1,N:CLEAR$(I,I)=CH
R$(N):NEXT I:CLOSE #1
645 C=USR(ADR(CLEAR$),SP,X):RETURN
650 T=SZ:FL$=FLOAD$:GOSUB 20:SZ=T:RE
TURN
655 DL=256*(TOP+4):DL4=DL+4:DL5=DL+5
:FOR I=0 TO 2:POKE DL+I,112:NEXT
I:PIX=0:N=0
660 FOR I=DL+3 TO DL+27+36*(MODE<>5)
STEP 3:C=SC+N*WIDE:POKE I,64+MO
DE:POKE I+2,INT(C/256)
665 POKE I+1,C-256*PEEK(I+2):N=N+1:N
EXT I
670 N=0:MENU=256*(TOP+5)+64:DLMEN=DL
+32+36*(MODE<>5):POKE DLMEN-2,MO
DE+64:POKE DLMEN,INT(MENU/256)
675 POKE DLMEN-1,MENU-256*PEEK(DLMEN
):FOR I=DLMEN+1 TO DLMEN+3:POKE
I,MODE:NEXT I
680 POKE I,65:POKE I+1,0:POKE I+2,DL
/256:OPEN #1,4,0,"D:DISPLAY.SUB"
685 DISPLAY=DL+128:TRAP 690:FOR I=0
TO 186:GET #1,N:POKE DISPLAY+I,N
:NEXT I:GOTO 695
690 POP
695 WHI=INT(WIDE/256):WLO=WIDE-256*W
HI:POKE DL+112,WLO:POKE DL+113,W
HI
700 POKE 560,0:POKE 561,DL/256:CLOSE
#1:RETURN
705 POKE SC+PIX,OLD:GOSUB 40:POKE 75
6,OLDCHBAS:GRAPHICS 0:POKE 764,2
55
710 ? "Screen is saved as D1:TEMPFIL
E.SCR":? :? "Do you want to save
the screen as":? FSAVE$;"? (Y o
r N)"
715 GOSUB 785:ON N<>43 AND N<>35 GOT
O 715:IF N=43 THEN GOSUB 765:GOT
O 725
720 FSAVE=0
725 ? :? "Do you want to quit? (Y or
N)":POKE 764,255
730 GOSUB 785:ON N<>43 AND N<>35 GOT
O 730:ON N=35 GOTO 735:ON N=43 G
OTO 760
735 ? :? "To return to edit the same
screen,{4 SPACES}press {REV}OPTION{OFF}":
:? :? "To start FONTBYTER over, p
ress {REV}START{OFF}"
740 OPT=PEEK(53279):ON ((OPT=6)+(2*(
OPT=3))) GOTO 745,750:GOTO 740
745 POKE 106,A:GRAPHICS 0:GOTO 10
750 POKE 106,TOP:GOSUB 635:FL$="D1:T
EMPFILE.SCR":IF FSAVE=1 THEN FL$
=FSAVE$
755 GOSUB 20:GOSUB 655:GOTO 120
760 POKE 106,A:POKE 764,255:GRAPHICS
0:END
765 FSAVE=I:TRAP 770:OPEN #2,4,S,FSA
VE$:CLOSE #2:XIO 36,#2,0,0,FSAVE
$: XIO 33,#2,0,0,FSAVE$: GOTO 775
770 CLOSE #2.
775 FL$="D1:TEMPFILE.SCR,":FLL$=FSAV
E$(4,LEN(FSAVE$)):FL$(17)=FLL$
780 XIO 32,#1,0,0,FL$:RETURN
785 C=PEEK(764):N=C-64*INT(C/64):RET
URN
790 IF WIDE<40 THEN WIDE=40:RETURN
795 IF WIDE>170 AND MODE<>5 THEN WID
E=170:RETURN
800 IF WIDE<340 THEN RETURN
805 WIDE=340:RETURN
810 TRAP 815:OPEN #1,4,0,"D:DELETE.S
UB":FOR I=1 TO 124:GET #1,N:DELE
TE$(I,I)=CHR$(N):NEXT I:GOTO 820
815 POP
820 CLOSE #1:WHI=INT(WIDE/256):WLO=W
IDE-256*WHI
825 TRAP 830:OPEN #1,4,0,"D:EXPAND.S
UB":FOR I=1 TO 1-24:GET #1,N:EXPA
ND$(I,I)=CHR$(N):NEXT I:GOTO 835
830 POP
835 CLOSE #1:RETURN
840 TRAP 865:XIO 36,#1,0,0,"D:*.SCR"
845 ? :? "Currently saved screen fil
es:":FLL$="SCR":GOTO 860
850 TRAP 865:XIO 35,#1,0,0,"D:*.SET"
855 ? :? "Currently available charac
ter sets:":FLL$="SET"
860 FL$="D1:*.":FL$(LEN(FL$)+1)=FLL$
:OPEN #1,6,0,FL$:FOR I=0 TO 50:I
NPUT #1,FLL$:? FLL$:NEXT I
865 CLOSE #1:RETURN
870 GOSUB 920:POKE SC+PIX,OLD:GOTO 8
95
875 WV=2*((DI=5)+(DI=13)+(DI=9))+(DI
=10)+(DI=6)+(DI=14):WH=2*(DI<8 A
ND DI>4)+(DI<12 AND DI>8)
880 W=(PEEK(DL4)+256*PEEK(DL5))-SC:U
=INT(W/WIDE):WV=WV-(U=0 AND WV=1
)-2*((U+7+12*(MODE<>5)=LINE-2) A
ND WV=2)
885 L=W-(U*WIDE):WH=WH-(L=0 AND WH=1
)-2*((L+40)=WIDE AND WH=2)
890 POKE DL+114,WH:POKE DL+115,WV:C=
USR(DISPLAY)
895 IF PEEK(53279)<>6 THEN DI=PEEK(6
32):ON DI<>15 GOTO 875:GOTO 895
900 PIX=PEEK(DL4)+256*PEEK(DL5)+(6+6
*(MODE<>5))*WIDE+20:OLD=PEEK(PIX
):PIX=PIX-SC:RETURN
905 OPEN #4,4,0,"D:CHARDATA.DAT"
910 FOR I=0 TO 255:GET #4,N:C(I)=N:N
EXT I
915 CLOSE #4:RETURN
920 FOR I=0 TO 10:POKE 53279,4:NEXT
I:RETURN
925 OPEN #1,4,0,"D:MENU.DAT":FOR I=4
TO 483:GET #1,N:POKE MENU+I,N:N
EXT I:CLOSE #1
930 MENSH=MENU+160*INT(SHIF/64):POKE
DLMEN,INT(MENSH/256):POKE DLMEN
-1,MENSH-256*PEEK(DLMEN):RETURN
Program 2: DISPLAY. SUB
Machine Language Scrolling Subroutine
900 OPEN #1,8,0,"D1.DISPLAY.SUB"
910 FOR I=1 TO 186:READ N:PUT #1,N:N
EXT I:CLOSE #1:? I:END
1000 DATA 104,173,49,2,133,206,133,2
13
1008 DATA 173,48,2,105,3,133,205,105
1016 DATA 109,133,212,162,0,161,205,
41
1024 DATA 191,133,207,230,205,161,20
5,133
1032 DATA 203,160,1,177,205,133,204,
200
1040 DATA 177,212,240,34,201,2,208,1
6
1048 DATA 24,165,203,105,1,133,203,1
65
1056 DATA 204,105,0,133,204,24,144,1
4
1064 DATA 56,165,203,233,1,133,203,1
65
1072 DATA 204,233,0,133,204,24,160,3
1080 DATA 177,212,240,42 201,2,208,1
9
1088 DATA 24,165,203,160,0,113,212,1
33
1096 DATA 203,200,165,204,113,212,13
3,204
1104 DATA 24,144,19,56,165,203,160,0
1112 DATA 241,212,133,203,165,204,20
0,241
1120 DATA 212,133,204,24,144,0,160,8
1128 DATA 165,207,201,5,240,2,160,20
1136 DATA 162,0,165,203,129,205,230,
205
1144 DATA 165,204,129,205,132,207,24
,165
1152 DATA 203,160,0,113,212,133,203,
165
1160 DATA 204,200,113,212,133,204,23
0,205
1168 DATA 230,205,164,207,136,208,21
9,165
1176 DATA 203,129,205,230,205,165,20
4,129
1184 DATA 205,96
Program 3: EXPAND. SUB
Machine Language Line Insert Subroutine
900 OPEN #1,8,0,"D1:EXPAND.SUB"
910 FOR I=1 TO 122:READ N:PUT #1.N:N
EXT I:CLOSE #1:? I:END
1000 DATA 104,166,207,169,0,165,209,
240
1008 DATA 29,160,255,177,203,145,205
,136
1016 DATA 208,249,230,204,230,206,16
4,208
1024 DATA 177,203,145,205,136,208,24
9,198
1032 DATA 204,198,206,24,144,9,164,2
08
1040 DATA 177,203,145,205,136,208,24
9,202
1048 DATA 240,29156,165,205,229,208,
133
1056 DATA 205,165,206,229,209,133,20
6,56
1064 DATA 165,203,229,208,133,203,16
5,204
1072 DATA 229,209,133,204,24,144,182
,165
1080 DATA 209,240,27,160,255,169,0,1
45
1088 DATA 203,136,208,251,230,206,23
0,204
1096 DATA 164,208,145,203,136,208,25
1,198
1104 DATA 206,198,204,24,144,11,164,
208
1112 DATA 240,7,169,0,145,203,136,20
8
1120 DATA 251,96
Program 4: DELETE. SUB
Machine Language Line Delete Subroutine
900 OPEN #1,8,0,"D1:DELETE.SUB"
910 FOR I=1 TO 122:READ N:PUT #1,N:N
EXT I:CLOSE #1:? I:END
1000 DATA 104,166,207,169,0,165,209,
240
1008 DATA 29,160,255,177,205,145,203
,136
1016 DATA 208,249,230,204,230,206,16
4,208
1024 DATA 177,205,145,203,136,208,24
9,198
1032 DATA 204,198,206,24,144,9,164,2
08
1040 DATA 177,205,145,203,136,208,24
9,202
1048 DATA 240,29,24,165,205,101,208,
133
1056 DATA 205,165,206,101,209,133,20
6,24
1064 DATA 165,203,101,208,133,203,16
5,204
1072 DATA 101,209,139,204,24,144,182
,165
1080 DATA 209,240,27,160,255,169,0,1
45
1088 DATA 205,136,208,251,230,206,23
0,204
1096 DATA 164,208,145,205,116,208,25
1,198
1104 DATA 206,198,204,24,144,11,164,
208
1112 DATA 240,7,169,0,145,205,136,20
8
1120 DATA 251,96
Program 5: MENU. DAT
900 OPEN #1,8,0,°D1:MENU.DAT"
910 FOR I=1 TO 482:READ N:PUT #1,N:N
EXT I:CLOSE #1:? I:END
1000 DATA 0,0,91,0,17,0,18,0
1008 DATA 19,0,20,0,21,0,22,0
1016 DATA 23,0,24,0,25,0,16,0
1024 DATA 28,0,30,0,126,0,0,0
1032 DATA 0,0,0,0,0,0,0,0
1040 DATA 0,0,0,127,0,113,0,119
1048 DATA 0,101,0,114,0,116,0,121
1056 DATA 0,117,0,105,0,111,0,112
1064 DATA 0,13,0,29,0,0,0,0
1072 DATA 0,0,0,0,0,0,0,0
1080 DATA 0,0,0,0,0,0,97,0
1088 DATA 115,0,100,0,102,0,103,0
1096 DATA 104,0,106,0,107,0,108,0
1104 DATA 27,0,11,0,10,0,0,0
1112 DATA 0,0,0,0,0,0,0,0
1120 DATA 0,0,0,0,0,0,0,122
1128 DATA 0,120,0,99,0,118,0,98
1136 DATA 0,110,0,109,0,12,0,14
1144 DATA 0,15,0,0,0,0,0,0
1152 DATA 0,0,0,0,0,0,0,0
1160 DATA 0,0,0,0,1,0,2,0
1168 DATA 3,0,4,0,5,0,6,0
1176 DATA 7,0,32,0,8,0,9,0
1184 DATA 125,0,0,0,0,0,0,0
1192 DATA 0,0,0,0,0,0,0,0
1200 DATA 0,0,0,0,0,49,0,55
1208 DATA 0,37,0,50,0,52,0,57
1216 DATA 0,53,0,41,0,47,0,48
1224 DATA 0,63,0,124,0,0,0,0
1232 DATA 0,0,0,0,0,0,0,0
1240 DATA 0,0,0,0,0,0,33,0
1248 DATA 51,0,36,0,38,0,39,0
1256 DATA 40,0,42,0,43,0,44,0
1264 DATA 26,0,60,0,62,0,0,0
1272 DATA 0,0,0,0,0,0,0,0
1280 DATA 0,0,0,0,0,0,0,58
1288 DATA 0,56,0,35,0,54,0,34
1296 DATA 0,46,0,45,0,59,0,61
1304 DATA 0,31,0,0,0,0,0,0
1312 DATA 0,0,0,0,0,0,0,0
1320 DATA 0,0,0,0,0,0,0,0
1328 DATA 0,0,0,0,0,0,0,0
1336 DATA 0,0,0,0,0,0,0,0
1344 DATA 0,0,0,0,0,0,0,0
1352 DATA 0,0,0,0,0,0,0,0
1360 DATA 0,0,0,0,0,81,0,87
1368 DATA 0,69,0,82,0,84,0,89
1376 DATA 0,85,0,73,0,79,0,80
1384 DATA 0,92,0,93,0,0,0,0
1392 DATA 0,0,0,0,0,0,0,0
1400 DATA 0,0,0,0,0,0,65,0
1408 DATA 83,0,68,0,70,0,71,0
1416 DATA 72,0,74,0,75,0,76,0
1424 DATA 123,0,94,0,95,0,0,0
1432 DATA 0,0,0,0,0,0,0,0
1440 DATA 0, 0,0,0,0,0,0,90
1448 DATA 0,88,0,67,0,86,0,66
1456 DATA 0,78,0,77,0,64,0,96
1464 DATA 0,0,0,0,0,0,0,0
1472 DATA 0,0,0,0,0,0,0,0
1480 DATA 0,0
Program 6: CHARDATA. DAT
900 OPEN #1,8,0,"D1:CHARDATA.DAT"
910 FOR I=1 TO 256:READ N:PUT #1,N:N
EXT I:CLOSE #1:? I:END
1000 DATA 108,106,27,0,0,107,11,10
1008 DATA 111,0,112,117,0,105,13,29
1016 DATA 118,0,99,0,0,98,120,122
1024 DATA 20,0,19,22,91,21,18,17
1032 DATA 12,0,14,110,0,109,15,0
1040 DATA 114,0,101,121,127,116,119,
113
1048 DATA 25,0,16,23,126,24,28,30
1056 DATA 102,104,100,0,0,103,115,97
1064 DATA 44,42,26,0,0,43,60,62
1072 DATA 47,0,48,53,0,41,63,124
1080 DATA 54,0,35,0,0,34,56,58
1088 DATA 4,0,3,6,0,5,2,1
1096 DATA 59,0,61,46,0,45,31,0
1104 DATA 50,0,37,57,0,52,55,49
1112 DATA 8,0,9,7,0,32,125,0
1120 DATA 38,40,36,0,0,39,51,33
1128 DATA 76,74,123,0,0,75,94,95
1136 DATA 79,0,80,85,0,73,92,93
1144 DATA 86,0,67,0,0,66,88,90
1152 DATA 0,0,0,0,0,0,0,0
1160 DATA 64,0,96,78,0,77,0,0
1168 DATA 82,0,69,89,0,84,87,81
1176 DATA 0,0,0,0,0,0,0,0
1184 DATA 70,72,68,0,0,71,83,65
1192 DATA 0,0,0,0,0,0,0,0
1200 DATA 0,0,0,0,0,0,0,0
1208 DATA 0,0,0,0,0,0,0,0
1216 DATA 0,0,0,0,0,0,0,0
1224 DATA 0,0,0,0,0,0,0,0
1232 DATA 0,0,0,0,0,0,0,0
1240 DATA 0,0,0,0,0,0,0,0
1248 DATA 0,0,0,0,0,0,0,0
Program 7: CLEAR.SUB
Machine Language Screen Clear Subroutine
900 OPEN #1,8,0,"D1:CLEAR.SUB"
910 FOR I=1 TO 33:READ N:PUT #1,N:NE
XT I:CLOSE #1:? I:END
1000 DATA 104,104,104,133,208,104,10
4,101
1008 DATA 208,133,209,169,0,133,207,
160
1016 DATA 255,145,207,136,208,251,14
5,207
1024 DATA 230,208,165,208,197,209,20
8,235
1032 DATA 96