Switchbox
Todd Heimarck, Assistant Editor
Here's a challenging game of strategy that looks easy at first, but takes time to master and permits many variations. The original program is written for the Commodore 128. We've added new versions for the Commodore 64, Apple II, eight-bit Atari computers, IBM PC/PCjr and Atari 520ST, as well as an Amiga version with speech and stereophonic sound effects.
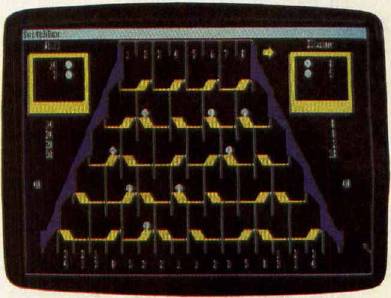
Playing "Switchbox" is like putting dominos in place for a chain reaction—either you're setting them in position or you're knocking them over. Winning requires skill and a sense of when to go for points and when to lay back and wait for a better board. The goal is simple: You try to score more points than your opponent by dropping balls into a box full of two-way switches. Each switch has a trigger and a platform. If the ball lands on an empty platform, it stops dead. But if it hits a trigger, it reverses the switch and continues. In many cases dropping a single ball creates a cascading effect—one ball sets another in motion, which sets others in motion, etc., all the way down.
Type in the program listing for your computer, and save a copy before you run it. If you're using a Commodore 128, enter the 128 version in 128 mode (not 64 mode). The Atari version runs on any eight-bit Atari computer with at least 16K of memory. The Apple II game works on any Apple II machine, under either ProDOS or DOS 3.3. The IBM PC/PCjr version requires BASICA (PC) or cartridge BASIC (PCjr), and a color/graphics adapter on the PC.
The Amiga version of Switch-box requires 512K of memory and Amiga BASIC by Microsoft (not ABasiC, the version supplied with a few very early Amigas). If you have only ABasiC, contact your dealer about getting an upgrade to Amiga BASIC. Before running the program, make sure that the Amiga's display is set for 80 columns of text (if it isn't, the numbers printed on the screen won't match the rest of the display). If you've previously changed the display to 60 columns, open the Preferences icon and change it back to 80, then close Preferences, activate BASIC and run the program as usual.
Since the Amiga program doesn't use line numbers, we've placed small arrows in the listing to show you where each line ends. Don't try to type in the arrows: There's no such character in the Amiga's character set. Wherever you see an arrow in the listing, press Return (or move the cursor off that program line) to enter the line. It's important to include the colon (:) that appears after program labels (Nextround:, Setup:, and so on). If you accidentally omit the colon, you'll make it impossible for the computer to use that label correctly.
Before typing in the 520ST version you must turn off the buffered graphics by clicking on Buf Graphics in the Run menu. You can be in either medium or low resolution mode when typing in the program; but before running it, you must be in low resolution mode. This can be done by selecting Set Preferences from the Options menu on the desktop and clicking on Low.
A Box Of Switches
Switchbox is a tale of twos: Each switch has two parts, two positions, two states, two paths in, and two paths out. The two parts are the platform and the trigger. A switch can lean to the left (platform left, trigger right) or to the right (platform right, trigger left):
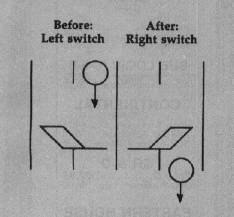
The trigger is weak, and always allows balls to pass. But the platform is strong enough to hold a single ball. So the platform either holds a ball—it's full—or it does not and is empty. When a ball sits on a platform, the switch is said to be loaded, or full.
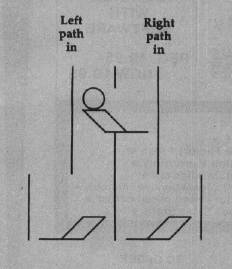
Figure 2 shows a full switch over two empty switches. The platform holds a ball and leans to the left. The trigger extends to the right. Note that the switch on top has two pathways leading in, the left path and the right, and that the right path leading out is the left path into one of the switches below. The left path of the top switch leads into the right path of the other, the switch below and to the left. If you drop a ball down the righthand path, it hits the trigger and flips that switch to the right. Then it continues down, hits the lefthand trigger below and flips that switch as well.
In the meantime, the ball on the platform is set in motion (when the switch is flipped) and then hits the trigger. The top switch is reset to point to the left. The second ball then drops a level to the platform below, where it stops. The playing field is composed of five levels, with four switches in the first level and eight in the bottom level. At the beginning of the game, there are no balls on the field—all platforms are empty—and the position of each switch is chosen randomly.
Moving Down The Path
Players alternate dropping balls into one of eight entry points. These balls (and others) may or may not make it all the way through the switchbox, to one of the 16 exit paths. Balls fall straight down (with one exception), so a ball's movement is always predictable. When it hits an empty switch, one of two things can happen. If it lands on the empty platform, it stops dead in its tracks. But if it lands on a trigger, it falls through to the next level below.
Moving balls always make it through loaded switches. Triggers allow balls to continue, and move the switch to the other position. If it's loaded, the dead ball on the platform is put into motion and it hits the trigger that just moved over. This makes the switch go back to its original position, but with an empty platform. So when a ball hits the trigger of a loaded switch, its motion continues unabated. The switch moves, the ball on the platform begins to fall and it hits the newly placed trigger. The newly emptied switch moves back again, and the two balls drop to the next level.
There's one more possibility: a ball dropping onto a platform that already holds a ball. A platform can't hold any more than one ball, so when this happens one of the balls slides over to the trigger. So the ball does not move straight down—it slides over to the next pathway. This is the exception to the rule that balls drop in a straight line. Of course, when the ball hits the trigger, the switch changes position, causing the other ball to drop and hit the trigger.
The Chain Reaction
At the game's start, all platforms are empty, so four of eight entry paths are blocked. Remember that your turn ends when a ball hits an empty platform and stops. As the switches fill up, the chances increase that a ball will descend through several levels. The goal is to score points by getting balls to pass all the way through the maze of the switchbox. The best way to collect a lot of points is to cause a chain reaction.
A ball that hits a loaded switch from either side continues on its way. And the previously inert ball on the platform starts moving. One enters, two exit. If both of those balls encounter full platforms, four drop from the switches. The pathways are staggered, so the effects can spread outward, with more and more balls cascading toward the bottom.
Rather than taking an easy point or two, it's often worthwhile to build up layers of loaded switches. Watch out for leaving yourself vulnerable, though. Because players take turns, you'll want to leave positions where your opponent's move gives you a chance to create a chain reaction. The best strategy is to play defensively. Look ahead a move or two, and watch for an opening that allows you to score several points at once.
Four Quarters
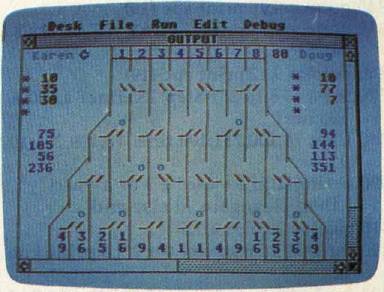
A game of Switchbox always lasts four rounds. In the first (equality), each exit counts for two points. Your goal is to score ten points. The second quarter has more points available, as well as a higher goal. If you look at the exits, you'll see that the further away from the middle, the higher the point value. The numbers increase in a "Fibonacci" sequence: 1, 2, 3, 5, 8, and so on. Each number is the sum of the previous two (1 + 2 is 3, 2 + 3 is 5, 3 + 5 is 8, etc.). The target score in round two is 40.
Writing An Amiga Game
Philip I. Nelson, Assistant Editor
Writing "Switchbox," our first game translation for the Amiga, posed a number of interesting programming challenges and proved to be an excellent way to become familiar with Microsoft's Amiga BASIC. To show off just a few of the machine's special features, the Amiga version of Switchbox includes fast graphics, stereo sound effects, and voice synthesis.
The first thing you'll notice about the Amiga program is that it has no line numbers. Instead, meaningful labels like Setup:, Putball: and Nextround: mark subroutines and major program divisions. To improve the program's readability, meaningful variable names like Points, Round, Column and Row have also been used in a number of cases. If you're familiar with Commodore 128 or 64 BASIC, you may find it interesting to compare one of those versions with this one. Though some routines have been repositioned, and the graphics techniques are very different, this program follows essentially the same logic as the original.
Window Management
Before creating any graphics, you must make some basic decisions about the screen itself. The four PALETTE statements in the Setup: routine specify colors for the new screen. If these are omitted, the Amiga uses the same colors that appear when you activate BASIC. The following statement creates a window for the game screen:
WINDOW 2, "Switchbox",,0
The first parameter (2), creates a new output window specifically for this program's output. If you don't create a new window, all output goes to window 1, which is normally titled with the name of the current program. You could follow this statement with WINDOW OUTPUT 2, to direct all output to window 2. But that's done automatically when you open the window. When you close the window with WINDOW CLOSE 2 (see the Gohome: routine), output reverts to window 1 again.
The second parameter in a WINDOW statement is a string that contains the window's title.
The third WINDOW parameter, which is optional, specifies the window's size. Windows can be smaller than the actual screen. In this case, we needed a full-screen window, so we simply left out this parameter. The window automatically expands to the full size of the screen.
The fourth WINDOW parameter also is optional. It specifies the window's type—that is, the window's characteristics. Though it's often desirable to resize a window and move it around the screen, those features aren't needed for a game. To disable them, we specify a window type of 0. This creates a window that can't be resized or moved around with the Title Bar; can't be moved from the front to back of other windows with a Back Gadget; and can't be closed with a Close Gadget. However, Amiga BASIC's normal menus are all left active, so the player can still stop the program by choosing the Stop option from the Run menu.
In any program that includes speech, it's a good idea to include a short SAY statement at the very beginning of the program before opening any custom windows. When the Amiga encounters the first SAY statement, it tries to load the narrator device program from disk (the Amiga's speech synthesizer is implemented in software, not hardware). If it can't find the narrator on the currently mounted disk, it displays a requester box prompting you to insert the correct volume. If this happens after you've opened a new window, the requester box may appear on the original output window, which is now invisible. This can be very confusing to a new user, who may think that the system has crashed, when infact it's just waiting for a response.
Hi-Res Graphics
The 128 version of Switchbox draws the playfield and animates the moving figures with traditional Commodore methods—PRINTing graphic characters on the text screen or POKEing them directly into screen memory. Since the 128's text screen is divided into 25 rows of 40 characters, it's a fairly simple matter to keep everything neatly aligned. Not so on the Amiga, which in this case presents a high-resolution graphics screen 640 pixels wide and 200 pixels high. While it's possible to put characters on this screen with LOCATE and PRINT, the Amiga's character set includes no graphics characters. So 128-style graphic techniques are useless unless you want a game screen that consists of X's, O's, and slash characters. Instead, everything must be drawn with hi-res commands like LINE, PUT, CIRCLE, and PAINT (see the routine labeled Setup:).
Repeated shapes are stored in an array with GET and then placed in several locations with PUT commands. PUT is used extensively in this game to create the moving balls, switches, and arrows, as well as to draw parts of the switchbox itself. Though it's one of Amiga BASIC's slower graphics commands, PUT is more than adequate for a game of this type and much faster than the same commands in other BASICs. Thanks to the Amiga's fast 68000 microprocessor and custom graphics chips, this version runs much faster than the original, even though no particular attempt was made to optimize the program's speed.
PUT has several different modes which determine what happens when you PUT a shape into an area that already contains graphics data. The Amiga uses XOR (exclusive or) mode for PUT unless you specify otherwise. This mode is particularly useful for animation, since if you PUT the same shape twice into the same location with XOR, it erases itself without disturbing whatever was there before. Here's a typical use of PUT with XOR:
PUT (140, 5),Larrow : PUT (440, 5),Rarrow
These statements, found in the Taketurn: routine, are performed on each new turn to make the player's arrows flip back and forth. If you're not familiar with XOR mode, this code looks confusing, since it PUTs both arrows on the screen no matter whose turn it is. But we began the game by PUTting the left arrow in place when the screen was drawn. Thus, when the first turn is taken, the left arrow erases itself, and the right one appears. On the second turn the right arrow erases itself, and the left one appears, and so on. This shortcut eliminates the need for a separate routine to keep track of the arrows' display status.
Speech And Stereo Sound
Speech and stereo sound effects may seem flashy, but the Amiga makes them quite easy to program. Amiga BASIC's SAY TRANSLATE$ command translates any English text into quite understandable speech. And it's easy to flip sound effects from one stereo output to another by changing the final value in a SOUND statement.
If your monitor has only one speaker, you'll probably want to defeat the stereo feature so that both players' sound effects can be heard through one output. This is easy to do. The Amiga has four sound channels, numbered 0–3: Channels 0 and 3 always go to the left speaker, and channels 1 and 2 go to the right. There are five SOUND statements in the program (in the routines labeled Switch:, Putball: and Score:). In each SOUND statement, the final parameter controls whether the sound goes to the left or right output. For instance, the Score: routine contains these statements:
SOUND j, 1, 64, Who
SOUND j + 400, 1, 64, 3-Who
The program variable Who equals 0 when it's the left player's turn, and 1 on the right player's turn. Thus, when Who = 0, the expressions Who and 3—Who create sound in channels 0 and 3, which both go to the left speaker. When Who = 1, they output through channels 1 and 2, which go to the right speaker. To defeat the stero effect in these statements, replace Who and 3—Who with the values 0 and 3, or 1 and 2, depending on which output you're using. Similar changes to the other SOUND statements will confine them to one speaker as well.
If you don't specify otherwise, SAY commands cause the program to halt until the computer finishes saying the current phrase. But at certain points in Switchbox, the computer talks "in the background" while it performs other program tasks. At the beginning, for example, you'll see it draw several graphics shapes while it pronounces the welcoming phrase. This effect is also quite simple to achieve.
Look at the first set of DATA statements in the Setup: routine: These values are stored in an integer array (Voice%) for later use in SAY commands. Each element of the voice array controls a different aspect of the Amiga's speech, such as pitch, speaking rate, and so on. The next-to-last element in the array controls whether the program continues while SAY commands are in progress. Setting this value to 1 selects synchronous speech which proceeds in the background. Replacing the 1 with a 0 selects asynchronous speech mode, which halts program execution until the current phrase is finished.
In round three the numbers are a bit lower. They increase arithmetically (1, 2, 3, 4, up to 8 in the corners). A goal of 20 points brings you to round four, where you can score big. Here the numbers are squares: 1, 4, 9, 16, 25, all the way to 64 at the edges. In rounds two through four, it's sometimes prudent to leave a middle path open for your opponent to score a few points, in order to gather a high score on the big numbers to the left and right.
Each round lasts until one player has reached the goal. At that point the other player has one last turn before the round ends. It's possible to win the round on this last-chance play; watch out for barely topping the goal and leaving a chain reaction open for the other player. An arrow points to the scoreboard of the player whose turn it is. On the other side of the screen, you'll see a number where the arrow should be. That's the goal for the current round (the Amiga version displays the goal on both sides of the screen, below the scoreboards).
Bonus points are awarded at the conclusion of each round. Four numbers appear below the scorecards. The first is simply the total so far. The second is the total plus a bonus of the goal for the round if the player's points are equal to or greater than the goal. For example if the goal is 20 and you get 18, there's no bonus. If you score 22, the bonus is the goal for that round (20) and you'd have 42 points. The third number under the scoreboard is the difference between scores for the rounds. If you win by two points, two is added to your score (and two is subtracted from the other player). The final number is the grand total of the first three scores and bonuses. Rounds one and three are fairly low-scoring with low goals. You may want to seed the field with extra balls during these quarters, so you can collect more points in the second and fourth quarters.
Variations
Although the goal of the game is to score the most points, there's no reason you couldn't agree to play for low score. In a "lowball" game, you would try to avoid scoring points. You wouldn't necessarily play backwards, you would have to adjust the strategy of where to place the balls. Fill up the board as much as possible and leave your opponent in a situation where he or she is forced to score points.
The DATA statements at the beginning of the program (the Setup: routine in the Amiga version) determine the goal for each round and the point values for the exit paths. You can prolong the game by doubling the goals; this also dilutes the value of a big score at the beginning of a round, preventing one player from winning on the first or second turn. An interesting variation is to assign negative values to some slots. If some paths score negative points, you are forced to think harder about where the balls will drop.
In addition to the numbered keys (1–8), the plus (+) and minus (-) keys are active. Pressing plus drops a ball at random down one of the eight entry paths. Pressing minus allows you to pass your turn to your opponent.
Once you've mastered the regular game, you can add some new rules. Each player gets three passes per half, similar to the three timeouts in a football game. If you don't like the looks of the board, press the minus key to use one of your passes. After one player has skipped a turn, the other player must play (this prevents the possibility of six passes in a row). It's also a good idea to make a rule that a player can't pass on two consecutive turns. You can also give each player two random moves to be played for the opponent. In other words, after making a move, you could inform your opponent that you're going to give him one of your random moves and you would press the plus key.
Here's one more change you could make: Instead of alternating turns, allow a player to continue after scoring. When a player drops a ball and scores some points, the other player would have to pass (by pressing the minus key). If the first player scores again, the opponent passes again, and so on until no more points are scored.
Playing Solitaire
To drop a ball, press a numbered key (1–8). If you're using a 128, ST or Amiga, the numeric keypad is convenient for choosing a move. By using the pass and random turn options, you can play against the computer. Here are the rules for solitaire play:
1. The computer always scores first. At the beginning of every round, the computer plays randomly until at least one point is acquired. Press the plus key for the computer's turn. You must continue passing (skip your turn with the minus key) until the computer puts points on the board.
2. After the first score by the computer, you can begin to play. When the computer has a turn, press the plus key for a random move.
3. Whenever you make points, you must pass again until the computer scores. When the computer gets more points, you can begin to play again. This rule means you should hold back on the easy scores of a few points; wait until there's an avalanche available.
4. If you're the first to reach the goal, the computer gets a last chance. Don't make this move randomly; figure out the best opportunity for scoring and play that move for the last-chance turn.
In the interest of keeping these programs to a manageable length, no attempt has been made to provide an "intelligent" computer opponent. Once you become familiar with the game, you might find it an interesting project to try adding some routines that give the computer a rational basis for picking one move over another.
For instructions on entering these listings, please refer to "The New Automatic Proof-reader for Commodore" and "COMPUTE!'s Guide to Typing In Programs" in this issue of COMPUTE!.