Screen Machine II: A Sketchpad With Pull-Down Menus For PC and PCjr
Part 1
Charles Brannon, Program Editor
Pull-down menus in IBM BASIC? It's no fantasy--presented here is a full-featured drawing program that illustrates the convenience and flexibility of a menu-driven user interface. Next month, in Part 2, well show how you can add these menu routines to your own programs. This month's drawing program, "Screen Machine II," runs on any IBM PC or compatible with a color/graphics adapter and BASICA, or a PCjr with Cartridge BASIC. Joystick or touch tablet optional.
Software features first popularized by the Apple Macintosh are finding wider acceptance throughout the computer industry. Pull-down menus and point-and-click selections have become a way of life among owners of the Macintosh, Commodore Amiga, and Atari ST. With the advent of operating system veneers such as Microsoft Window, GEM, and Topview for IBM machines, even more people are getting excited about mousing around on their computer.
Without the software tools to implement these techniques, though, programmers have to laboriously write all the routines needed for pull-down menus, icon selection, and windowing, taking time away from programming the application itself. Tools such as Windows and GEM do the trick for advanced programmers, but BASIC programmers have to reinvent the wheel if they want to add these useful features.
You might think BASIC is not fast enough to emulate the features of operating systems written in turbocharged 8088 or 68000 machine language, but it's almost always possible to tease just a little more power out of BASIC. Although a complete mouse-based user interface is a bit much to expect, I've developed a set of generalized subroutines that any BASIC programmer can use to support fancy pulldown menus in Microsoft Advanced BASIC (BASICA) or PCjr Cartridge BASIC. The routines require bit-mapped graphics, so you need a color/graphics adapter if you're using a PC or compatible. (The PCJr has a built-in color/graphics adapter.) By changing only a few small subroutines, the package can be adapted for other graphics cards and pointing devices.
Rather than illustrate these routines with a plain-vanilla demo program, I though I'd provide a more convincing illustration: a fullfeatured drawing sketchpad. "Screen Machine II" is a descendant of the original "Screen Machine," a drawing program published about two years ago in COMPUTE!'s PC & PCjr Magazine.
The original Screen Machine used a traditional command-driven user interface. Individual keystrokes were required to activate special commands. For example, to draw a line, you first pressed the space bar to "nail down" one endpoint, marking the spot with a cross. You then moved the cursor to a new position and then pressed L to connect the marked spot with the new cursor position. A line was drawn to connect the points. To draw a circle, you first set your mark to represent the center of the circle, then moved the cursor to a point along the desired circumference. You had to visualize the circle in your mind, because it wasn't actually drawn until you pressed C.
Although Screen Machine had plenty of features (and in the hands of a talented artist was capable of making beautiful pictures), the stumbling block was the indirect method of using the program. You had to memorize every command or frequently refer to a list of commands. This approach works well once you've mastered a program, but it can alienate the newcomer or occasional user. In a drawing program, especially, it's crucial not to break the flow of ideas between the artist and the canvas.
Screen Machine II
Thanks to pull-down menus, you don't have to memorize a lot of commands to have fun with Screen Machine II. All of the functions are available for selection whenever you need them.
The listing following this article is the minimum required to publish Screen Machine II as a ready-to-run program. Screen Machine II needs almost all of BASIC's 64K memory space, so the original program listing with full comments didn't leave enough memory to run. Next month, however, we'll present a fully REMarked version that shows exactly how the program works, along with a tutorial on using the menu routines in your own programs.
When you first run Screen Machine II, there is a short delay, then the drawing screen appears. The top line of the screen shows which menus are available: Picture, Tools, and Preferences. Your color palette appears at the bottom of the screen, initially showing boxes filled with cyan, magenta, and white paint.
A pointer cursor appears near the middle of the screen. You use this pointer to select items from menus, dip into the paint to change your drawing color, or to draw figures. The pointer can be controlled with a joystick, a touch tablet such as the KoalaPad, or the cursor keys (make sure Num Lock is in the correct position for cursor control). When using the joystick, you may want to unlock it for free-floating movement.
If you don't have a joystick or touch tablet, you can disable the joystick routine in Screen Machine II to prevent interference with the cursor controls. Change line 340 from FROZEN =0 to FROZEN=-1.
To use a light pen or mouse controller, you need to modify the subroutine at line 20000, which we'll discuss next month. The use of menus, though, is not tied to the actual pointing device used, such as a mouse.
Calibrate Your Joystick
The pointer responds most naturally with a touch tablet, so the program is initially set up to use a Koalapad. The KoalaPad simulates the joystick, but has a greater range, so if you use a joystick with Screen Machine II you'll only be able to position the pointer within the upper-left quadrant of the screen. You may also have problems using a different touch tablet, since not all tablets return the same values. When you first run the program, then, you need to calibrate your joystick or tablet. The calibration option is available under the Preferences menu, but we haven't discussed how to use the menus yet. And until you calibrate your joystick, you probably can't access the menu item that is used to select the calibrate option. Fortunately, you can also press the J key--a keyboard shortcut--to activate the calibration feature.
After you press J, you're first asked to move the joystick to the upper-left corner, then press the button. (Screen Machine II only uses the top button on the joystick, or the left button of the touch tablet.) This first action sets the origin of your pointing device. If you're using a touch tablet, it is vital that at this point you merely lift the pen off the tablet surface and press the button. This lets Screen Machine II know when you are pressing down on the tablet, and when you lift the pen off the tablet. The value for "pen up" is the same as the coordinates for the upper-left position of the tablet, so it's best just to press the button without touching the tablet surface, in order to make sure that Calibrate sees the right value. With a joystick, move the stick to the northwest corner before you press the button.
Next, you're asked to move the joystick to the lower-right corner, then press the button. With the touch tablet, move the stylus or your fingertip to the southeast corner of the tablet, and while pressing firmly with the stylus, click the button. It may be best to use a position slightly above and to the left of the lower-right position, since if you put the pen off the tablet surface, no value is generated.
In general, you must press very firmly against the tablet surface, almost to the point of scoring the tablet, in order to avoid false readings caused by intermittent stylus contact. These false readings aren't caused by Screen Machine II, but by the tablet. A special routine could be used to compute the average position of the touch tablet within the last second, then reject values far out of range, but this would slow down the program to a crawl. As it turns out, this jitter is rarely a problem, since the BASIC program samples the touch-tablet too slowly to see many of the transient glitches.
After calibration, you should be able to move the pointer freely as you slide your finger or stylus across the tablet surface, or by moving the joystick. Control may seem clumsy at first, especially with the joystick, but improves considerably with practice. If you get no response at all, check the joystick or tablet cabling, and press J to calibrate again.
Keyboard Control
If you don't have a joystick or touch tablet, you can use the keyboard cursor controls to move the pointer arrow. The keyboard isn't the fastest way to scurry across the screen, but it is exact. The joystick, however, overrides keyboard control (although you can use a properly calibrated touch tablet along with the keyboard), so you need to press the K key right away to freeze the joystick and enable keyboard control. The K key alternately freezes and reenables the joystick, and is a keyboard shortcut for the Keyboard command on the Preferences menu.
There are two ways to use the keyboard controls. The pointer can move one pixel at a time for fine movements, but it could take all day to inch your way across the screen. If you press a cursor key rapidly or hold it down as it repeats, the cursor accelerates. It first moves one pixel at a time, then two, then three, until it's moving at the top speed of 12 pixels per keypress. If you stop pressing the cursor key, press another key, or release the key for a moment, the acceleration reverts to one pixel per keypress. If you want fine control, press and release the cursor key slowly, allowing time between each keystroke to prevent acceleration.
Keyboard Shortcuts
| Key | Menu |
|---|---|
| U | Picture/Undo |
| ^N | Picture/New |
| O | Picture/Open |
| S | Picture/Save |
| ^Q | Picture/Quit |
| D | Tools/Draw |
| L | Tools/Line |
| R | Tools/Rectangle |
| C | Tools/Circle |
| A | Tools/Airbrush |
| P | Tools/Paint |
| B | Preferences/Bkgd color |
| K | Preferences/Keyboard |
| J | Preferences/Calibrate |
Unfortunately, the program is not fast enough to keep up with the full repeat rate of the cursor keys, so even after you release the key, the program is acting on up to 15 pending keystrokes. It's best to control the number of keystrokes yourself by just pressing the same key rapidly rather than holding it down to repeat. If you do hold down the key, release it before the cursor reaches its destination. It will keep going for a short distance, then stop. With practice, you can time things right so that the cursor ends up exactly where you anticipated.
Using The Menus
To access a menu, just move the arrow cursor so that it points at one of the menu titles: Picture, Toots, or Preferences. The tip of the arrow is the active point, so make sure it is within the menu bar and touching the desired menu title. Now press and release the button. (The keyboard equivalent for the button is the INS key, conveniently located beneath your thumb when you use the cursor keypad.) The menu title reverses color, and the menu drops down.
Note that this differs from the way menus are selected on other machines. On the Atari ST, menus drop down automatically if you merely point at a menu title. On the Macintosh and Amiga, you point at the menu and click to pull it down. You have to continue to hold down the button to keep the menu displayed, and move the pointer within the menu to select an item. To actually make the choice on a Mac or Amiga, you release the mouse button.
In contrast, with Screen Machine II you press and release the button to drop down the menu, move the pointer to the item you want, then press the button again to select the item and remove the menu. This technique is most appropriate when you're using pointing devices such as a joystick or cursor keys, because it's difficult to hold down a button while moving the pointer.
For example, if you point to Picture, then click the button, it drops down a list containing the choices Undo, New, Open, Save, View, and Quit (see figure 3). To the right of each selection are the keyboard equivalents: U, ^N, O, S, V, and ^Q. Instead of pulling down a menu and selecting a choice, you can just press the appropriate keyboard shortcut. The ^ character indicates that you should press the CTRL key along with the following character: ^N means that you should press N while holding down CTRL.
Using the more cumbersome CTRL-N and CTRL-Q sequences, instead of merely N or Q, helps prevent you from casually erasing the screen or exiting the program. Since these are destructive options, the CTRL key is used to guard against accidental keypresses. Use the accompanying table as a quick reference to keyboard shortcuts.
Selecting A Menu Item
To select a menu item, point the cursor at the desired item. As you slide the cursor up or down within a menu, the item you point to is highlighted in reverse video. You then press and release the button to select the highlighted item. To cancel a menu selection, either move the pointer outside of the menu, or move it to point at the menu title so that no other items are selected when you press the button. If you move the cursor to the left or righi of the menu border, the menu is automatically canceled. You'll hear an "uh-oh" sound effect to confirm that you've canceled the menu.
When you select an item, on the other hand, it flashes twice, emitting little tweeting sounds to let you know that you've chosen a valid option. (fly the way, if you don't want any sound effects, change line 320 to read SNDEX=0.) After you select a menu item, some action is usually performed. If you select New from the Picture menu, for instance, the screen clears. Use Quit to exit the program. Following is a quick tour of the menus--we'll discuss the meaning of each item later on.
Some menu items select a setting for the program. The Tools menu contains the choices Draw, Line, Rectangle, Circle, Airbrush, and Paint. This menu is used to select the current drawing tool. Only one tool is active at anytime. When you click the button while pointing at the drawing surface, rather than at the menu bar or within the palette, the current tool is activated, and you start the drawing action. In Draw mode, you can draw connected lines as you move the pointer about. In Line mode, though, you stretch a "rubber-band" line across the screen, emanating from the point you first clicked on. When you press the button a second time, the rubber-band line disappears, and the desired line is stamped down. In Paint mode, each click initiates a flood-fill, used to color enclosed figures.
The Tools menu indicates the current tool by placing a check mark next to it. A check mark can show which of several items is currently selected. If you select another drawing tool, the check mark moves to the new tool. In the Tools menu, a selection mutually excludes all other selections.
On the other hand, a check mark can also be used to show the status of several on/off settings. The Preferences menu lets you select 320 x 200, 640 x 200, and 320 x 200 PCjr drawing modes; two color palettes for the 320 x 200 graphics mode: cyn/mag/wht and red/grn/yel; as well as Bkgd color (background color), Keyboard mode, and Calibrate. More than one item can be checked in the Preferences menu. You obviously can't draw both in both 320 x 200 mode and 640 x 200 mode at the same time, so only one of the three graphics modes is checked. However, while in 320 x 200 mode, you can choose either of the two color palettes, so both 320 x 200 would be checked as well as either cyn/ mag/wht or red/grn/yel.
Ghosted Items
If you select 640 x 200 mode, some menu items under Preferences are no longer appropriate. It isn't possible to switch color palettes or change the background color while in 640 x 200 mode, so the inappropriate menu selections need to be disabled. Also, the 320 x 200 PCjr mode, which permits 16 colors, only works with the PCjr, so this selection should be made inaccessible when running on a PC.
Figure 1: Ghosted Items
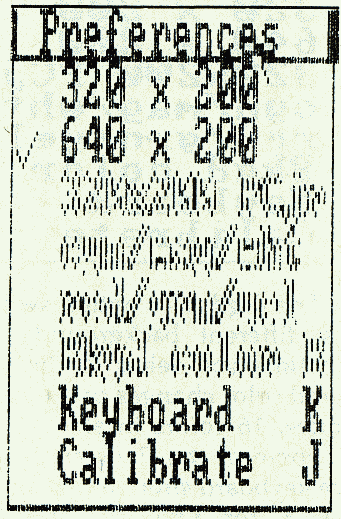
In 640 x 200 mode, the menu items cyn/mag/wht, red/grn/yel. and Bkgd color are disabled, and the text of the menu items is distorted to show that you can't access them (see Figure 1). This distortion dims and garbles the text--such a menu item is ghosted out, as if the text was a "ghost" of the original text. The 320 x 200 PCjr option is ghosted out when running on the PC. A ghosted menu item can't be selected; you can't even highlight it by pointing to it.
A ghosted item immediately tells you that the menu item is inappropriate for the current environment. If you wonder which commands work in which modes, ghosting makes it obvious. Along with ghosting and the check mark, a menu can be documentation, online help, and a status report, as well as the device used to change these settings or activate commands.
Drawing Tools
The pointer arrow is the pass key to all the functions of Screen Machine II. You use it to select a menu item, sketch on the drawing surface, or choose a new drawing color. You already know how to use the menus. To change drawing colors, just point within the box containing the desired color and click the button. A border encloses the current drawing color so you can tell at a glance which color is being used. In 640 x 200 mode, you can only switch between black and white, of course. On the PCjr, you can select the 16-color drawing mode (see below).
Figure 2: The Tools Menu
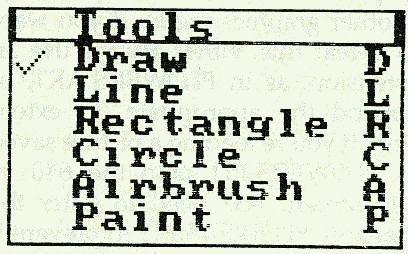
Your default drawing tool is Draw, as you can confirm by looking within the Tools menu. With all the tools, you start the drawing aclion by clicking the button while pointing at the drawing area. The drawing area is bordered by the menu bar, the color palette, and is enclosed within a rectangle. You can't draw anywhere outside of this border.
In Draw mode, the first button click initiates the mode. The cursor disappears (to speed up drawing), and a point is plotted at the cursor position. You can now move around on the screen, leaving a trail behind, as you sketch freehand with the joystick, tablet, or cursor keys. The cursor keys are especially useful for touch-up work or small, complex figures. Again, you can use the Keyboard option from Preferences if you need to disable the joystick. If you press the button (or merely lift the stylus from the tablet surface), you exit drawing mode, and you can once again freely move the cursor without drawing on your screen canvas.
In Line, Rectangle, and Circle modes, the first click sets the first coordinate for the figure. You then move the pointer about to change the size or position of the figure, then press the button again to finalize the figure. While previewing the figure, the line, circle, or rectangle is repeatedly drawn and erased to allow movement. As you move the figure across the drawing surface, it may erase parts of the picture as it passes over the screen. Don't be concerned--this is just a side effect of the animation process. When you press the button to choose the desired figure, the previous screen is redrawn, restoring any erased parts, and then the desired figure is overlaid on top of the picture. If you make a mistake, you can use the Undo option from the Picture menu (or simply press U), to restore the previous screen.
In Line mode, the first click sets one endpoint of the line. You move the other endpoint around with your pointing device. You see how the line will look as you move it around the screen. In Rectangle mode, the first click sets one corner of the rectangle. As you move the pointer, you are dragging around the diagonally opposite corner of the rectangle. In Circle mode, the first click sets the center of the circle. You move the pointer around to enlarge or contract the radius of the circle. The second click stamps down the figure. (Remember, you can always Undo the most recent drawing action.)
The Airbrush tool is handy for shading or blending colors. It randomly sprays out pixels within an 5 x 5 zone centered around the pointing arrow. The longer you stay in one place, the more paint is sprayed down. If you move around while spraying, you get a series of random dots. This approximates the behavior of a real airbrush. Again, the first click starts airbrush mode, and a second click exits airbrush mode, restoring floating cursor movement. As with Draw mode, lifting the stylus from the tablet surface implies you want to stop the airbrush and go back to moving the cursor.
Use the Paint tool carefully. It's used to fill in an enclosed area of the screen. For example, you could draw a rectangle first, then fill it in. The paint floods out of the cursor position, and doesn't stop until it touches areas of the same color. You can only fill an area bounded by the same color as the current drawing color. If you attempt to fill with a different color, the paint overflows the container, possibly filling the whole screen. However, if you remember to press U before you start another drawing action, no harm is done.
You can use the keyboard shortcuts D for Draw, L for Line; R for Rectangle, C for Circle, A for Airbrush, and P for Paint.
Figure 3: The Picture Menu
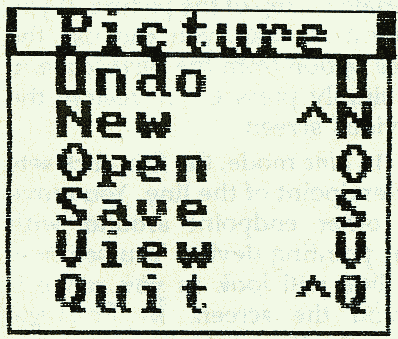
The Picture Menu
The Picture menu affects the overall screen canvas. Use Undo to restore the previous screen. The screen is saved in a buffer before any drawing command changes the screen. Undo copies this buffer back onto the screen, restoring the previous screen and erasing the most recent change. Of course, Undo can only undo the most recent action, and you can't go back to the way the screen was before you performed the Undo--you can't undo an Undo.
The New option simply erases the screen. Be careful--it doesn't ask "Are you sure?" first.
Use Quit to exit the program. You could, of course, simply turn off the machine, but Quit is somewhat more elegant. Once you're back in BASIC, you can type SYSTEM to exit to DOS.
The Save command stores your picture on disk. Open restores a previously saved screen. After you select Open or Save, a box pops up in the center of the screen, prompting you to enter a filename. You can enter any legal PC-DOS filename, induding a path prefix, such as A: or B:. This is the name that your picture is stored under. After you Save a picture, you can use Open to read this picture back onto the screen.
If you don't use an extender, as in FLOWERS.ART, an extender is added for you. The extender is made of the characters PI (for picture) and the number of the graphics mode used: 1 for SCREEN 1, 320 x 200; 2 for SCREEN 2, 640 x 200, and 5 for the PCjr 16-color 320 x 200 mode, SCREEN 5.
So a picture saved while in 640 x 200 mode would have the characters .PI2 appended to the filename. This extender is added for both Open and Save. If you attempt to Open the picture FLOWERS while in 320 x 200 mode, it actually searches for FLOWERS.PI1. However, if you're in 640 X 200 mode, it searches for FLOWERS.PI2. This prevents you from loading a picture saved in one graphics mode onto the screen of another graphics mode. If you want to defeat this, either always use an extension, as in FLOWERS.ART, or append the appropriate .PI extension. If you're loading a picture saved as FLOWERS.PI1 onto the 640 x 200 screen, you need to enter the filename FLOWERS.PI1 to prevent it from searching for FLOWERS.PI2.
if a disk error occurs, another box pops up showing you the DOS error code, and it prompts you to press either R for Retry or C for Cancel. If the error is something you can immediately correct, such as inserting a disk, you can press R to retry the disk operation. Otherwise press C to cancel the operation, then figure out what you did wrong before again selecting Open or Save.
Next month, we'll show you how to use the BLOAD command to load one of these pictures from within your own programs. If you can't wait, examine the Open and Save routines at lines 2100 and 2170.
The keyboard shortcuts for the Picture menu are ^N for New, O for Open, S for Save, and ^Q for Quit (remember that ^ means to press CTRL as you press the indicated key).
Choosing Your Preferences
The Preferences menu lets you select various special options. The first three entries: 320 x 200, 640 x 200, and 320 x 200 PCjr, let you pick which graphics mode to use. (You should choose your mode before you begin drawing; the drawing area is erased when you change modes, so any drawing will be lost.) The 320 x 200 mode gives you four colors to work with. In this mode, you can choose either of two color palettes: cyn/mag/wht (cyan/ magenta/white), or red/grn/yel (red/green/yellow). The latter options are ghosted in all other modes.
The 640 x 200 mode gives you more horizontal density for fine detail, but you can only choose between black and white. On the PCjr only, you can select the 320 x 200 PCjr mode and get 16 colors for vivid, realistic (or surrealistic) paintings.
Figure 4: The Preferences Menu
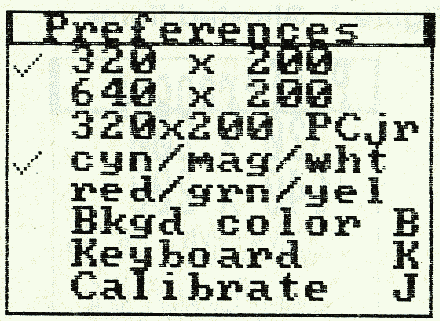
The Bkgd color option switches to a different background color. Each time you select it, the background color changes to the next in a series, 16 colors in all.
Some of the Preferences items have keyboard shortcuts: B for Bkgd color, K for Keyboard, and J for Calibrate.
BASIC Shortcomings
This program was an experiment of sorts, an attempt to discover if techniques such as pull-down menus can be achieved in BASIC. I knew from the beginning that BASIC's relatively slow speed (as compared to machine language or compiled languages) would be the limiting factor. In particular, using a 30,000-byte array for an Undo buffer causes a short delay the first time any routine is activated. The first time you try to move the cursor, select a drawing tool, change colors, select a menu, etc., there is short delay as the huge array is shifted downward in memory to make room for new variables as they are encountered. This problem could be eliminated by referencing every variable in the program before the array is dimensioned, but this is really more trouble than it's worth.
The innermost, core routine in this program is the subroutine at line 20000, used to check for the "mouse" position. It adapts to the keyboard, joystick, and touch tablet checks for keyboard shortcuts, scales the values to the current screen resolution, and keeps these coordinates in bounds. All this checking in such a commonly called routine is bound to slow things down. If you are using only one pointing device or one graphics mode, you may want to consider streamlining this routine to speed things up.