MASTERING
THE ATARI VCS GAMES
By David H. Ahl
and Martha Koppin
|
||
|
||
|
||
|
||
|

By Martha Koppin
Dodge 'Em by Atari
Game Description
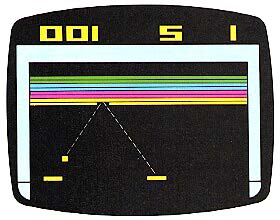
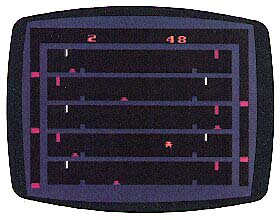
The object of Dodge 'Em is to clear a concentric track of all the dots. This does not seem overly difficult, except that there is another car on the track driven by a juvenile delinquent intent on forcing you into a game of "chicken." He is a master at the game in that he never does chicken out; he smashes into your car every time. In order to stay alive, you must change lanes to avoid him.
After you clear the track of all dots twice, two computer controlled cars enter the track, making life more difficult. These cars move more slowly than the single car and seem to be less eager to smash up.
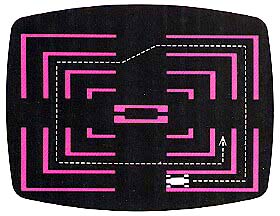
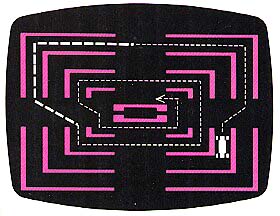
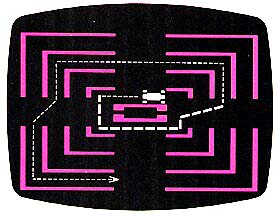
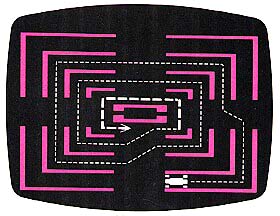
Each player is allowed three heats per game. The heat is ended when the cars crash or when the player runs over five sets of dots, whichever is first (usually the crash!). Because of the limited number of sets allowed per game, the maximum number of points possible per game is 1080. Fortunately, the delinquent has very little imagination in the "b" difficulty position (which is the easier) and always makes the same moves in the same situation. Thus, a pattern can be followed which will afford success almost every time. The movement pattern must be coupled with the appropriate speed variation, as you must be in the right place at the right time for the pattern to work. Figure 1 is a sketch of the track and the first part of the Pattern A (which should be used for tracks with only one computer car with the difficulty switch on "b") Where the dots are close together, the accelerator is depressed. Where the dots are spaced farther apart, the car is coasting. Again, it is important to press and release the accelerator at exactly the right point in the track to avoid being smashed. Following patterns 1 through 5 will generally carry you past the first three boards. From there on, you are on your own.Controllers
Your car automatically moves forward around the track. To change lanes, move your controller up, down, left or right. Remember that you are not in the car, steering left when you want to make a left turn, but rather you are above the track, moving you car relative to the track. When you are on the upper part of the track you move your controller up to move to the outside lane, rather than moving it left to move left into the lane. This takes some getting used to but soon becomes automatic.
The accelerator of your car is the red button on the joystick. The most important feature of the accelerator is that when it is depressed the car can change only one lane in either direction. If the car is moving at a more leisurely pace it can (and will, often when you don't want it too) switch two lanes. One of the primary functions of the accelerator, therefore, is to give you more control of the car.
Scoring
There are 80 dots on the track, each of which is worth one point as your car runs over it. Each time you clear the track of all dots, a new set appears and you are awarded 8 bonus points.
Variations
Game 1: One player against the computer car.
Game 2: Two players alternating turns against the computer car.
Game 3: Two players, alternating control of the point-scoring car and the crash car. There is no computer controlled car.
Games 1 and 2 have two difficulty levels: when the difficulty switch is set on "b" the computer controlled car always starts in the same position, and when the switch is on "a" the computer car starts in a different position each time.
By Martha Koppin
Super Breakout by Atari
Game Description
The object of Super Breakout is to demolish rows of colored (assuming, of course, that you have a color TV) bricks. Each time you hit a brick with the ball, you score the appropriate number of points and the brick disappears.
Hitting the wall in the same place each time results in breaking a path through it. Once the ball breaks through the wall, it rebounds against the top of the wall and the top of the screen knocking out bricks until it breaks back through to the bottom of the wall. Obviously, this scores a good number of points.
It seems to be easier to concentrate on breaking a path through the extreme right- or left-hand corners of the wall. Shooting for the middle usually results in clearing the entire first two rows before breaking through.
The bad news about breaking through is that when it happens the paddle is immediately reduced to half its original size, making it more difficult to keep the ball in play. However, with a little more concentration and a finer touch on the paddle controller the wall can be totally demolished.
The key to hitting the ball back consistently is anticipating where it will hit the bottom of the screen. If you wait to see where it's going to land, you'll get there too late to catch it.
After the first wall is taken care of, for a total of 416 points, a second one appears. No credit is given for the elimination of a wall; the point values remain the same and no extra balls are awarded. The first time I made it through a wall, I was extremely disappointed to find that there was no fanfare or reward--just more work!
|
| For success in Breakout, you must anticipate how the ball will rebound. |
Controllers
You move your paddle left and right at the bottom of the screen. The speed of the video paddle is not limited, as in some games; it moves at the same rate as the paddle controller. The red button on the controller serves the ball to start each turn.
The video paddle is divided into four sections. Each section has a different rebound angle, so you can anticipate where the ball will go. However, the rebound angle becomes sharper after the eighth hit, then less sharp again after the sixteenth hit. After the forty-eighth hit the paddle is divided into only two sections, with each rebound angle being about 45 degrees.
You will have to gain a fair amount of expertise to make use of this information about the angles. At first, it will take all of your coordination just to get the paddle to hit the ball, never mind at what spot on the paddle. Also, attempting to hit the ball at the edge of the paddle often results in missing it altogether.
The speed of the ball is not controllable, but does increase after the eighth hit and as the ball knocks out one of the bricks in the top four rows of the wall.
Scoring
Each wall of bricks contains eight rows. Each time a brick is knocked out of the first or second row, the player scores one point. Bricks are worth three points in the third and forth rows, five points in the fifth and sixth rows, and seven points in the seventh and eighth rows.
The only exception to this is in the game variations that have more than one ball in play at a time. In these games, the point values are multiplied by the number of balls in play.
Variations
Game 1: Basic one-player game.
Game 2: Basic game for two players. Each player receives his own wall of bricks and the turns alternate. A turn ends when someone misses a ball.
Game 3: Double Breakout for one player. You receive two paddles and two balls. When two balls are in play at the same time, point values are double. The paddles are stacked one on top of the other.
Game 4: Double Breakout for two players.
Game 5: Cavity Breakout for one player. The wall of bricks, has two holes in it, each containing a ball. When the play begins, it looks rather like a face with two maniacal eyes. When a path is broken into one of the cavities, the ball within is released, putting two balls into play. Point values are doubled as long as both balls remain in play. When one ball is missed, the point values revert to their original amount and play continues until the second ball is missed.
Game 6: Cavity Breakout for two players.
Game 7: Progressive Breakout for one player. Rather than having one wall of eight rows of bricks, Progressive Breakout offers two walls, each of which contains four rows. As the play progresses, these rows move down the screen, getting progressively closer to the paddle. Since the rows change color as they move down the screen, their point value lessens. Therefore, it is to your advantage to break through as soon as possible to hit the uppermost bricks. The very low bricks present a problem because there is very little room to react between the time that the ball hits the brick and the time it goes off the bottom of the screen. Apparently, if one of these low bricks is hit in its center point before it disappears, bonus points may be awarded. Personally, I have always been too wrapped up in the heat of the game to notice the score at this point. This game does not have a two-player version.
Game 8: Children's version of Breakout for one player. This is the same game as Game 1, except that the paddles do not decrease in size when the wall is broken through and the ball does not speed up when one of the last four rows is hit.
Game 9: Children's version of Breakout for two players.
Comments
One of the best features of Super Breakout is the sound effects. The sound that a brick makes when it disappears varies from row to row and from game to game. When the ball breaks through the wall and rebounds at the top of the screen, knocking out brick after brick, the sound is more fun than the points.
In order to achieve a decent score in Super Breakout, your paddle controllers must be in perfect condition. Otherwise, the video paddle will wander a little, causing more misses than hits.
By Martha Koppin
Pitfall by Activision
Game Description
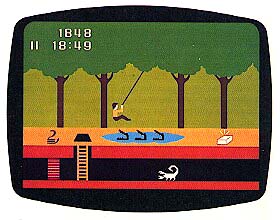
Pitfall Harry is an agile fellow with unbelievably good posture. His mission is to travel safely through the jungle collecting the "Lost Treasures of Enarc" (Yes, the name of the game designer is Crane--it sounds more exotic when spelled backwards). Some of the dangers awaiting him (Harry, not Crane) are scorpions, crocodiles, snakes, fires, quicksand, vanishing pits, open holes, and rolling logs. Since an encounter with most of these will kill Harry, Mr. Crane has sportingly given Harry three lives.
The first scene of the game includes a hole with a ladder leading down to the underground tunnel and a stationary log. To start Harry on his journey, move him to the left and off the screen. Moving to the right will immediately put Harry at a disadvantage, since all the rolling logs in the jungle roll from left to right. It is easier for Harry to run with them than to try to jump over the approaching logs.
Harry's first obstacle is a pool of crocodiles over which hangs a swinging vine. He must use the vine to clear the pool and continue on to the next scene. One important note about swinging vines: they are included in a scene for a reason, so use them. Even when the scene seems safe, if you wait a second at the edge of the screen, a vanishing pit or quicksand bog will inevitably appear. This is especially true in the scenes containing treasures.
|
The prize is always at the edge of a quicksand bog, so if Harry goes rushing in he may be swallowed up just at his moment of glory. If you find that Harry got a late start in running across a scene between quicksand appearances, you might try pressing the red button at the very second that it starts to reappear (while Harry is running). With a little luck, Harry will be in mid-air when it opens up under him and his momentum will carry him beyond the danger.
Under each scene runs a subterranean tunnel with either a ladder connecting it to the surface or a scorpion patrolling below. The scorpion follows Harry's movements from below, but cannot harm him as long as he does not enter the tunnel.
Harry must jump over fires and snakes ("cobra-rattlers" apparently Mr. Crane's knowledge of herpetology is limited). If he touches either of these he will die instantly; they are not hard to jump, however.
Rolling logs are annoying but not fatal. Since they roll in the same direction (if Harry is running left) and at the same speed as Harry, he will not have too much trouble avoiding them. Touching even stationary logs cost points.
The hardest thing Harry has to do is jump over a pool of crocodiles without a vine. He must hop from one to the next while their mouths are closed. This is possible, but requires concentration and coordination on your part.
To start this maneuver, you must first watch the crocodiles open and close their mouths until you get a feel for how long they keep them open. Now move Harry about two steps to the right of the pool.
When you are ready, wait until the crocodiles are just about ready to close their mouths and make Harry take a running hop to the first one. If you have timed this right, the crocodile should have his mouth shut, if not, you can only bid adieu to Harry.
Assuming that Harry is still okay, you must now take your hand off of the joystick for a split second and then tap the stick and press the button simultaneously to make Harry hop to the next croc. Repeat this until he gets to the other side of the pool. You must do this without any delay between taps. Remember what they say about he who hesitates . . .
It would seem better to hold the joystick and press the red button three times, making Harry skip across the crocodiles' heads quickly. It doesn't work. Holding the stick while you press the button makes Harry's jump too long and he ends up falling into the water between the crocodiles.
Croc hopping is difficult, but, unfortunately, necessary to get a decent score; all of the treasures are on the other side. One small consolation is that if Harry does get eaten, his replacement falls from the trees on the left side of the screen (on the other side of the crocodile pool, since Harry is moving to the left) and can thus continue on his way until the next set of crocs appears.
Once you have mastered the various techniques of crossing each hazard, you can amass a respectable number of points by simply running Harry at top speed through the jungle. However, in the jungle as in life, the big money is in the big risks.
To achieve the maximum score, you must make use of the underground tunnels. Each tunnel covered cuts off two or more surface scenes. Therefore, going below ground can be a useful shortcut to eliminate unproductive or dangerous scenes. However, taking the wrong short-cut can cause Harry to miss a treasure.
In order for Harry to take the most efficient and productive route through the jungle in the allotted 20 minutes, he must have a map. To make the map, you will need to write down the number of each scene and a short note about its contents, noting especially the location of ladders, brick walls, and treasures. You will need to get as many of the 256 scenes in the game as possible covered by going left. However, since time will run out before Harry returns to his starting point, you will have to repeat the procedure going right (by now Harry should be proficient enough to swing through the jungle in both directions).
This time start numbering the scenes at 256 and go down until the two lists meet. By checking which frames the various tunnels eliminate you should be able to figure out when to go below and when to continue above ground. In any case, speed is of the essence.
The major hazard in the tunnels is the scorpions. They are very difficult to jump, and if Harry's timing is not exact he will lose a life.
Pitfall is an imaginative game which is particularly appealing to those who do not like the pressure and confusion of the more fast-moving Atari games. Fast reflexes are not of major importance in Pitfall, but concentration and precise timing are.
The adventure is challenging, but won't give you an ulcer. Since there is an upper limit to the number of points available, eventually you may achieve a perfect score and therefore beat the game. However, the process involved in reaching that score will give you many entertaining hours.
I was somewhat disappointed in the lack of variety of the treasures and dangers. There are only seven different scenes, and the game could have been greatly improved by the addition of some surprises. However, since I do not know the programming limitations involved, I will not criticize.
Controllers
Pressure on the joystick to the left or right causes Harry to run in the corresponding direction. Pressing the red button causes him to leap with the grace of Rudolph Nureyev. By combining these two movements, Hairy can achieve the running leap necessary to clear large obstacles.
To make Harry carefully descend the ladder leading to the subterranean tunnels, you must use a diagonal movement on the joystick, pressing down and to the left or right. A straight horizontal movement will result in Harry making a very fast and costly descent.
To make Harry grab a swinging vine, move the joystick in the proper direction and press the red button. If Harry hits the vine, he will latch on and continue to swing back and forth until you make him let go. This is done by pressing the joystick down. However, the safest dismount is achieved by using a diagonal movement, which makes Harry swing out farther, clearing the danger by a greater margin.
Scoring
Harry starts his adventure with 2000 points, but loses some each time he has an accident (falling down the ladder, for example, costs 100 points). He is allowed to continue his journey even after he has lost all of his points, and will never show a negative score. More significantly, points are gained each time Harry successfully locates a treasure.
The treasure values are: Diamond Ring-5000 points; Gold Bar-4000 points; Silver Bar-3000 points; Bag of Money-2000 points. There are several of each kind of treasure in the game.
There is a time limit of 20 minutes on this game. The time remaining is displayed in the upper left of the screen, under Harry's score.
By Martha Koppin
Stampede by Activision
Game Description
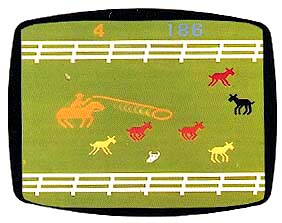
Your object in Stampede is to lasso as many calves as you can without letting too many get behind you. You are allowed to let three of them go before you lose the game. At each 1000 points, you are awarded another stray, with an upper limit of nine.
The calves run at different speeds, those with lower point values running at higher speeds (giving you more time to get behind to lasso them). The Black Angus stand still all but forcing you to run into them or pass them by. They are almost impossible to lasso unless you are ready for them.
The game would be all but impossible, except for the fact that the cattle allow themselves to be herded. If your horse touches a calf (or group of calves) before it leaves the left-hand side of the screen, the calf skitters forward to the point farthest from the horse, giving you some time before you must either lasso or herd it again. The calf does not actually have to be in front of the horse to be herded; if the horse touches it anytime before it actually leaves the screen, it will be saved. The Black Angus cannot be herded; if the horse hits one, he rears back and slows down, sometimes allowing a stray to leave the screen.
|
True to the theme, there are also old cattle skulls on the trail which present a hazard to your horse. If you attempt to ride over one, your horse will rear and again lose time.
To lasso successfully, the loop must touch a calf. If you throw too soon, not only will you miss, but the time it takes to re-coil your rope may make it difficult to try again at a more appropriate distance.
The calves and obstacles move in six horizontal lanes, and only one variety will be in the lane at any one time.
To keep from losing a calf and keep the game going, it is important to keep the slow-moving cattle (harder to lasso or herd) to a manageable number.
The horse will only move so fast up and down the screen. Thus it is impossible to get behind a calf at the top of the screen to lasso it and then get down to the bottom to catch a slow-moving one.
At first, the calves move slowly enough that it is fairly easy to lasso them all. Therefore, the strategy is to catch all but the red Herefords. At this point, they will all be moving only slightly slower than the horse and can be easily herded. If two lanes of cattle appear to be nearing the left-hand side of the screen at the same time, herd both lanes, rather than try to lasso them. You can get them later.
When the screen is filled with only Herefords, herd all but one lane to the far right of the screen and lasso the Herefords in the remaining lane. Stay put for an instant, as the next thing to appear in that lane will be either a skull (dodge out of its way) or a Black Angus (lasso it). Next will come a couple of Jerseys and then some Guernseys. More Herefords will follow the Guernseys.
If you keep all but one or two lanes in Herefords, you should be able to herd the Herefords and lasso the calves in the chosen lane(s).
Each time a calf is lassoed or gets past you, the next type of calf in the sequence will appear. When the Herefords appear again in the chosen lane(s), move on to a different lane, so that one particular animal does not stay on the screen too long.
A skull appears after the first lane of Herefords is cleared. The next lane cleared of Herefords will be followed by an Angus. The skull and Angus alternate for the rest of the game, but it is sometimes difficult to keep track of which went before.
To keep the herd in order, keep any Hereford lanes together in an almost vertical line on the screen. This way, you can make just one pass up or down to herd them all back to the right-hand side.
Be careful about letting calves get past you, because it will mess up your carefully managed herd, possibly creating two non-adjacent lanes with the slow animals forcing you to run feverishly from top to bottom on the screen.
After you get the feel of things, try clearing out more than one or two adjacent lanes of Herefords, especially early in the game. The calves become less willing to be herded after they have been stepped on several times; lassoing two or three lanes at a time means that you can clear out all of the old, stubborn Herefords, more quickly.
When working with several lanes, each containing groups of two or three, it is sometimes beneficial to eliminate all but the front ones on each lane first. Then take care of those single calves, so that the next wave of calves come out all together.
Controllers
The joystick moves the horse up and down on the screen; he cannot be moved forward or back. Presumably he is not responsive to giddap or whoa! Pressing the red button causes the cowboy to throw his rope. The horse will not move in any direction until the rope returns to the cowboy.
Scoring
Points are amassed by roping the cattle encountered on the trail. The dark red ones are Herefords, worth 3 points. The brown ones are Guernseys, worth 15 points. The tan ones are Jerseys, worth 25 points, and the black ones are Black Angus, worth 100 points.
Variations
Game 1: Basic game with calves starting out at a leisurely pace. The speed increases as the game progresses.
Game 2: Basic game, except that the calves move slightly up or down to avoid being lassoed. These calves are practiced in the art of vertical evasion, and this movement is no real problem.
Game 3: Same as Game 1, except that calves do not appear in their set pattern. One pointer: in some lanes several skulls alternate with Black Angus before giving way to other animals. Therefore, when you encounter a Black Angus, be ready for a skull and then another Black Angus. You can do your herding when the skull appears, getting back in place for the Black Angus.
Game 4: Same as Game 3, except that calves again try their vertical evasion tactics.
Games 5 through 8: Same as first four games, except that the speeds of the calves is faster from the start.
Setting the difficulty switch on "a" shortens the length of the rope, making lassoing all that much harder.
By David H. Ahl
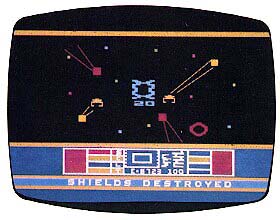
Room of Doom by CommaVid
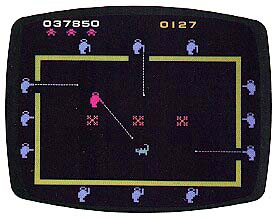
Your mind throbs, seeking a way out of the Room of Doom. Surrounding the room are fiendish gunmen concealed behind doorways. Slowly, their doors open and close thus allowing them to shoot at you. Not only that, these fiends have unleashed a hydra-headed monster which relentlessly pursues you about the room. But don't panic! Not yet, anyway.
As the doors concealing the gunmen open and close you can fire through them as well; each gunman you hit is worth 75 points. Furthermore, if you get close to the monster your gun will stun him for a few seconds; this is worth 50 points. However, should you remain in a room too long before eliminating the surrounding gunmen, the monster becomes invulnerable to your bullets.
You begin with a reserve force of three Doom Room players, shown at the top of the screen. Each time you eliminate all the gunmen surrounding a room, you move to an even more diabolical chamber and earn another player (up to a maximum of six).
|
Many rooms on the upper levels have deadly objects scattered through them. Even the slightest contact with either the monster or these objects spells doom.
Room of Doom has 64 different game variations, as well as four different starting rooms, for an almost endless variety of challenges. The following elements are the main variables:
1. Doors. Ordinarily, the doors blocking the gunmen periodically open and close, and the gunmen only fire when their doors are fully open. In the open door variation, the doors always open thus permitting the player and gunmen to shoot without warning at any time.
2. Diagonal Fire. The player can always fire diagonally as well as horizontally and vertically. Ordinarily, the gunmen fire only horizontally and vertically, but in the diagonal fire games they can shoot on the diagonal as well.
3. Speed. In the high-speed games everything happens twice as fast as in the normal speed game.
4. Guided bullets. Ordinarily, your bullets travel only in straight lines. However, in the guided bullet variations you can guide your bullets by moving the joystick in the direction you want the bullet to go.
5. Stationary fire. Ordinarily, you can fire only when standing still. In some variations you can fire only while moving.
6. Repeat fire. Although only one bullet can be on the screen at a time, ordinarily firing a bullet causes the previous one to vanish. In some variations, however, you can fire again only after your previous bullet has hit something. For the utmost challenge in Games 49-64, you can fire a new bullet only after the previous bullet has hit something and you can fire only while moving.
Can you survive through all the Rooms of Doom? We haven't yet, but we are still trying.
By Martha Koppin
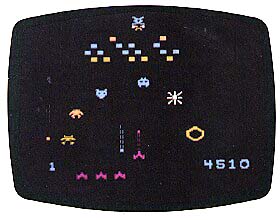
Cosmic Swarm by CommaVid
Game Description
Cosmic Swarm is really not complicated once you master the controls. You are piloting a tiny remote control probe ship into the power chamber of Waypoint, an "interstellar trade depot," which has been invaded by giant termites. The termites are building a nest within the power chamber and must be stopped before they completely jam it. (Somebody at CommaVid really has a wild imagination!)
What you see on the screen is a bunch of large bugs laying down blocks in a haphazard manner. If your ship touches one of the termites or one of the blocks, it is destroyed. If you fire on the termites, you can destroy them.
The nest blocks cannot be removed except when they are energized. To accomplish this, you must fire at a termite carrying a block and hit the block squarely on its bottom. If you are successful, all the blocks will turn red and can then be blasted away--one at a time. If at any time you hit any part of a termite, the blocks turn green, become deenergized and are no longer vulnerable.
|
Periodically, you must refuel from a refueling ship which moves slowly down and then up one side of the screen. There is a warning sound before it appears, and since it travels so slowly, there is usually no problem in getting to it before it disappears. If you should miss the refueling ship, the game ends. Actually, I found it much more difficult to keep from shooting the ship since it was on the screen for such a long time and my shots were not always entirely accurate. Shooting the refueling ship results in instant defeat.
To start, you have three extra probe ships and after every 100 points, you are awarded another ship, with a maximum of six held in reserve at any time.
Controllers
Mastering control of the probe ship is no easy task. The various movements are described in detail in the instruction booklet. Basically, the ship is thrust in various directions when the joystick is moved left, right or diagonally without the red button being depressed.
With the button down, these same joystick movements cause the ship to rotate to the left or right. When the button is released, the gun is fired.
The problem, then, lies in trying to fire and move at the same time. Since just directing the ship requires so much coordination (rather like rubbing your stomach and patting your head) it is wise to fire only when it is standing still. It is possible to fire on the run in certain directions, but usually the ship ends up spinning around firing aimlessly.
As a beginner, forget about shooting the termites at all for the first several games; just practice getting control of the ship.
Cosmic Swarm has four skill levels controlled by the difficulty switches. The left switch controls the speed of the termites and the right controls their aggressiveness. By combining the settings of the two switches, you can select the best level for you. Setting both switches on "b" gives a beginner level.
Scoring
You are not going to score 999,999 on Cosmic Swarm. The points available are as follows:
1 point for hitting a termite without a block; 2 points for hitting a termite carrying a block; 1 extra point if you hit the block on the bottom; 1 point for hitting an energized (red) block.
At generally one point per shot, you will really work for your extra ships!
Comments
Since the controller action is so different from most of the other Atari games, this one is interesting and offers a challenge.
By Martha Koppin
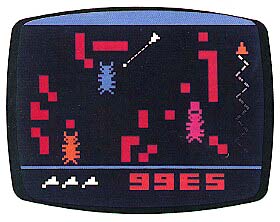
Worm War I by Fox Video Games
Game Description
According to the manufacturer, your mission in Worm War I is to drive your tank through the city of Teriaki, blasting away as many worms and blocks as possible. We are not given any idea what these poor creatures have done to deserve this, since they have no aggressive tendencies whatsoever. They do not shoot, eat, bite, blast or in any way plot the demise of your tank. Their only sin is to crawl thoughtlessly in front of your tank, causing you to lose fuel. Perhaps this happens because the pavement becomes slippery with the mashed bodies, and traction is lost. At any rate, the worms simply crawl from side to side on the screen as your tank approaches, and you try to eradicate them and their city.
This does not sound too hard, and indeed, it is not; this is one of the less frustrating games for the Atari VCS.
Your tank starts with 99 units of fuel. The length of time you have to blast the worms depends on how long your fuel lasts. Collisions are very hard on your mileage. Each time you run into a worm you lose 10 fuel units; running into a block costs 5. The amount of fuel remaining is shown on the screen, right below your score.
|
The simple running of the tank also uses fuel, and the faster you go, the faster you consume it. The walls on either side of the screen are broken into segments, and each time your tank passes one segment a unit of fuel is consumed.
Since you have unlimited ammunition and limited fuel, it is to your advantage to keep the fire button depressed, more or less strafing the whole screen. The few worms that are able to sneak between bullets will probably be taken care of the next time they cross the range. Continuous fire also allows you to knock out quite a few blocks, as you move from side to side.
You have opportunities to stop for fuel during your rampage through the city. Periodically, a Pagoda Gas Station appears on the screen and you can drive through it to replenish your supply. Your tank can hold only 99 units, but the amount of fuel you take on depends on how fast you drive through the station. The slower you go, the less fuel you get (don't ask me why).
Since you get only a certain amount of fuel each time, and do not necessarily fill the tank, eventually you find yourself out of gas. Thus, the game ends.
It is to your advantage to obliterate everything on the screen (except the gas stations), so keep the joystick pulled back to give you as much time as possible. If you are getting a little low on gas, concentrate on eliminating the worms first. After each screen of worms is gone, a new set appears, and sometimes a gas station with it.
If you let a worm get past you to the bottom of the screen, he soon reappears at the top. If a gas station gets past you, it turns into a worm at the top; you don't get a second chance to refuel at that particular station. If you cannot make it through a particular gas station because of blocks, it is better to blast it than to let it get by.
When a gas station is blasted, the whole screen blows up. You are awarded no points, but you also lose no fuel and the screen is again clear of obstacles for a short time. It can pay to blast a station when your gas supply is in the 90s, and the screen is getting congested with blocks. A clear screen gives you time to get a head start on the oncoming blocks and worms.
Do not start to fire before you determine which of the blurry images are turning into worms and which are gas stations. You might inadvertently blow up a gas station just when you need it most.
The far edges of the screen are safe from collisions, so if you find a worm fast approaching you, beat feet for the edge. You can stay there indefinitely, but you do use up fuel, and you must clear away worms for the gas stations to appear.
The gas stations often appear nestled in a cluster of blocks. You must fire single shots very carefully to avoid blowing up the Pagoda. If you can clear just enough away to allow you access to a small portion of the Pagoda, you will still be able to refuel. This is tricky business, so keep the tank going as slowly as possible until the gas station is clear; then get your speed up to get as much fuel as possible as you sail through.
Controllers
The joystick moves your tank horizontally across the bottom of the screen. Moving the stick forward speeds the tank up (actually, the tank remains at the bottom of the screen, but the obstacles and worms approach faster). Pulling back on the stick is the braking action for the tank, slowing it almost (but never entirely) to a stop. The red button is the fire button; press each time you wish to shoot, or hold it down for continuous fire.
The right difficulty switch controls the braking action of the tank. The "b" setting allows the tank to slow down to almost a stop, while "a" allows the tank to slow down only a little when the stick is pulled back.
The left difficulty switch controls the movement of the worms. With the setting on "b," the worms move in a consistent pattern from one side of the screen to the other; they move randomly on setting "a."
Scoring
Each time you shoot a worm, you score a set number of points. The easier ones in the first group are worth 20 points, with each successive group becoming more valuable. There are also bonus points awarded each time you clear a group of worms.
The obstacles are worth 5 points apiece. This is not insignificant, since as the game progresses, many blocks can be visible on the screen at one time, allowing for a good number of points to be gained before you even begin to take care of the worms.
Game Variations
Game 1: Basic one-person game as described above. The first set of worms starts out on a clear screen, but after this the obstacles appear.
Game 2: One-person game with no obstacles.
Game 3: One-person game with the same details as Game 1, except that the worms are invisible. This is not as difficult as it sounds, since you are firing continuously at the blocks anyway. Sooner or later worms are likely to crawl into your line of fire, invisible or not.
Game 4: Two-person cooperative game having the same details as Game 1, except that there are two tanks and drivers, sharing fuel and points.
Game 5: Two-person cooperative version of Game 2.
Game 6: Two-person cooperative version of Game 3.
Game 7: Two-person competitive version of Game 1. There are two tanks, two drivers, and two sets of fuel and points.
Game 8: Two-person competitive version of Game 2.
Game 9: Two-person competitive version of Game 3.
Martha Koppin
Deadly Duck by Fox Video Games
Game Description
The object in this game is for Deadly Duck to secure as many points as possible by shooting down crabs (flying crabs?) and falling bricks. As he does this, he must avoid hitting the dragonflies which are moving between him and the crabs. They cannot be destroyed, but when they are hit they drop bombs on Deadly, which he may or may not be able to avoid.
|
You begin with one duck on the screen and three spares, which are pictured below your score. Each time you clear a screen of crabs, you are awarded a spare duck. You are allowed an unlimited number of spares, but only three will ever be pictured on the screen.
During Level 1, try to shoot several of the crabs away so that you will be less confused as to which will drop the brick. Hopefully, this will enable you to shoot the bricks more consistently. Try not to shoot away all the crabs, but practice shooting bricks without getting squashed.
Once you have mastered the technique of shooting bricks (try the shoot-and-run method), you can finish off the last of the crabs in Level 1. The two dragonflies make their entrance in Level 2, and run interference for the crabs. Try not to hit them; if you do, move away quickly so you won't be bombed. For only 10 points, it's not worth messing with the dragonflies.
As you progress to various levels, the dragonflies become more numerous and things generally move faster.
Controllers
Deadly duck is moved back and forth across the screen by pushing the joystick in the appropriate direction. The red button causes the duck to fire, although it looks more like Deadly is spitting (could that be what is known as spitfire?) at the crabs above him.
Scoring
Each time Deadly kills one of the crabs, he gets 30 points. When he wings a dragonfly, he gets 10. (Dragonflies cannot be killed.) For shooting a brick in mid-air during Level 1, 50 points are awarded. For the same shot in Level 2, 100 points are awarded, and for Levels 3 and 4, 200 and 500 points, respectively.
Game Variations
Each of the four games of Deadly Duck is simply the basic game, but starting at a different skill level. Therefore, if you can stay in Game 1 long enough, you will eventually pass through Game 4. This is great for practicing at the higher levels without having to go through all the beginning stages.
Game 1: Beginner level--Starts with no dragonflies.
Game 2: Level 2--Starts with two dragonflies.
Game 3: Level 3--Starts with four dragonflies.
Game 4: Level 4--Starts with six dragonflies.
By Martha Koppin
Skeet Shoot by Apollo
Game Description
In Skeet Shoot, you have a skeet shooter, a target launcher, and targets. Each time a target is launched, you must point the gun in the proper direction and shoot so that the shot will intercept the clay pigeon.
This is all very straightforward and not terribly difficult with the skill switch set on "a." With the switch set on "b," the targets move much faster and the game becomes almost impossible.
Controllers
The joystick controls the direction in which the shooter's gun points. Press the red button to fire.
Scoring
There are 25 targets per game, each of which is worth one point.
Game Variations
There are 17 variations of the basic game, allowing you to determine the direction of the target and the position of the shooter. Four of these games are for two people.
Comments
There is a skill to be developed in Skeet Shoot, with fast reactions being an absolute necessity in the more difficult setting. This is obviously not a game for the space adventure fanatics.
By Martha Koppin
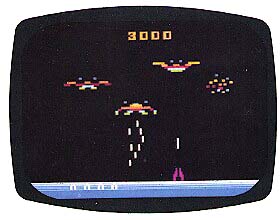
Demon Attack by Imagic
Game Description
In Demon Attack, your missile base is at the bottom of the screen with the space demons zooming in from the sides to hover over you. Only one demon per wave fires on you; the others simply hang around waiting to be shot. Each time you shoot the one demon that is firing, another moves in to take its place until the wave ends. There are eight demons per wave.
While the carton in which Demon Attack is packaged has an impressive picture of silver rocket-dinosaurs zooming through space, the actual game at first looks more like "Starling Attack." Remember when your mother told you not to look up at a flock of migrating birds? It took a while for me to think of the creatures as aliens, and the round things dropping from their bodies as bombs.
You begin the game with three spare missile bases, which are shown on the left corner of the screen. Each time you successfully destroy an entire wave of aliens without suffering a hit yourself, you are awarded a spare base. Only six bases at a time can be held in reserve, however.
|
The first wave is easy to destroy; simply move the missile base below your target and fire. If you choose an aggressive demon, fire and move away quickly before the bombs hit you. There is plenty of time to fire and run. The hardest thing about the first wave is hitting the benign creatures at the end of the wave that do not fire but are very difficult to hit as they drift randomly across the screen.
The second wave is the same as the first.
The third and fourth waves have crab-like creatures that fire double lazer beams, with the second batch firing shots closer together. You may have trouble moving your base under the firing alien between shots, so your timing must be good. Wait as close as you can to the spot directly below the offending creature; as soon as the last of his shots hits the ground, move quickly to the other side.
The fifth and sixth waves have creatures that split in two when hit. However, when one divides, only one half continues dropping bombs. If you can hit half of the divided alien, the other half will twitter (again, like the starlings) and flutter to the ground. It will chase you, but you can either shoot it or outrun it in most cases. If you move to the far edge of the screen, the half-demon will usually hit the ground before it gets to you. Outrunning them is often safer, but, of course, you miss an opportunity to score points by hitting them.
Since the bigger, undivided demons are wider, they cover more area with their bombs. Therefore, it is to your advantage to split the aggressive one up as soon as possible, making it easier to dodge underneath it as you eliminate its cohorts; do not shoot the aggressive halves. Try to shoot all of the harmless aliens first, since they will be replaced by more harmless ones and you will not have to have too much contact with the bombers. This is especially important as the undivided bombers become more and more dangerous in later waves.
The aliens in the seventh and eighth waves shoot lasers and divide when hit.
In the ninth and tenth waves the bombs have a tendency to drift, making it very difficult to get close to the undivided bomber without getting sprayed by the bombs. Avoid getting caught in a corner, since the bombs drift toward you and there is nowhere for you to go.
The eleventh and twelfth waves have demons which rhythmically shrink and then return to full size. They are very difficult to hit when undivided, but when split they react like all of the other starlings. . . .er, demons. They shoot drifting lasers.
If you can get this far in the game then you can handle yourself well enough to continue without my help. Rest assured, you will never run out of demons.
Controllers
The joystick controls the horizontal movement of your missile base, allowing it to chase or avoid the attacking space demons. Pressing the red button on the controller fires one missile. Since only one missile can be in the air at any one time, holding the button down does not produce rapid fire.
Scoring
Each time you hit a space demon you are awarded points, with each wave of demons becoming progressively more dangerous and therefore more valuable in terms of points.
Game Variations
Game 1: Basic Game
Game 2: Basic Game for two people. Each person finishes one whole wave before the other gets a turn.
Game 3: Same as Game 1, only the missiles are controlled by the joystick. Moving the joystick in any direction causes both the missiles and the missile base to move accordingly. This changes the strategy of the game somewhat, since the fire-and-run technique results in the missile totally missing its mark. You must fire and then quickly direct the missile to the appropriate demon.
Game 4: Game 3 for two people.
Game 5: An advanced version of the Basic Game. The opening wave is the same as the ninth wave of Game 1. Also, the missiles move faster.
Game 6: Game 5 for two people.
Game 7: Same as Game 5, but with steerable missiles.
Game 8: Game 7 for two people.
Game 9: Same as Game 2, except that each works on the same wave, alternating turns. Each turn lasts only a few seconds.
Game 10: Same as Game 9, except with steerable missiles.
Comments
This game is a lot like many other alien invasion games, except that success depends more on timing than on fast reactions. It is challenging without being impossible.
By David H. Ahl
Phaser Patrol by Starpath
With the incredible success of Star Raiders for the Atari 400 and 800 computer systems, it was only a matter of time until variations and takeoffs were devised for other game playing systems. For the Atari VCS, you have a choice of four versions: Star Raiders from Atari, Star Master from Activision, Star Voyager from Imagic, and Phaser Patrol from Starpath (formerly Arcadia). Since this is the "base" Starpath game, which includes the Super Charger necessary for other Starpath games, we have chosen to describe it here.
|
First a word about the Super Charger. This is a device made by Starpath which provides an additional 6K of memory for the Atari Video Computer System (permits higher resolution graphics) and also an input port so that a standard cassette recorder may be connected to the VCS to load tapes containing games. Although the Super Charger plus Phaser Patrol is relatively pricey ($69.95), it permits other Starpath games to be purchased on standard cassettes at bargain basement prices ($14.95). Price-wise, the crossover point is reached when you purchase your fourth Starpath game; from there on, games on cassette are a bargain by any standard.
Unlike some computers we know, where the adjustment of volume and tone controls on the recorder must be within very narrow limits, the Starpath Super Charger system was quite forgiving and allowed loading cassettes from several different recorders over a wide variety of tone and volume settings. We applaud Starpath for a well engineered product.
Phaser Patrol is a game played in two phases: navigation and space battle. In the navigation phase, the screen shows a checkerboard grid of 36 sectors. Each is marked with one of three symbols designating Dracon fighters, a friendly starbase or contents unknown.
You choose a destination by moving the white cursor with your joystick to a distant sector and pressing the red button to warp there.
Upon flying into a sector occupied by Dracons, your condition alert indicator lights up red. In addition to that indicator, you have four others indicating the status of your shields (operational, damaged, or destroyed), computer (helps in navigation and firing), long-range scanners, and torpedoes.
A radar screen in the center bottom portion of your display shows the location of Dracon attackers, both in and outside your view area. Your mission clock shows elapsed time, an energy gauge indicates your reserve, and, finally, a message display gives you important messages concerning ship damage, combat performance, etc. Got that?
It may seem like a lot to absorb, but once you become immersed in the play of the game, it's second nature to keep one eye on your instrument panel and the other on your window into space. That's where the real action takes place.
In the center of your window is a phaser torpedo sight with a rangefinder below it. Hidden among the stars in each sector are a varying number of Dracon fighters. Your mission is to navigate around the sector tracking the Dracons, and eventually destroy them.
|
To do this, you use your joystick. Pull back, and the ship climbs. Push forward, it dives. Move left or right, and the ship will, too. As soon as your phaser torpedo sight is locked on target, press the red firing button and your torpedo will chase the Dracon and destroy it. Miss the first shot, and the Dracon has a good crack at you.
As your energy gets low, you must find a sector with a friendly starbase where you can refuel.
Phaser Patrol rewards the player who destroys the Dracon armada quickly and efficiently. At the end of each game, you are awarded a rank and level. As you progress through the 16 rankings, you'll learn to figure out an escape route in advance, use your shield sparingly, and replenish your fuel efficiently. But beware, it will take you many hours of play to reach Hero, Level A.
We play-tested three other games from Starpath: Communist Mutants from Space, Suicide Mission, and Fireball. In Communist Mutants, a deadly armada of mutants is positioned at the top of the screen by a diabolical Mother Creature whose objective is to attack your planet and enslave its inhabitants.
The Mother Creature does this by laying eggs that hatch into bloodthirsty Commie mutants. Your defense is the usual laser cannon. The mutants swoop down at you in Galaxian-type formations against which you must defend Mother Earth.
We found in playing the game that the only way to clear the screen was to eliminate the Mother Creature. This is reasonably easy to do with the penetrating fire option since a penetrating bomb eliminates all creatures in its path of fire as it continues to the top of the screen.
On the other hand, with the time warp option (pulling back on the joystick "stops time" briefly) eliminating the Mother Creature is more difficult. Basically, while time is stopped, you must clear a path in the center of the attack wave so you can get a clear shot at the Mother Creature.
Other options provide for guided fire, shields, difficulty level (1 to 9), and number of players (1 to 4). It is not necessarily a reflection of our political leanings when we say the game is good clean fun.
The Fireball cassette includes five separate games which combine the themes of Breakout and Juggler. Your goal as a cute little animated juggler at the bottom of the screen is to keep between two and six balls in motion, then hit them handball-style into variously shaped block walls overhead.
In Suicide Mission, you become a microscopic submarine in a wounded body. Your enemy is a viral colony. A direct hit with a penicillin torpedo divides the colony. Hit it again, and the pieces divide into creepy little viruses. Substitute "asteroids" for "viruses," and you have the idea of the game. If you like Asteroids, but you prefer the warmth of a human body, try Suicide Mission.
By David H. Ahl
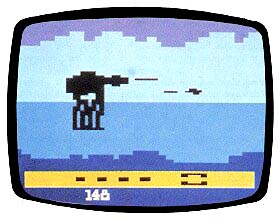
Empire Strikes Back by Parker Brothers
Game Description
In The Empire Strikes Back, you are the pilot of a highly maneuverable, missile-firing snow-speeder. Your enemy is an army of Imperial Walkers who are marching toward your power generator on the ice planet Hoth.
The object of the game is to destroy as many of the Imperial Walkers as you can before they reach the power generator at the right end of the battlefield or before they destroy your fleet of snow-speeders.
As a rebel commander, you receive five snow-speeders per game. To start the action, you fly your snow-speeder toward the left to meet the oncoming Imperial Walkers. The Walkers approach in a single file, moving from left to right. Only one Walker appears on the screen at a time.
Your radar indicator at the bottom of the screen shows where all five Walkers are. It also shows which Walker you are presently battling on the screen.
It is important to remember that as soon as the lead Walker reaches the right end of the battlefield shown on the radar indicator, it blows up the power generator and ends the game. Just before this happens, you hear a warning sound and the sky begins to flash.
|
Imperial Walkers are tough. It takes 48 hits on the body to destroy one. Each group of eight hits weakens the Walker one stage and changes its color. Each color change means that the Walker is walking slower, firing less often and aiming less accurately.
While repeated firing is a sure way to destroy a Walker, there is a quicker way--by firing a missile into a "bomb hatch."
Bomb hatches are indicated by flashing colored squares that appear from time to time on a weakened Walker. Bomb hatches appear one at a time in one of three places: just above the head, just below the head, or on the back. Hit a bomb hatch, and it means instant destruction of the Walker.
When you destroy an Imperial Walker, a new one enters the battlefield. Each new Walker is even tougher than the last. It walks faster, fires its missiles more rapidly, and aims its fire more accurately.
Imperial Walkers fire deadly missiles at snow-speeders, some of which even have the ability to "track" your snowspeeder. Walkers can aim their missiles at snow-speeders approaching from behind as well as head on.
When your snow-speeder is damaged, you may land in a valley for a moment for repairs. However, each snowspeeder is allowed only two repairs before it is out of commission.
Thus, your best bet is to try to stay out of the Walker's line of fire or, if you feel particularly reckless, you can try to shoot down the Walkers' missiles. This is risky business, and we found it was generally a better strategy simply to avoid the missiles.
If you can keep your snow-speeder alive for two minutes, "the Force will be with you." Your snow-speeder will begin flashing and you will hear the theme song of the rebels. The Force will be with you for 20 seconds. During this time, your snow-speeder is all-powerful. It cannot be damaged or destroyed. So when you gain the Force, move right in on the Imperial Walker and fire away.
Initially, your biggest problem in this game will be learning to control your snow-speeder, in particular, learning how to make it hover in front of an approaching Walker. Since the Walkers move relentlessly forward and it takes 48 shots to destroy each one, you don't have time to fly back and forth between them. You must keep hammering away at the first few Walkers in the line until the first one finally drops. By this time, the second one will have made good progress, and you will have to concentrate your attack on him. You just don't have time to fly from one end of the battlefield to the other; rather you must concentrate your attention on the lead Walkers.
We found it was generally better to attack a Walker from the front since two of the three bomb hatches on its body are toward the front. You want to be in a position to immediately dive in on one when it starts flashing. Not that you will always score a hit (you seldom will), but you will have a greater probability of success if you attack from the front.
After sustaining a hit by a Walker, it is generally worthwhile to stay in battle a little while longer rather than going immediately for repairs. Since you are allowed only two repairs on a snow speeder, if you can prolong the active duty cycle, you will get maximum fighting time from your vehicle.
We found the playing hints in the instructions very worthwhile. They recommend trying to weaken the lead Walker without destroying it. By so doing, you will slow down the walking speed of all the others. This will give you more time to weaken and destroy the other Walkers before the lead one reaches the power generator.
Game Variations
The Empire Strikes Back has 32 game variations, 16 for one player and 16 for two players. Three factors are varied in the games.
Smart bombs. In game variations with smart bombs, sometimes the Walker will release a smart bomb which flys in a looping pattern and will follow your snow-speeder. You can try to shoot it down for 100 points or you can outfly it until it disappears from the screen.
Solid walkers. Normally you can fly effectively "through" a Walker. However, in games with solid Walkers you cannot fly your snow-speeder through the body of a Walker (although you can fly between its legs). However, hitting the Walker with your snow-speeder will weaken the Walker three colors and will also cause the loss of your snow-speeder.
Level of difficulty. Each game variation has four levels of difficulty.
Scoring
Points are awarded for the following actions: Hitting Imperial Walker with missile-1; Shooting down walker missile in flight-10; Crashing snow-speeder into walker-5; Destroying walker-50; Hitting bomb hatch to destroy a walker-100; Shooting down smart bomb-100; Also, for each 2000 points you score, you receive one extra snow-speeder.
By Martha Koppin
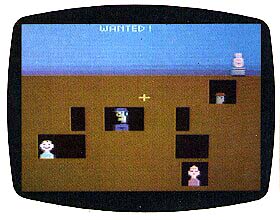
Gangster Alley by Spectravision
Game Description
Gangster Alley begins with a picture of a building with an escaped convict (Nitro Ed) running around on top. Gradually, different faces appear in the windows and you must move your rifle sight to zero in on the gangsters, but avoid the hostages. If they stand up high enough to draw their guns, they shoot and you lose one of your bullet-proof vests. (You start out with four vests and are awarded an extra for every 5000 points.) Sometimes Nitro Ed will hold a bomb over his head; he must be shot immediately to prevent him from dropping the bomb and blowing up everybody (and, incidentally, ending the game). Not surprisingly, the reward on him is the largest.
|
Success in this game depends on fast reactions, but also on being able to move the joystick accurately. Overshooting your mark results in wasted time and the possible loss of a vest.
Controllers
The joystick moves the sight of your gun. Press the red button to fire.
Scoring
For each gangster you shoot, you are awarded a different number of points, depending on which one it is and how quickly you hit him. In the instruction booklet there are mug shots of the gangsters and a list of the various points (in this game the points are actually dollars) awarded.
If you shoot the woman or the child, $1,000 is deducted from your score. (Not that that will necessarily make them feel any better about being shot!)
At the end of each phase you are awarded 10 points for every bullet you did not use. (You are allotted 24 bullets per phase.) Game Variations
Game 1: Basic Game
Game 2: Basic Game for two players
Game 3: Children's game
Game 4: Children's game for two players
By Martha Koppin
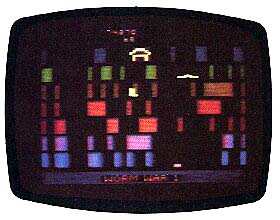
Planet Patrol by Spectravision
Game Description
Planet Spectra has been invaded by enemy forces and your mission in Planet Patrol is to destroy their missile bases. The enemy's arsenal contains heat seeking torpedoes and drone missiles. If either hit the patrol vessel, it will be destroyed. The drone missiles can be knocked out by your laser blasts, but the torpedoes are indestructible and must be avoided.
On the planet are several stranded pilots who show up periodically. Don't shoot them as they are on our team! Rescuing them will also net you a fair number of points.

|
Missile bases have been set up on the planet in clusters of three. They appear immediately after you rescue the pilot and are very easy to destroy. However, after the third one is hit the screen is scattered with debris which stands still for a moment and then, as you take off again, moves very quickly into the path of your ship. It is difficult to maneuver around the bits and pieces, so use the pause to position your space ship in the best spot to start threading its way through the debris.
If you do not destroy all three bases, you won't have to worry about the debris because you will hit the force field in front of the bases and end the game.
When and if you make it through the debris, a black landing strip appears. You must line up your vessel accurately to make a landing. As your space ship rolls to a stop, a fuel truck rolls out of nowhere to fill up your tanks. The gas gauge is in the lower, left corner of the screen and will be red when your fuel is low.
As you progress through the various phases of the game, not only do the point values increase, but the enemy weapons move faster, making it more difficult to avoid a collision.
As you move to the dark side of the planet, the missiles and torpedoes are visible only when you fire your lasers. Fortunately the darkness does not last for long, and if you fire constantly: you should be able to avoid losing your ship.
Bonus vessels are awarded every 10,000 points, with the maximum number of extras stored at any one time being four.
Controllers
Vertical pressure on the joystick moves your space ship up and down on the screen. It will not move to the left or right since the speed of the ship is not under your control. Pressing the red button causes your weapons to fire.
When the difficulty switch is on "b," your ship is bigger and therefore more likely to be hit. Beginners should start with the switch oh "a."
Scoring
There are three ways to score:
1) Destroy a drone missile--10 points in Phase 1
2) Rescue a stranded pilot--100 points in Phase 1
3) Destroy the enemy base station cluster--200 points in Phase 1
These point values increase proportionately as you progress through each phase.
You are allowed four patrol vessels in the game.
Game Variations
Game 1: Basic Game
Game 2: Basic Game for two players
Game 3: Children's Game
Game 4: Children's Game for two players
Comments
Part of the appeal to this game is its simplicity. Speaking as one who hates reading instructions, I appreciated the fact that a quick scan of the booklet enabled me to play a reasonably good game (although I did shoot my friend the stranded pilot).
Since Planet Patrol increases in difficulty as the game progresses, high scores are not easily attained. This game is basically a simpler (although not necessarily easier) version of Atari's Defender.
By David H. Ahl
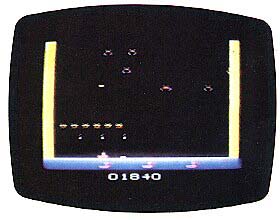
Airlock by Data Age
You are captain of a disabled nuclear submarine that has come to rest on a ledge perilously close to a gaping hole in the floor of the ocean. Rocked by currents welling up from deep inside the earth, your vessel has begun to take on water in its lowest levels. Can you escape each level in time?
The objective in Airlock is to retrieve the hatch keys on each level and make your way to the next level before your compartment floods. At the same time you must avoid the torpedoes which have been shaken loose and which, when they cross your path, rob you of precious time.
|
When the fire button on the joystick controller is pressed, your player jumps and the timer starts. You must now retrieve the hatch keys in the proper order (orange key first, white key second) and make your way to the elevator. The elevators are on alternate sides of the screen at each level.
To retrieve a key, you move your player directly underneath it and press the fire button. The player will jump to collect the key. You also use the fire button to move your player over the barriers on each level as well as to help him jump over the torpedoes that constantly move across his path. If you miss and are struck by a torpedo, it will not explode (fortunately), but you will be out of commission for several seconds before your player jumps up to resume game play.
You have ten seconds to complete a level. If there is any unused time at one level, it is credited to the next. As a result of this timing system, we found that the first level was by far the most difficult. You will find it easiest to complete if you wait to press the button to start until just after the torpedo has passed you heading from right to left.
Upon starting, immediately run right and jump the barrier. Position yourself under the key, jump up, and retrieve it. Run to the left, again jumping the barrier. Continue running and jump the torpedo and the other barrier at the left side. Then jump up and retrieve the white key and start running to the left where the elevator door will have now opened. As you touch the left wall, the elevator will rise to the next level.
It takes almost ten seconds to accomplish this procedure, so you will not be entering the second level with any extra time. However, it is somewhat easier because you start right next to the orange key and, by running to the right with three quick jumps (two for the barriers and one for the torpedo), you can retrieve the white key at the right side and be in the right elevator in about eight seconds.
While the pace of the game does not let up as you progress upward, at least you have a small buffer of a second or two which, by clever playing, you can sometimes increase as you go along.
One hint mentioned in the instructions which we found useful is to position your player so that he can jump a barrier and torpedo at the same time. It can save you precious seconds, and the time you save on one level may help you out on the next.
In Airlock, your only controls are the joystick which moves your player from left to right and the firing button which causes him to jump.
This is one of the few games in which scoring is not tallied by increasing points. Instead, you try to beat the clock and you "win" the game if you can escape to the top level.
There are four variations of Airlock: five airlock levels for one or two players and ten airlock levels for one or two players. In the variations with ten airlock levels, the second five levels have four barriers per level, thus providing an ample challenge for even the most seasoned submarine commander.
Other Games From Data Age
We tried four other games from Data Age: Sssnake, Encounter at L-5, Warplock, and Bugs. Warplock is a variation on the Galaxian theme, while Encounter at L-5 is a distant cousin (very distant!) of Missile Command. Both are challenging and entertaining.

|
Sssnake is based on an original concept in which you are a daring big-game hunter who has stumbled into the legendary "land that time forgot." You are in a fortress at the center with snakes and other prehistoric creatures roaming the trails outside. Not only that, but the snakes can't be destroyed and eventually they wriggle their way inside your fortress. Your only defense then is to avoid them.
Thus, Sssnake becomes a game of strategy in which you attempt to avoid the snakes while positioning your weapon to fire upon the other creatures (which can be killed). The woods are full of barriers (trees?) which deflect and absorb your shots. Strategy and skill are necessary to rack up big scores in Sssnake.
In Bugs, your objective is to zap giant insects which live in sub-terranean hives, as they escape to the surface. Since the action takes place on a distant planet there are many other rather unusual creatures, all bent on your destruction. We are sure glad these bugs don't live on planet Earth!