
|
BY ATARI FOR VCS AND 5200
|
BY MARTHA KOPPIN
DESCRIPTION
Atari's Defender is similar to the arcade game in action and strategy, but instead of the six controls found in the arcade game, the home version has only the joystick controlling all firing and maneuvers.
Basically, the game consists of your space Ship (Defender) and aliens manning various types of spacecraft. They are intent not only upon destroying your ship, but also upon kidnapping the inhabitants of the city. (Apparently, they have been pretty busy, since there are only live humanoids left.) Once kidnapped, the humanoids are changed into Mutants and return to earth to get you and eradicate all vestiges of civilization.
Since you alone are responsible for the protection of the city, your aim is to destroy the aliens and their ships.
Each alien spacecraft has different characteristics, which Influence how you should attack them.
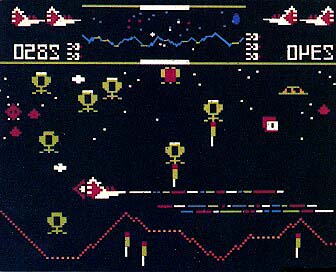
The pods pose no threat to you unless you bump into them or shoot them. However, they are worth 1000 points each, and you must destroy them sooner or later to progress to the next wave of aliens. When a pod is shot, it breaks into two swarmers which appear instantly often very close to Defender. Frequently, they fire at the same moment they appear, giving Defender no chance to get off a shot. This seems to happen most frequently when the pod is shot at mid-screen; by waiting to fire until the pod is at the very top or bottom of the screen you often let a few seconds to home in on the swarmers before they attack you. Swarmers are the marksmen of the alien fleet and seldom miss.
Bombers pose no real problem as long as you don't bump into their airborne mines.
Baiters are small, thin ships that are almost as tenacious as the mutants but harder to hit. Since you can fire only horizontally, your activity is like trying to sink an oncoming torpedo.
Landers move predictably, and only a few will fire in the general direction of Defender. Accuracy is not their strong suit. However, since the shots are not too difficult to dodge (although periodically a shot will home in on Defender and thwart her evasive tactics), there is a danger that you will become careless and get blasted.
The landers cannot fire horizontally or vertically. They must always fire at an angle. This is important when you are trying to rescue a humanoid. If you can stay abeam of the lander as it ascends with its prey, you can destroy it at close range and catch the humanoid. The only problem occurs when you get too close and bump into the lander as it is trying to make its escape, you will destroy lander, humanoid and Defender in one fell swoop--not a cost effective move.
Mutants are the most obnoxious of all, showing no mercy to the one who tried to save them from a fate worse than death. They are faster than Defender and tenaciously dog her as she attempts to complete her mission. The first mutants do not seem as nasty as those which appear later on in the game; they move slower and periodically slide off-screen, where they pose no threat. The later mutants are almost impossible to avoid, and the only effective defense is to move around quickly, firing in an uninterrupted stream.
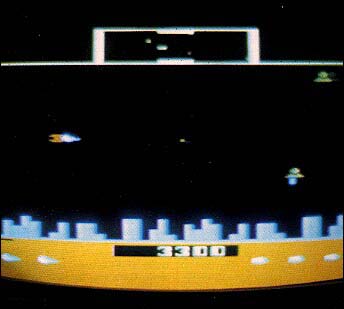
Above Defender and the aliens, at the top of the screen is the scanner. This gives you advance warning as to the position and number of oncoming aliens. At first it will look like nothing more than video snow, however, with some practice you will be able to determine what is going on at various points in the city. When a blip goes off the scanner screen at one end, it reappears at the other side. You must dispose of each alien. Don't be fooled into thinking that once they fly by they are gone forever--no such luck.
The scanner also provides information on the number and location of any remaining humanoids; they appear as small dots on the bottom of the scanner screen. If you keep an eye on the scanner, you know at once the direction in which to fly to rescue a kidnap victim. A lander with a humanoid attached looks like a double image rising, vertically on the scanner screen.
Learn to use the scanner; as the game progresses, it is the only way to be at all prepared for attack.
Only one lander at a time will attempt to kidnap a humanoid. Every lander is a potential kidnapper, but the particular one assigned to the task at the moment moves in a slightly different way. The non-threatening landers move in a slightly diagonal track; progressing steadily across the screen in the opposite direction of Defender and descending at the same time. A kidnapping lander moves straight down over a humanoid, and when he has made contact, rises straight up. The abducted humanoid is visible, hanging on below the lander, flashing and presumably shrieking in terror!
Joystick Controllers
The Joystick controls the altitude, direction and speed of your fighter plane. Altitude is controlled by the vertical movement of the stick, and direction is determined by moving it to the left or right. Speed is increased by increasing the horizontal movement; to brake, simply pull the stick in the direction opposite of that in which you are flying.
To enter hyperspace, move the fighter all the way to the top of the screen and press the red button while exerting vertical pressure on the stick. The spaceship will disappear and quickly reappear in another location. This is not a particularly useful maneuver, since you cannot control where the ship reappears.
A more strategically valuable move can be accomplished by simply pushing the fighter off the top of the screen. It becomes invisible (and therefore invulnerable), and will reappear at the same location when you pull the stick toward you.
These same actions bring about a different result when performed at the bottom of the screen. When you move the ship down the city, it again becomes invisible, but when you press the red button every flying thing visible on the screen is obliterated. This is the detonation of the Smart Bomb. Obviously, this is the most powerful weapon at your disposal; unfortunately, you are given only a few of these beauties, so they must be used frugally.
The red button is also used for straight firing and to reset the game.
Start with the difficulty switch on B, giving Defender a little more speed to outmaneuver the aliens. The A setting is for later (much later) when you need an extra challenge.
Scoring
The point value for destroying the various aliens is as follows:
|
Pod Swarmers Bomber Baiter Mutant Lander |
1000 points 500 250 200 150 150 |
Shooting a lander which is in the process of abducting a humanoid, and bringing the humanoid safely back to earth results in an extra 1000 points. Shooting a lander and catching the humanoid in mid-air is worth an extra 500 points.
If you shoot an abducting lander before it takes the humanoid above the bottom third of the screen, the humanoid will fall safely to earth even if you can't catch him. This results in an extra 250 points.
If you shoot the lander and let the humanoid fall from the upper portion of the screen, he splatters on the city and dies; you get only the 150 points for shooting the lander.
At the end of every wave of aliens, you are awarded 100 points for each humanoid remaining on earth.
|
Playing Strategy
At the beginning of each wave, if you fly east you will encounter a bomber, which is easy to take care of immediately. Then there will be two pods. Do not shoot these if they are in mid-screen; the resultant swarmers will be too difficult to avoid and Defender will meet an untimely end. Wait until the pods are at the very top of the screen, or let them go by completely, catching them next time they show up at the top of the screen.
Since the first wave of aliens moves fairly slowly, you may want to shoot everything but the landers. This will give you the potential to rescue humanoids from each lander in this wave for 1150 points each (150 for the lander and 1000 for rescuing the humanoid), instead of the regular 150 for just shooting the landers. The bad news about this routine is that you may get yourself shot down because you are fooling around in the midst of a screen full of aliens. It takes a little practice to dodge the enemy fire and to catch the humanoids, but if you can manage it, you will add at least an extra 10,000 points to your final score.
One more way to maximize your score during the first wave is to leave one pod intact until the very end of the wave. This is because if the last ship shot is a lander, you will not get the chance to rescue the humanoid and get the 1000 points before Wave Two begins. So, leave the pod until last; it will still split into swarmers, affording the opportunity to score more points.
During the second wave, the kidnappers move much more quickly, making it very difficult to keep up with their activities. Shooting everything in sight is the strategy for this and every subsequent wave.
Each time you score 10,000 points, you are awarded an extra Defender (you start off with two extras) to replace one that has been shot down. At each 10,000 point mark you are also awarded another Smart Bomb. Do not use your Smart Bombs too freely, because you will need them as the going gets tougher. One appropriate place is when your score is close to a 10,000 mark and you are on your last life. Detonating the Smart Bomb at a point when the screen is filled with aliens will often put you over the 10,000 mark, giving you both another life and another bomb. Obviously, it is better to use a Smart Bomb than to lose your last Defender.
After every five waves of aliens, all of your humanoids are restored to Earth and the city is rebuilt (if it has been destroyed). This is important because after the last of your humanoids is kidnapped and changed into a mutant, the whole screen blows up, including the city, and you are alone with the nastiest mutants of all. If you can stick it out until the fifth wave, things will calm down and you can once again fight against the landers, bombers, and pods (but on a more difficult level).
When the mutants have finally taken over, you can catch your breath by moving your space ship either to the very top or the very bottom of the screen, until it disappears. In this position, your ship cannot be shot down, neither can it do damage to the mutants (unless you have saved your Smart Bombs--I told you you'd need them), so sooner or later you will have to reenter the fray and face the music. That is, of course, unless you are going for the world's record for staying alive in Defender (boring!).
When you are cruising along during the first wave looking for a potential kidnapper, it is advisable to move Defender to the extreme top or bottom of the screen so you can move freely without getting shot or bumping into something. Even though you are invisible, you can still move the space ship back and forth over the city, looking for humanoids.
Since the mutants are definitely the greatest threat to your safety, it will pay you to keep at least one of your humanoids on earth so that you will not be subjected to the onslaught of mutants when the city blows up. To this end, it sometimes works to hover over your one remaining humanoid to protect him. If you can successfully keep the invaders away from him until the fifth wave is passed and the humanoid ranks are replenished, you will have bought yourself a little more time.
One final note: If this is all too frustrating for you at first, try Game 10 (children's game). It is good for beginning adults, and if you practice late at night, nobody needs to know . . .
Game Variations:
Game 1: Basic game as described above. Game 11 is the same, but for two players, alternating turns.
Game 2: Basic game but humanoid pickup speed is fast, as are the mutant and baiter speeds. Game 12 is for two players.
Game 3: This game has no city, no aliens--nothing but mutants. The scoring remains the same in that each time you hit a mutant, you are awarded 150 points. Therefore it is difficult to get extra Defenders or Smart Bombs; the points accumulate too slowly. The city is not restored after the fifth wave. These mutants are the nasty kind. Game 13 is for two players. Boring game variation.
Game 4: Basic game but Waves One and Two are skipped; the game begins with Wave Three. Game 14 is for two players.
Game 5: Same as Game 4, but humanoid pickup speed and mutant and baiter speed are fast. Game 15 is for two players.
Game 6: Same as Game 3--mutants only--but begins with Wave Three. Game 16 is for two players. Just as boring as Game Three.
Game 7: Basic game but begins on Wave Five. Game 17 is for two players.
Game 8: Same as Game 7 but humanoid pickup speed and mutant and baiter speed are fast. Game 18 is for two players.
Game 9: Same as Game 3--mutants only--but begins with Wave Five. Game 19 is for two players. Still Boring.
Game 10: Children's version. (If it makes you feel better, we can call it "Novice Game".) Basic game but humanoid pickup speed and mutant and baiter speed are slow. Worth trying.