|
BY JOHN J. ANDERSON
BOUNTY BOB GETS HIS MAN
Miner 2049er is probably the best and the worst software event that has happened in quite a while. It is without any doubt the most popular game I have ever run on the Atari computer, and next to word processing, now my most frequently run program. Star Raiders was a passing fancy compared with this game; Choplifter an afternoon's diversion. After dozens of hours, instead of writing about it I feel like playing a game right now: Miner 2049er has true staying power. It always offers something new. It always makes you laugh.
It is now available for the Atari 5200, as well as the Atari computer, and will soon be available for many other machines.
Owen, our arcade games aficionado extrordinario, devoured Miner with all the enthusiasm of a fine wine connoisseur. In the February issue of Creative Computing, he called it "limitlessly playable." With ten separate and very distinctive screens, the action never bogs. "Atari Strikes Gold," said Owen's headline.
LOST WEEKEND VIDEO GAME
Why then was the game also the worst thing to happen to me? Well, though not in Owen's league, I'm a somewhat better than average gamester. When confronted with something so challenging that even twenty hours of play doesn't beat it, we're really talking addiction, folks. I had just finished work on an Atari games book at the time, and was sure that I never wanted to see another video game. Then Owen dropped Miner on my desk.
When I realized some days later that my output for Creative Computing had dropped dramatically because Miner was all I ever booted, I became concerned. There was only one way out, and that was radical. I dropped everything, and learned to beat the game. The stakes were high: if I hadn't done it, I might have landed on video skid row, begging for quarters.
Don't get me wrong. I still have to muster a lot of concentration to make it through all ten screens at "zone 1" difficulty, and a new level of challenge is added simply by starting the game at zone 2 or 3. But I did find a sure-fire route all the way through, and only then did my obsession begin to abate.
MEET BOUNTY BOB
Miner 2049er, like Donkey Kong, is what I would have to call a climbing game--a popular and growing arcade category. But the advanced screens of Miner are so original, so different, that they transcend the genre. Getting to the Advanced screens is truly rewarding, and completing them to arrive back at screen 1 of the second zone is a blast. Scoring almost seems secondary, though there are ways to maximize your score, and after you have mastered the game, you can concentrate on "upping your high. " But until you discover the "northwest passage," so to speak, you are best off ignoring your score completely.
In the game you are Bounty Bob, and you must cover all the catwalks in the mine, claiming treasure, and destroying alien mutants. As you shuffle along, controlled by joystick, the sections of catwalk fill in below your feet. Once you have covered all sections on a screen, you advance to the next one. If you take one of the several prizes to be found along a path, all mutants on the screen become temporarily vulnerable. They change color and shape, then flicker back to their original and deadly form, a la Pac-Man. The speed of the mutants as well as the time they remain vulnerable depends on the zone of play. The first ten screens (called "stations") default to zone 1, although the game can be started on a tougher level.
There are other hazards on each screen. Obviously if you suffer a fall of too great a distance, it will prove fatal. There are also chemical and mechanical hazards, such as nuclear waste, pulverizers, explosives, and poisoned martinis to be avoided. There are slides, which can sometimes provide a short cut, and sometimes a trap with no escape. It is up to Bounty Bob to use them to his advantage. He gets three lives, and an extra bonus life is awarded if he reaches 10,000 points.
|
In some screens there are numbered teleporters, and Bob can "beam" up or down to various levels of the catwalk by pushing that numbered key. Other screens sport moving platforms upon which he can hitch a ride.
The game is also played against the clock. A timer at the top of the screen clicks off the seconds left for completion of that station. If Bob begins to flicker, he's about to expire, and only swift completion of that level will save him. Perhaps the challenge of the game is beginning to become clear to you.
Beside his characteristic shuffle, Bob can jump. By aiming your joystick in the direction you want him to jump, then pressing the trigger, you can make Bob into a lithe and tireless leaper. In fact, you must perfect his grand jete in order to beat Miner 2049er. Bounty Bob is in your hands.
MASTERING THE GAME
I have never been a proponent of rote patterns for beating video games, but as I am about to set out ten stations worth of patterns for you, a few qualifying statements are in order. First of all, I know for a fact that there are other ways to complete the screens, and though I have tried in all cases to hone my routes to perfection, better paths probably exist for some of the screens.
More important, I want to encourage you to practice the ability of ad lib maneuvering, as opposed to what you learn here. The real fun of any video game comes when you lose a rote pattern for some reason or another, and must think and move fast to find an alternate means to success. Don't quit just because you blow the pattern. Fight your way out of it, and you will get the most enjoyment out of Miner 2049er.
Before we get into the road map specifics of beating Miner 2049er, let me provide some general advice and pointers (Refer to Table 1, Page 104):
If you want to discover your own paths through the game, you will have a lot of fun doing so. Then, only if you are totally stumped might you want to peek at the balance of this article. For anyone who feels the game is ruined by eliminating the exploration component of any of the screens, my suggestion is to stop reading right here.
THE SPECIFICS
Here is a blow by blow account of all ten screens.
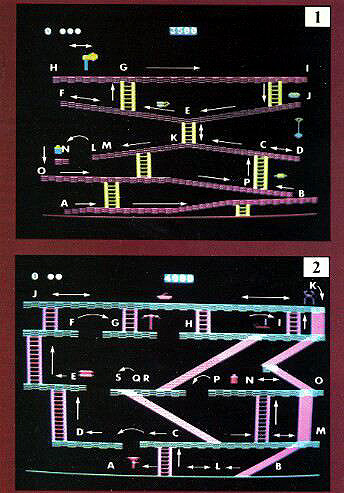
STATION 1: THE MINE SHAFT
The first game screen helps you get your "sea legs" and warm up the old joystick. Move all the way across the bottom walk, noticing that a little pirouette is needed to fill in the very left hand side. Likewise, you'll need another doubling back maneuver as you move between point B and the ladder. Head up the ladder immediately, make a right, and pick up the shovel. Then head up the middle ladder, grab the teacup, and make for the left-hand edge, point F.
|
Next it's up the lefthand ladder, and your first encounter with the mutants. The axe will help you keep them vulnerable as you first move left, then right all the way across the top platform, to point 1. Backtrack a bit to get down the righthand ladder, finish off the righthand side of this walk, obtaining the rolling pin in the process, and then down the middle ladder again. Make sure you have hit the tile directly above the middle ladder. Just standing on it won't fill it in--you must move across it. After the ladder it's a left, to finish off the walk to point L. Then backtrack about two tiles.
Now jump to the left to clear the ledge marked as point N, picking up the jug as you go. It will make the next mutant vulnerable as you walk, not jump, off the ledge to the left, and finish off the rest of the board. Note that one mutant is left alive. You could easily alter this pattern slightly to finish it off, but it would undoubtedly cost more time points than the puny worth of the alien.
STATION 2: THE SLIDES
The only treacherous terrain in the second screen is its namesakes, the slides, and they are not likely to be fatal, just annoying. The first thing to do is move to the left, grab the torch, and finish off the left- and right-hand mutants. Then up the ladder to point C. Jump off the lefthand ledge, then double back a bit to finish off the walk. Move through point D and up the ladder.
Make a right, and grab the point E hamburger. Then up the ladder, and jump off the ledge at F to the right. Hit the lefthand top-level mutant in the process.
Jump again off the right-hand ledge, grabbing the pick axe and the plane as you go. Jump up when directly under the righthand top-level mutant to vaporize him. Jump the slide between points H and I, hitting the candlestick and filling in the floor, but without dropping down. This will take a bit of practice. You don't need to fall down a slide to clear it. Work it from the sides. Finish out that platform except for the very furthest right extreme, because you don't want to go down that slide yet, either.
Then go up the ladder, make a hard left, and go all the way across to point J and back, grabbing a set of pliers. Now slide down the slide from point K to the bottom of the board.
Head back up the ladder but this time to the right. Jump the slide to finish off point M, then jump back. Go up the ladder to point N, and repeat the jump over/jump back process to hit point 0. Then grab the flask, jump left from point P, but only as far as point Q. Then double back to point R, located at the lefthand side of the slide that drops down from above. Jump left from there, and
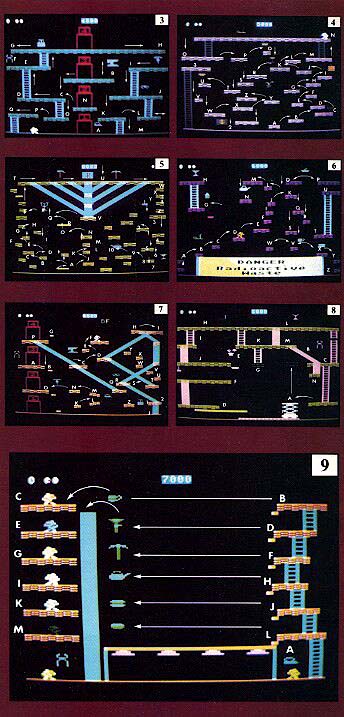
STATION 3: THE TRANSPORTERS
Now things start to get interesting. There are many ways to complete screen 3, but here is one good way. Move immediately left, grab the iron, and finish off the mutant. Then, after positioning yourself in the transporter, press 3. Notice that the transporter must re-energize before it can be used again. Move right and jump to grab the anvil at point B, then walk right off the left-hand side of that platform to land at C. Go all the way left to D, then back a bit and up the ladder.
If the mutant above is not vulnerable, pause on the ladder until it moves right of the ladder. Then make a dash for the pliers at point F, finish off the mutant, and head up the ladder to grab the detonator. Move left, then right, across the top from G to H.
Pause at point H until the mutant below is left of the drill. Then jump down, grab it, kill the mutant at I, and head down the ladder (don't try the walkoff method here, it's too far). Turn right and finish the platform, hitting a mutant and grabbing the goggles. Then backtrack left and walk right off the lefthand side to fall to point K. Move left, then right to finish the platform. Jump right to point L, finish that platform, then walk-off right back to the floor at M.
Get back in the transporter and press 2. Finish the floor there, then jump left to point C, where you have already been, to walk off the right to point 0. This may seem dumb, but it won't seem too silly if you try jumping directly from N to 0 a few times. Finish off that floor, then jump left to P, and move to Q to finish the board.
STATION 4: THE LILLIPADS
This screen is where things really start to get dangerous. Certain moves must be executed with careful timing and dexterity to successfully complete this board.
Pause for a moment in front of the money, until the mutant on the far right moves in front of platform A. Then grab the money, knock out both mutants, and jump right onto A. Finish it, jump right to B, finish it, then jump to C, killing the mutant and getting the candlestick. This entire sequence must be completed on the power of the money, so don't tarry.
Jump left to D, then E, F, G, H, hitting the mutant at J on the power of the candlestick. Make sure you finish every platform as you go. Jump to I, grab the cake, then up to J and K. Grab the martini, then jump to L and M. Eliminate the top-level right-hand mutant by jumping up from the platform at N.
Then go up the ladder, right and all the way left to complete the top, hitting the left-hand mutant on the way.
Walk off the left top to point 0, then to P. To jump to Q from platform P, you must be all the way right--"hang ten" off the right hand side of the platform. Then you may reach Q, grab the burger, and walk off the right back to K. Standing just to the left of platform L, jump down to R. It is important that you be not too far left when you make this jump, or you will miss R completely, and "buy the farm." The power of the burger will make the mutant at R vulnerable. Drop down off the left to S, finish it, then drop down off the left again to T. It is important to "hang ten" again, this time from the left of T, to jump left and reach U. You will grab the pie as you drop off the left-hand side of U to V. Walk off right to reach W.
After W is completed, jump right to X, right to Y, and jump up to get the flowerpot. Jump left to Z, then walk off the left-hand side, drop to X again, walk off the right-hand side, and you will be at I. Walk off the left-hand side of I to hit the ground once again. Finally climb the ladder at the extreme left, and finish the walk at point 3. Simplicity itself, right?
STATION 5: ADVANCED LILLIPADS
By the time you master this screen, finishing the walkways over slides without sliding down them will be second nature to you.
The first thing you should know about this station is not to drink the martini right above your head. Remember what was said about glowing things. Wait for the left-hand mutant to move right, then follow it, and jump to platform A. From there go to B, C , and D, but don't take the teapot just yet. Jump left to E, left to F, and up to G. Wait until the mutant at S moves left to jump right from G to H. Walk off the right end of H and the right end of I to D again. Pause until the lefthand mutant is right below, then grab the teapot and walk off the righthand side of D. Finish off both mutants.
Jump back up to A, but this time jump right to J. From there it's left to K, right to L, then straight up to M and N. Jump left to O, straight up to P, then left to Q. Pause after jumping up to R, until the top-level lefthand mutant is at the far right of its path. Then jump left to S, hitting the mutant there, and up, up, up, and up to T. You can use the power of the blowtorch between R and S to eliminate the toplevel lefthand mutant. if this does not work, you will have to avoid the mutant, either by clever timing or by jumping it, until you reach the pickaxe on the top level.
Once you reach T, fill in the floor to point U without falling down the slides. Backtracking will be necessary to position your jumps between slides. You may choose to use the money to hit the top-level righthand mutant. Otherwise you can get it with the hammer later on. Slide down the slide at U to V, finish that platform, then "hang ten" to the left. It's a long jump from V back to Q. If you want to experiment with the moving platform to the right, be my guest. I think it's a trap, and I always retrace my original route left back up to the top platform. It wastes time, but is necessary.
Get back to point U by jumping slides. Jump slides all the way right, killing the remaining mutant with the hammer if you haven't already done so. Walk off the right hand side to point W. Walk off left to X, left again to Y, right to Z, left to I, then jump left to 2. Grabbing the candelabra is very tricky. You must be one pixel from falling off the left hand side, which is a fatal drop. Jump straight up to grab the candelabra. I suggest this only to advanced players. There is no harm in leaving it alone.
Walk off the right of platform 2 to reach 5, repeat to reach 6, then walk off left to the floor. Jump up to 8, and hang ten as far as possible to jump left to 9. It may feel wrong at first, but it's the only way. You can practice this one, since missing is not fatal. All that's left to do is jump left to 10, and the board is cleared.
STATION 6: THE RADIOACTIVE WASTE
Although it is not easy to concentrate with nuclear debris staring you in the face, you can conquer screen number 6. Your first few tries are bound to be discouraging, no matter what preparations you make. Be patient--go ahead and die a few times--that in video games is a part of the learning process.
And whatever you do, don't give up hope. Station 6 is a breeze once you learn the trick to it.
On this screen, more than any other, you must master the art of hanging ten off the edge of one ramp to reach the other. Jump up to A, B, grabbing the candle, hanging ten then to C, destroying the mutant, and following to D, E, and F.
Pause then at F, and wait for the moving ramp to come around. You may want to jump up to I. Either jump up to or slide down onto the moving ramp. If you have worked reasonably quickly up to this point, your timing should be good to catch a left-moving ramp over to point G. If not, wait for the ramp to come around again. Later you may change the pattern, but for now stick with me exactly.
Once you have caught the ramp, ride it to the left until you are parallel with tile C below. Jump left to point G, catching the jug as you go. Climb up to H, knocking out the mutant and catching the prize, then back down to hang ten off point G.
Wait patiently for the ramp to come back your way. When it is just ahead of your hanging toes and incoming, slide down onto it. Ride it back to ledge I. Certainly this takes a bit of practice.
The jumps from I to J, K, L, and M are quite straightforward. From M slide down left to N, then jump back to J. Jump through K and L again, and this time right to O. Right to P will pick up the plane and hit the mutant at P. Then jump left back to O, walk off left to K, walk off right to Q, then off right again to R.
Do not try to make it from R to S. Rather jump back up to Q, then walk off left to reach S. Jump right to reach T, climb up to U and then back down again. Hang ten, then jump left back to S. Walk off right from S to V. Jump left to W, right back to V, then right again to X, grabbing the burger, which you will use to nail the final mutant at Y, then Z. And viola.
Station 6 marks a point in the game at which multiple routes become not only feasible, but commonplace. There is more than one way to get through this screen, and I encourage you to be flexible; you will be needing this flexibility ahead.
STATION 7: ADVANCED TRANSPORTERS
This is one of the most dangerous screens in the game. There are many opportunities to misstep, and mutants seem to materialize from nowhere. If you can make it past this screen, you have a good chance of finishing the first zone.
Move into the transporter and beam yourself to level 3. Catch the ramp right to C. This will take practice, as will all ramps. Hang ten, and as the ramp approaches under your toes, jump. Jump right to C, grabbing the anvil, and right again to D. Jump up to snuff the mutant above you on F. Jump left to E, then right to F, jumping for the whopping "BF" prize overhead. Don't miss it, as it is worth over 1000 points. Then catch the ramp to the right, jumping when at the furthest right to H. I wait until the ramp actually changes directions, then immediately jump right, and am never short.
Aha, the slides are indeed back to haunt us. Jump over both slides here, to I, then jump left again to a point between them. Carefully finish off this platform, then take the left slide all the way down to J. After getting both the mutants, catch the moving ramp to get up to K. Moves L, M, and N are simple. Don't take the ramp left to O--that is a trap. Hang ten, jump left, and you'll make it, grabbing a drill and killing a mutant in the process.
Stand toward the left in the transporter, then beam to 4. If you stand dead center, you will immediately slide down a slide, so stay left when you beam up. Jump the slide to finish the platform, then slide all the way down.
Jump up to R, then back down to Q. Standing to the right of the slide, jump to point S, finishing that platform--this will take a bit of practice. Then jump right to T, and up to U.
You must stand to the right (I might almost call it "hanging heel") to get from U to V, V to W, and X to Y. If you stand in the middle the jumps will be fatal. Jump left from Y back to D, and left again to C. Slide back down to Q.
Walk off right to Z this time, then right to I, and right to 2, and back down to the floor at point J. Go back into the transporter, and press 3 again. Take the ramp right again, only this time jump right early, so that the last unfinished tile of the screen fills in.
A note of caution should be injected here. Dozens of things can go wrong in Station 7, forcing you to deviate from the given pattern. This should be no problem, as long as you complete the board in the groups of steps that have been laid out here. Nail the elevated mutant first, or he'll cause trouble. You may want to leave the pliers alone the first time through, just to have a backup prize in case of emergency. Set for each and every jump, as they are tricky.
STATION 8: THE LIFT
This station is tricky, but it is also more fun than any other in Miner 2049er. Why? Because of the lift itself, which is operated when Bob is on it by tapping the space bar and moving the joystick. The first time you reach it, you should play around with it to get the feel of how it works. When leaving the lift, you free Bounty Bob with another tap of the spacebar or a quick press of the trigger. Don't rush when you are on the lift, and make sure you know which operating state you are in the whole time you ride it.
The moving platform you find on this level is glowing. That means it is fatal. Don't touch it.
Finish the platform you begin on, then jump left to the lift. Hit the spacebar, then go straight up until the lift is even with the small platform at B. Carefully jump right to B, and right again to C, then retrace your steps back to the lift. Stand just left of the ladder when jumping from C back to B. Set for each and every jump--the B platform is small.
Once on the lift, position Bob at the far left, then hit the spacebar. Move left and down to reach the prize at point F. Then move the lift down to match the platform at point D. Disengage control of the lift, then jump left, hit the alien, and finish the platform at D. Jump back then to the lift. Head straight up until parallel with the platform at point E. Jump left to J and nab a mutant. Don't worry about finishing the platform, as you'll be back. Jump back to the lift, and ride it down until it is even with the platform at point F. Time your jump left so that the mutant is moving away from you as you reach its platform. You will have to jump the mutant and a slide to reach the blowtorch. Watch that slide! Falling down it is not fatal, but it might as well be, as there is now no escape from point D.
After jumping back to the lift, position it so that you can climb the ladder, with the right hand side of the lift even with the right hand side of the ladder. This will facilitate jumping from J back to the lift.
Climb up to K. but don't worry about finishing it just now. Time your move to H, so you can reach the candle and knock out the top-left mutant. Climb down the lefthand ladder back to I, jump the slide to finish the far left, and from there slide back down to J. Here is where you'll appreciate the placement of the lift, as you jump back to it.
Move back up to K and continue to ignore K as you time your move to L. Time the climb once again so you may jump the slide, and do in the top right hand mutant by grabbing the martini. After the top level is finished, slide down the slide. Finish off K, except for the area labelled M over the slide at the far right. Jump to this tile from a point just left of the slide from L to K. Then slide down to finish the screen at point N.
Don't try to climb a broken ladder or jump off one.
STATION 9: THE PULVERIZERS
I hesitate to call any screen in Miner easy, so let me say merely that there are fewer kinds of mistakes to make on this screen than on any other. Time your jumps, and this screen will be yours.
First, climb all the way down to the floor at point A. Stand in front of, but do not take, the iron. When the approaching mutant clears the last pulverizer, grab the iron and kill it. Then climb all the way back to point B.
The pattern from here on repeats itself at each level. Walk off left to the little ramp nestled under point B. It will shoot you across the screen, so you can jump left to point C, grabbing the cup and getting a mutant. Timing the jump is easy, if you know the trick: only jump left immediately after you have taken the prize just right of any platform. If you wait until the moment you take it, then jump left, you will always make it to the lefthand platform. Then take the slide all the way down. The first time you get there, there will be a mutant to take care of. Pause, then, in front of each pulverizer for one cycle, and you will never get nailed by one. It may look possible to skip this step sometimes, but why take chances?
Repeat these steps through D and E, F and G, H and I, and so on until the screen is finished.
|
STATION 10: THE CANNON
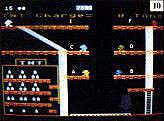
The first thing you must realize, and accept, about this screen, is that the effect of the prizes will wear off long before you have a chance to wipe out any mutants. Yes: you must work around each and every alien to complete station 10.
The only value of the prizes here is to act as charges in Bounty Bob's bid at becoming a cannonball. The top of the screen will read out how great a charge has been built up. As charges can not be put down, be careful in the powderkeg. Don't jump around in it or make any false moves.
Pick up a single, 10-ton charge, then climb up the ladder on the right and walk off left into the cannon. Move the cannon to the far left, and wait for the mutant to walk right. Then press the trigger to fire yourself onto platform A. Fill in the left of platform A, then head down the slide.
Pick up another single charge and use it to finish the righthand side of A. Jump the mutant as it heads back at you and hit the slide back down. This will leave one remaining single charge with which to complete platform B. You must jump the mutant at B at least once to effect this.
The rest of station 10 works in the same way. You have three chances at the second level of platforms, which require double charges (twenty tons). It can be done with two, so there is an extra here. You have six chances to complete the third levels E and F, requiring triple charges (30 tons). When firing upward, as when sliding back down to the floor, you must watch not only the mutants on the same level as you, but those above and below to insure a safe trajectory or clean drop down a slide. Grazing an alien is always fatal.
When dropping down the righthand side to get another charge, you can walk off left unarmed, as if to drop in the cannon. This movement will result in a harmless fall to the floor, saving time.
Remember not to clean up any extra charges until after all the other platforms are finished. Only then should you pick up the remaining charges to clear the board. Then you will be through.
This screen requires flawless skill in jumping mutants. You should hone this skill through continued practice. Remember, the timing of a jump is critical.
And there you have it: you have made it entirely through zone 1. At station 1, zone 2, the terrain looks familiar, but the enemy is faster and more deadly. For added challenge and higher scores, start the game at zone 2 or 3, and see how far you can go. At zone 4, new patterns are called for--see if you can discover them. At zone 5, things are pretty nearly impossible.
Best of luck and many happy (if obsessive) hours with Miner.
|