SPECIAL FEATURE
MEGA macrocosm
A close look at Atari's MEGA ST.
by Tom Hudson
Tom Hudson is a free-lance programmer who works primarily with the Atari ST series. His commercial products for the ST include DEGAS, CAD-3D and DEGAS Elite. Tom is a SYSOP in the Atari SIGs on the CompuServe telecommunications network, where his ID is 76703,4224.
Atari has been manufacturing its line of 16-bit ST computers for almost three years now. The earliest ST models, which appeared in mid-1985, contained 512 kilobytes of memory—quite a bit when compared to the 48K limit of the Atari 400 and 800 series 8-bit computers of just six years earlier. But there was a problem. Those STs loaded their operating system, TOS, from disk, using a large chunk of memory for system overhead. This seriously limited the size of programs that could be run—even the 300K or so left over was a restriction for graphics programs needing large amounts of memory for bit-mapped images.
The ST came equipped with sockets for ROM chips which could hold the operating system, so Atari tackled this issue by early 1986, when they released the TOS operating system on ROMs. Just about every ST owner upgraded to the ROMs as soon as they appeared, and everyone was happy—for a while. It was apparent that 512K, which earlier had seemed like all the memory a person could ever want, just wasn't enough for complex programs or some of the helpful desk accessories that were now available.
At this time, Atari was developing the 1040ST, the 1-megabyte version of the ST. This machine was to be essentially the same as the 520, but was more self-contained, with a built-in power supply and double-sided disk drive. Rumors circulated widely that the 1040 would contain a socket for a "blitter," a custom coprocessor which could speed up graphics operations immensely. When the machine appeared, though, there was no blitter, no socket. The 1040 did have the TOS in ROM, which was a plus, but in reality it was nothing more than a 520ST with increased RAM. It was in a package which was more convenient to move around, and had a double-sided disk drive built in, but that was about it. As a result, many people (myself included) had their 520s upgraded to a megabyte and bought external double-sided drives, rather than buy a whole new machine.
Time passed, as time does, and Atari came out with the 520ST FM—basically, a 520 that had graduated to the 1040 case. It had a built-in power supply and a single-sided floppy, making the machine just as convenient to move around (no more power supply "bricks" to worry about!) This allowed Atari to reduce the tooling needed to manufacture the computers, with only one case to mold instead of two. It also got rid of an external power supply and its case. From an economic standpoint, it was a smart move.
During this time, there was a lot of talk about Atari's long-awaited blitter chip. The older 520s and 1040s didn't have a socket for this chip, but it could still be added through an add-on circuit board. People waited with bated breath. And waited. And waited.
While they waited for the blitter, they also wanted more memory! It seemed that, with the new desktop publishing, CAD and graphics programs, a megabyte of memory simply wasn't enough. Two- and three-megabyte memory expansions appeared on the market. The problem was that nobody knew which of the RAM expansions were of good quality, or if they were compatible with all software.
Atari was working on the answer to the problems, which they announced at the January Consumer Electronics Show: the MEGA ST.
Figure 2. — CPU box.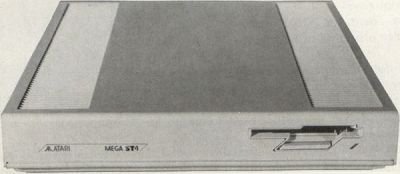
MEGA power.
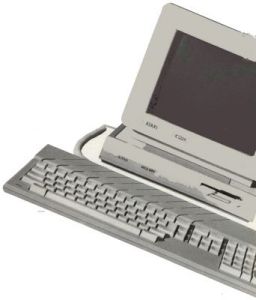
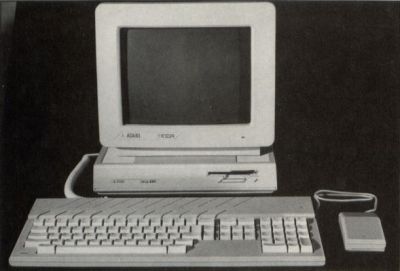
The MEGA ST is a radical departure from the 520 and 1040 systems in terms of its design. Unlike the one-piece 520 and 1040 units, which were literally tied to the desktop by cables, the MEGAs are two-piece units (Figure 1). The main component is the CPU box, which remains on the desk, while the second component is a separate keyboard connected to the CPU by a coiled cord. The keyboard may be placed in the lap, if desired.
The MEGA ST is planned to come in two configurations: 2 and 4 megabytes. Four megabytes should be enough to keep users happy for a while. . .or will it? This amount of memory will accommodate just about any existing application I can think of, with lots of extra room. More on that later.
Included with each MEGA ST is a language disk, which contains ST BASIC and the control panel and VT-52 terminal accessories. The ST BASIC Quick Reference Guide and a 133-page manual are included. The computer manual is very well written, with sections on the blitter chip.
Each MEGA has a built-in socket for the blitter chip, which is also included. This will speed up graphics operations considerably, resulting in faster, smoother program operation. New TOS ROMs, which fix some bugs of the earlier release and allow existing programs to use the blitter, are also included. The blitter may be enabled or disabled by a drop-down menu selection on the GEM desktop.
The MEGAs come with a double-sided floppy disk drive as standard equipment. This is built into the front of the CPU box (Figure 2).
There is a convenient addition to the MEGA that you won't find on either the 520 or 1040 systems: a standard battery-backed-up clock. This is a welcome addition for people like me, who don't want to have to set the system clock every time the system is started.
Externally and from a strict functionality standpoint, these are the only differences from the 520 and 1040 that many people will ever see. However, there are several features which make the MEGA worth a closer look.
Up close and personal.
Let's look at the exterior of the MEGA ST and see how it's laid out.
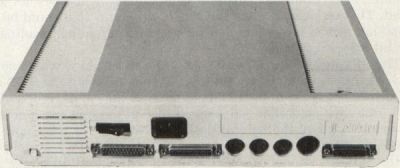
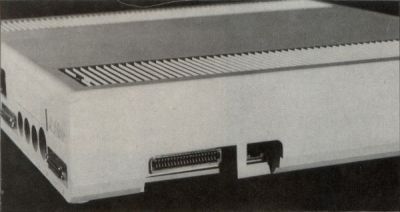
Figure 3 shows the rear panel of the MEGA ST. Essentially, this is the same as a 520 or 1040ST, with (from left to right) the reset button, power switch, modem connector, power connector, printer connector, MIDI out, MIDI in, monitor connector, floppy disk connector, and hard disk/DMA connector.
One item on the rear panel of the MEGA that you won't find on the other ST computers, between the reset switch and modem connector, is a small cooling fan. This fan is positioned next to the internal power supply and should provide welcome cooling to the rest of the system, for improved reliability. The fan is extremely quiet; if you have a hard disk, you won't even hear the MEGA's fan.
Another interesting detail on the rear section of the MEGA is the rectangular panel above the MIDI ports. This panel is removable, presumably for cabling needed for the Atari laser printer or other add-on equipment.
Access to all the rear connectors is easy, and I had no problems at all connecting my equipment to it.
Figure 4 shows the left of the MEGA's CPU box. This contains the standard Atari cartridge port (left) and the telephone-style connector for the keyboard's coiled cord. The cartridge port is made to the same dimensions as earlier ST models, so all cartridge-based software and peripherals should connect without difficulty. I have personally tested the following cartridge port add-ons, all of which connect without any problems: Hippovision video digitizer; Magic Sac Plus; Stereotek glasses; Kuma K-MAX; Hybrid Arts ADAP Soundtrack; and ComputerEyes video digitizer.
I had some initial worries that the keyboard cable would be a problem in fitting some of the units to the port, but the cord will flex out of the way, avoiding conflicts.
Figure 5 shows the battery compartment for the battery-backed-up clock. This compartment is located on the upper left rear of the MEGA's CPU box, and requires two AA batteries (not included).
A clock operated by batteries is a wonderful addition to the ST. It keeps the proper date and time (you must set it initially), so that files you create have a proper time/date "stamp" on them. This is particularly useful for compilers with "MAKE" utilities, which use the time and date information to determine which files are up-to-date.
Figure 5. — Clock's battery compartment.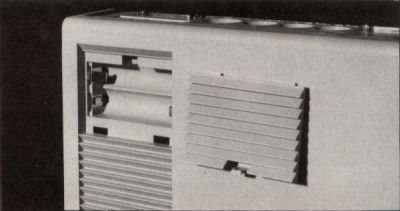
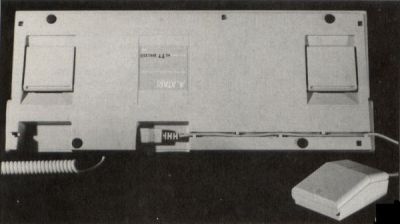
The MEGA's keyboard unit, as mentioned earlier, is separate from the main CPU box, connected to it by a coiled telephone-style cord. The 18-inch coil can extend to over 36 inches, allowing you to sit back and type with the keyboard in your lap. If a longer cord is needed, a standard 6-conductor phone cord can probably be substituted.
Figure 6 shows the underside of the MEGA ST keyboard. As you can see, the mouse plugs into the standard 9-pin connector in an inset area underneath the keyboard. A nice feature here is the channel which leads to the right from the inset. This is provided to hold the mouse cord in place, running to the right of the keyboard. A second inset area, on the left, contains another 9-pin connector for joysticks or other devices. Inserting the mouse and joystick plugs into the sockets is a little tricky, though not as bad as plugging them in on the 1040ST.
Inset into the bottom of the keyboard are two fold-out feet (the square units on either side). These pop out and snap into place with a nice, solid click, so that the keyboard can be positioned at a higher angle (Figure 7).
The keyboard itself has stiffer springs in the keys, helping prevent the problem many users experience on the 520 and 1040 machines, where a finger brushes against a nearby key and accidentally activates it. This probably happens mostly to non-touch typists, like me.
The keys themselves are placed and shaped identically to those of the 520 and 1040 keyboards, making it easy to move up to the MEGA from the older machines. The stiffer keys have received rave reviews from others who have used the MEGAs.
There are a couple of things I noticed about the new keyboard that may cause problems in use, however. The first is that when the keyboard feet are deployed to raise the keyboard's level, the back of the keyboard partially obstructs the floppy disk slot. The second is that since the mouse connector is located on the keyboard unit itself, if you want to put the keyboard in your lap, the mouse tends to want to come along. Removing the mouse cord from the "keeper" slot in the bottom of the keyboard can help avoid this problem somewhat, and the "joystick extender" cords sold by Radio Shack will probably help, as well.
The MEGA's design is, overall, quite good. The large CPU box is a perfect platform for a monitor, and Atari is planning a new hard disk drive the same size as the CPU box, which will allow the stacking of the components, to keep your desktop uncluttered. The unit is attractive and easy to set up. Cabling is restricted to the rear of the unit. Many people feel that the detached keyboard will improve ease of use, and the improved feel of the keys will boost productivity.
The inside story.
The real fun starts when you start looking at what the MEGA ST series has "under the hood."
Like all the ST computers, the MEGAs come equipped with a Motorola 68000 microprocessor chip, which runs at 8 megahertz. Most of the internal support chips are the same as those in the 520 and 1040 machines.
There are several differences in the MEGA ST that are worth looking at, however.
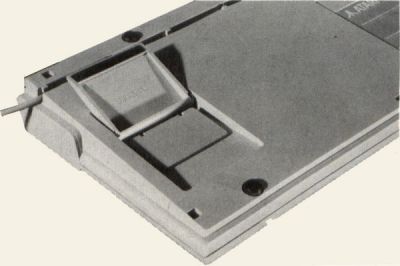
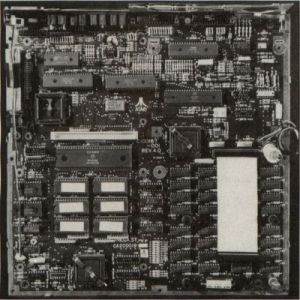
Figure 8 shows the MEGA ST's main circuit board, or "motherboard," and Figure 9 is a diagram of the parts on the board. This board contains all the MEGA's components, with the exceptions of the power supply and the floppy disk drive. The MEGA is put together in a "serviceman-friendly" way, using only nine screws for the main case, three for the floppy, and two for the power supply. Disassembly and reassembly is quick and easy, with quick-release connectors on all wiring harnesses.
As you can see in Figure 9, only the square chips, ROMs and two other chips are socketed. A reduced number of sockets cuts costs and increases reliability in the computer, but if a nonsocketed chip fails, the time and cost of repair climbs because the old chip must be carefully removed by painstaking desoldering.
You will notice that the square MMU and DMA control chips are both held in place by special metal clips placed diagonally across their sockets. This is a fairly recent improvement by Atari, which reduces problems with the chips coming loose due to vibration in shipping or the expansion and contraction caused by the heating and cooling of being turned on and off. Since the clips have been added to ST machines, the number of problems reported by users has dropped substantially.
A related observation: When the 520 machines appeared, a technician told me that computers with built-in keyboards often have problems caused by the vibration of the keyboard loosening the socketed chips. According to this theory, the separate MEGA ST keyboard would reduce these failures.
The MEGA ST RAM is located in the lower right corner of the motherboard, directly below the floppy disk drive. Figure 8 shows the motherboard of a MEGA 4, which contains thirty-two 128K RAM chips, for a total of 4 million bytes. That's a lot of RAM.
Directly above the floppy drive ribbon cable (which partially obscures the RAM chips) are two small connectors. One of these is the power input connector, which receives power from the power supply board. The latter sits on top of the motherboard at the upper right.
The other connector is unused, suggesting that it's for other devices which may be installed in the MEGA ST in the future. My guess is that it would be primarily for the laser printer interface board. This may be one of the considerations that prompted Atari to add the fan, since, as a power supply provides more electrical power, it generates more heat. Incidentally, the power supply in the MEGA is rated at: +5V @ 3A; +12V @ 1A; and -12V @ 30mA.
Another welcome addition—one many ST users have wanted for some time—is the simple 64-pin connector that's directly above the 68000 chip. This connector allows easy access to the ST's main bus, so that RAM expansions or other custom electronic add-ons may be simply plugged in, rather than soldered in. I can see a number of fantastic add-ons that could use this connector—it's available; all we need is someone to use it! According to Atari's Leonard Tramiel, additional RAM can be added via this connector.
Above the bus connector and to the left is a socket for the blitter. Final MEGAs will have the blitter included as a standard piece of equipment, though the early MEGA in this photo has no blitter chip. The blitter should speed up block image operations and text on the ST substantially, although I have no benchmark information at this time. Generally speaking, the larger the block image to be moved, the better the hardware blitter performance in relation to the software blit routines.
The final major change on the MEGA motherboard is the 24-pin connector in the upper left corner of the motherboard, directly under the hard disk connector. This is reportedly a special, internal DMA connector, which would conceivably allow such things as internal hard disk drives. It may also be used for the laser printer driver board, which will be installed in the MEGA ST's case when the Atari laser printer is purchased.
That's it for the major internal differences between the MEGA ST and the other ST models. The only other differences are in the physical layout of the motherboard and the battery-backed-up clock, whose connector runs from the battery compartment connector at the upper left to the point at the lower left.
Where's the beef?
Okay, we've seen what the MEGA ST is, inside and out. It's got several convenience features that the 520 and 1040 machines lack, and it's got lots of RAM. But is it really that different from the older machines?
In a word, the answer is no. From a software standpoint, the MEGA will run any software the 520 and 1040 machines will (at the time of this writing, some reports are surfacing that a number of titles don't work with the MEGA series, most likely due to incorrect programming techniques). It will hold more in memory at one time than the other machines will, but that's about it. The hardware is essentially the same, with the same graphics modes (320×200 with 16 colors, 640×200 with 4 colors, and 640×400 monochrome). It has room inside for add-on equipment and the connectors to allow the hookup. For the average user, is it worth getting a MEGA rather than a 520 or 1040? Let's examine the issues.
- Memory. The MEGAs contain 2 or 4 megabytes of memory, standard. The MEGA ST2 can probably be upgraded to 4 megabytes by simply adding RAM chips to the motherboard. A 520 or 1040 must be upgraded via a third-party RAM expansion board, and some of those can only go up to 3 megabytes. These boards are priced at upwards of $600, or $200 per megabyte. Extending this to 4 megabytes gives an approximate price of $800. Adding RAM to a 520 or 1040 may involve modifications that void the warranty, and some RAM expansion methods may be of questionable quality and reliability.
- Blitter. The MEGAs have a blitter as standard equipment. Adding one to a regular 520 or 1040 involves installing the blitter add-on board and a new set of TOS ROM chips. The hardware for this upgrade won't be free, and having a technician install it could add to this cost. A consideration here is that if a RAM expansion was added to the ST, adding a blitter may run into a problem with space inside the computer case or a basic compatibility problem with the RAM expansion.
- Battery backed-up clock. Third-party battery-operated clocks are currently available for around $40. This is a unit which fits underneath one of the ROM chips and is easily installed by anyone who can use a screwdriver, so adding one to a 520 or 1040 isn't a problem.
Figure 9. . . .and its parts.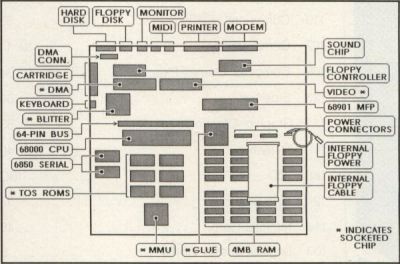
- Internal connectors. There isn't much you can do about this. The older STs don't have internal connectors for anything, so if companies come out with special add-on boards for the MEGA series, they won't be as easy to add to a modified 520 or 1040. There won't be a lot of space left inside a 1040 case after upgrading the RAM and blitter, either. Plan on doing a lot of soldering to add anything else in. This includes the Atari laser printer, something a lot of people will want.
- Keyboard. This is definitely improved, with the two exceptions mentioned earlier about the mouse cord and disk drive slot. I've heard of some people hacking their 520s and 1040s for a detachable keyboard, but this is a little extreme. The feel of the keyboard is definitely better on the MEGAs, something that would be tough to duplicate on the older STs.
These are the main points to consider when deciding whether to not to buy a MEGA ST. Based on the possible problems that could arise by tacking extra equipment onto a 1040ST to duplicate the MEGA's capabilities, and the fact that even an upgraded 1040 wouldn't have the expansion capabilities, a MEGA ST seems more logical if you plan to upgrade your system in the future.
Conclusion and ideas.
I can see a lot of applications for a MEGA ST (particularly the 4-megabyte system). On the one I have here, for example, I can set up a 1.5-megabyte RAM-disk, load up lots of desk accessories and a memory-hungry application, such as CAD-3D, which in its maximum memory configuration can use around 1.5 megabytes. The primary application has all the memory it wants, and a lot of room left over. The RAMdisk is a fast way to store temporary or often-used files.
Four megabytes opens many doors. You're no longer tied down to a small memory area in which to operate, and can divide up memory in many creative ways.
This leads me to a natural suggestion for the MEGA. There is a product called K-Switch for the 1040ST which divides up RAM into two parts, effectively creating two 520STs within one 1040. The user can switch from one application to another at any time. It isn't multitasking, because when you move to program 2, program 1 stops, and vice versa. But the idea behind it is a good one: Use your memory most efficiently by having more than one program in the computer at once.
As you can guess, 4 megabytes of memory could accommodate a RAMdisk and several application programs at one time! The MEGA ST4 needs a "Mega-Switcher" to allow users to partition memory into several user-defined parts.
Of course, Atari has more plans for the MEGA, including the eagerly-awaited laser printer and other items we can only speculate about.
With its convenience features, awesome memory capacity and expansion capability, the MEGA ST line should find an important part to play in the ST computer line for some time to come.
Special thanks for this article go to Larry Copenhaver of The Computer Room in Kansas City, Missouri.