the Animation stand: Boarding Stories
BY MAURICE MOLYNEAUX
Blissfully ignorant of the realities of time and space and plain old common sense, Maurice Molyneaux hopes someone will someday discover "retroactive reincarnation" so that when he dies he can come back in a previous life as animation director Chuck Jones. His greatest fear would be to come back as Wile E. Coyote, and in the process have to learn some humility.
While proofreading last month's installment I noticed that it wasn't the straightforward, discussion of storyboarding I'd planned. I thought, You haven't discussed presentation, visual indicators for showing movement, discussed how to link dialogue or anything! You keep coming back to ideas and refining concepts! Your focus is wandering.
After this bout of self-abuse I started looking to correct these failings, but ended up not changing anything. Why? As I edited I realized that segregating the topic and techniques of storyboarding from the rest of the process would be an arbitrary division and not reflect the actual nature of the workings. What I'm saying is that storyboarding is not a separate part of the task of making an animation, like laying out your tools before building a shed is, but rather an integral part of the creative process, the act of developing your idea.
In animation you come up with a concept, explore it in notes and sketches, try to break it down with a storyboard and end up fleshing the idea out as you do so. The storyboard may give you a new/different viewpoint. Ideas you liked may not work as you thought and smaller things become more important. Then it's back to more notes and sketches—and another go at the storyboard. To treat storyboarding as a task and entity unto itself would be a mistake.
This realization made me aware of why I've always been so dissatisfied with animation books that discuss the process, because they invariably do make this separation. Most artistic endeavors are like living things. They start off as a seedling of an idea, growing and branching in many directions. As time passes, some branches grow fuller, others wither and die. Still others you must manually (and often painfully) prune away.
Keeping this analogy in mind, let's get back to some creative gardening.
As I was saying
Before continuing, remember that I'm giving you an example of how to create an animation. You should be applying the techniques and processes I discuss here to your own ideas, not just copying what I'm doing; otherwise we'll all end up with essentially the same thing!
Last time I was discussing how to go about breaking an idea down and roughing out a preliminary storyboard. I did just that, coming up with an idea ("an ant wanders away from the anthill, but does not get far before some disaster strikes and ends its day [and life] rather abruptly"), thinking of different approaches (realistic, scary, dramatic, comedic), sketching ideas for these, narrowing down the possibilities, then roughing out key moments in each approach in a "preliminary" storyboard. I settled on the comedic approach as the stronger one, because the ant was a real character whose actions resulted in a reaction that affected the plot. In the dramatic idea the ant was a victim, never comprehending of its plight.
In addition to this stronger "plot" element, there's another reason for choosing the comic idea. I want to get the maximum impact out of this animation. By impact I mean emotional reaction from the audience. In the dramatic approach it's most likely people would be impressed by the animation, but let's face it, it's hard to sympathize with being burned by light focused through a magnifying glass, particularly when it's depicted as happening to an ant and in a manner as stark and realistic as I'd planned.
In the comic approach, I would be trying for laughter. The way the idea is structured it would build funny ant-dealing-with-the-heat gags one on another until the climax where the ant strikes back at his attacker, but gets smashed as a consequence of his own daring. The heat gags would be amusing enough, but the kicker would come with the surprise ending of the magnifying glass falling on him.
I'm not saying that humor is always preferable. You should go with what appears to be your strongest approach. Some people think of humor as an easy way out. Not true. Good humor is one of the more difficult things to pull off. Chances are if you miss the mark in a serious approach, it won't be a complete loss. But blow a gag—make something that's supposed to be funny unfunny—and your audience will have no sympathy.
In this case I'll take the risk of trying to do something funny, first because I think the ideas I came up with could be sufficiently humorous, and secondly because I've done cartoon humor before and made it work. Once you've made people laugh you want to keep on making them laugh. It's a sort of addiction.
Onward and forward
So I have my concept and a preliminary storyboard (see last issue). I now have to develop this into something I can animate. Here's where I am forced to do some of that arbitrary separation of topics discussed earlier, for at this stage in the game I will usually be shuffling revised storyboards with character-design work and also will start trying to determine which animation program(s) would be best suited to the task I plan. I don't want to drag storyboarding out any further than this installment, so I'll press ahead with it and get to the other topics later.
The preliminary storyboard I drew for the last issue delineates the key sequences I'm planning, but it lacks considerable detail with regard to the actions taking place within each sequence and omits linking material such as the transitions between sequences. I need to flesh out the concept, and that means—you guessed it—another storyboard.
Let's look at the actions presented in the preliminary layout. The ant is being heated up by an unseen assailant using a magnifying glass. The sequences already drawn are:
- Ant lays down to get tan.
- Ant sleeps in shade of sombrero that catches fire.
- Ant lays under beach umbrella that goes up in smoke.
- Ant crawls across sand like a man in a desert.
- Ant is startled to see a hand holding a magnifying glass.
- Ant leaps at hand and bites it.
- Ant walks away triumphant, brushing his hands together.
- Wham! Magnifying glass falls into picture, squashing ant.
What is missing are details within and links between these. This is what I will attend to now.
We need an establishing shot that sets up the situation. How about the ant cutting leaves from a plant? Okay. That's where I start. Next, I need to introduce the threat. As he works, a shadow crawls up behind him and passes over him. We change angles to see an ant's-eye view of a silhouetted magnifying glass passing in front of the sun, and then the glaring magnified light through it. The threat is now established. Now to link this to the first drawn sequence: the ant getting a tan.
Here's a solution. I cut back to viewing the ant at work. A circle of bright light focuses around him. He wipes his brow, then shades his eyes as he squints up at the light. Then—aha!—he gets an idea. There is a blur of action, and we see him settling back on a towel, wearing sunglasses to get a tan.
I need a link to the next sequence, featuring the sombrero. At this point, I'll establish a standard device for showing the increasing heat level: Show the magnifying glass and the bright spot in it. I'll use this "linking device" between each sequence. For good measure, each time I show it the view will be a little closer to the glass, and the bright spot in it will be brighter and more intense. This has the dual effect of making the threat seem larger and more powerful each time, in addition to establishing why the ant has to keep switching strategies in order to beat the heat.
Here's how I work this linking device in and flesh out details in the sequences. The ant is getting a tan. Cut to the glass and the light, then back to the ant, who is getting a sunburn (so he's a black ant turning red). The ant hops up, grabs the towel, snaps it and presto! The towel is now a sombrero. (How? Irrelevant question. This is a cartoon, after all.) He dons it, drops to the ground and takes a siesta. Cut back to the glass. Back to the ant, whose sombrero is starting to burn. He sniffs a bit, there is a pause, then toing! His eyes snap open. A slight pause as the flames continue, then a blur of action as he whips off the sombrero and stomps the flames out.
The next sequence utilizes the beach umbrella that goes up in smoke. Do you see a problem with this? I do. It's too similar to the gag that it follows. Funny once, boring twice. What to do?
The first thing that comes to mind is to come up with another gag. Easy, right? Uh, yeah, well, maybe not. Nothing appealing comes to mind right now. I could leave it, but as I know it's wrong, I won't. I can't think of a replacement, so I'm left with the option of deleting it. Leaving it would do more harm than shortening the animation, so I'll cut it. If later on I get an idea for a replacement I can always shoehorn it in.
The next sequence is the ant crawling like a man in a desert. How shall I bridge the gaps between the sombrero-stomping and this? Cutting to the glass again might be effective, but maybe I should have the ant first finish stomping out the flames then trudge off screen. I could then cut to the glass and back to him crawling.
Then again, no. Having him finish stomping, relaxing, then trudging off lengthens the animation but does little else. It establishes nothing and seems to add nothing worthwhile. The problem is that I don't want to just cut suddenly back to the glass.
Ah, ha! I've got it! The solution here is not to cut to the glass, but to dissolve to it. As the ant stomps, the scene dissolves from that image to the image of the glass and the sunlight. To establish the heat as more severe than ever and that time has passed, in this case I'll hold the shot of the glass for an extra second than previously, then dissolve back to a scene of the sand, but no ant. We see a trail running across the screen, then the view shifts sideways along the trail until the ant comes into view, dragging himself across the sand, panting.
Okay, we're ready to finish up. The ant has to see the glass and hand, then attack. In the original idea he would crawl out of the light then, when the light refocused on him, would suspect foul play and look actively for the source. I like this idea, but how do I present it?
The problem here is finding the best way to establish what is going on in the minimum amount of time and in the most direct and understandable way possible—and all without being cliched and trite! Timing is critical, because thus far each sequence is linked to the next by the bridge of showing the magnifying glass, and a long transitional shot at the end would destroy the pacing (the pace should build up toward the end, not slow down; that's why they call the finale a climax). This use of the magnifying glass as a bridge is dramatic and eliminates the need to animate uninteresting and unnecessary transitional sequences (like the ant getting hotter, thinking and then staging his next plan). Likewise, the ending should employ some similar technique and not shift gears to an approach I've thus far rejected.
Here's a thought: As the ant crawls, I dissolve back to the light, then back to him crawling. He comes upon a large leaf, and ducks behind it to get some shade. Once in the shade, he sighs and looks relieved—but the heat focuses tightly on the leaf and burns a hole through it, letting the light hit the ant again. Now he suspects something's not right, steps out from behind the leaf. Surprise! He sees the hand and the magnifying glass! His expression goes from shock to anger, then slowly slides into a cunning look. He starts walking toward the hand, whistling innocently, then springs into the air, sporting huge teeth and chomp!
The final problem is how to make the transition between this attack and the finale. Some actions are so complex that trying to animate them is pointless. Pointless not because it can't be done, but because it's difficult, and even if you got it right, it probably wouldn't be the best solution. So, I'm not going to show the hand whisking out of the picture and the ant dropping to the ground and walking off, only to get flattened. Right as the ant bites I'll switch to a shot of the sky and sun. Suddenly, the hand snaps up into view, fingers spread and a glowing red bite on one finger. Just for effect I'll plan a blood-curdling scream here. Oh, what about the magnifying glass? Well, I'll add it here, flying out of the hand and shooting out of the top of the picture.
Won't showing the glass flying off clue the viewers as to the end? Only if I make it obvious. The trick here is to keep the viewer's eye on the hand, so they'll only peripherally note the glass flying off. This is done by having a pulsing red bite mark on the dark silhouette of the hand, which will be shaking at screen center. The combination of the pulsing bite mark and shaking action should keep the viewers' eyes on the hand (I hope).
I finally cut back to the ant walking away, smugly brushing his hands together. Then, suddenly, wham! The magnifying glass flattens him!
Fade to black. Roll the credits. The end.
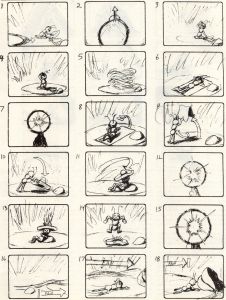
So, there's the plan, which I have drawn out in the revised storyboard accompanying this article. I got most of these ideas without having to sketch, but in order to make sure I won't forget any, I jot down a quick note about each idea. It's easy to forget some little bit of business when you're working on projects like this, so always make notes!. For your benefit, I'll update the list from before and add the new material and make other changes (compare it to the first list). Here's the continuity now presented in the new storyboard:
- Ant collects leaves, shadow passes over him.
- Shot of magnifying glass moving in front of sun.
- Ant starts to get hot, wipes brow, squints at light.
- Ant has idea and lays down to get tan.
- Close up (CU) of glass with light blazing through it.
- Ant gets sunburn and produces a sombrero to sleep under.
- CU of glass.
- Sombrero starts burning, ant realizes this and stomps it out.
- Extended extreme CU of glass.
- Ant crawls across sand like a man in a desert.
- Another extreme CU of glass.
- Ant crawls into the shade under a leaf, but the heat burns a hole through it! Ant gets suspicious.
- Ant steps out from behind leaf and is startled to see a hand holding a magnifying glass focusing the light on him.
- Ant whistles, walking nonchalantly toward hand, then he leaps at the hand and bites it!
- Loud scream, hand jerks into full open position with glowing red bite spot; glass flies up out of view.
- Ant walks away triumphant, brushing his hands together.
- Wham! Magnifying glass falls into picture, squashing ant.
Indicators
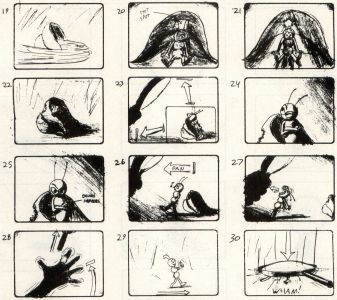
Let's look at the storyboard accompanying this article. Does it seem pretty clear to you? I hope so. You can probably already fathom the action and probably understand what all the arrows and such stand for. Still, we'd better talk a bit about them.
These arrows are what I call "movement indicators," and they help in establishing the directions of actions in a minimum number of drawings. Thus, to storyboard the ant walking toward the hand, I merely have to draw one pose of him in a walking mode and use an arrow to indicate his path. To indicate an action that involves starting from one position and then moving, and/or moving then stopping, I use small start/stop lines at the head and tail of the arrows. Look at the frame where the hand displays the bite. A curved arrow comes up from the bottom of the picture and shows the path the hand takes into the picture. There is a stop line at the tip of the arrow, indicating the hand stops that movement at the indicated position. Note that the arrow for the magnifying glass just keeps going, meaning it doesn't stop.
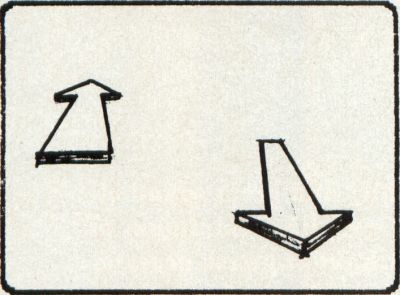
To indicate actions moving in or out from the screen, I use similar arrows, but ones drawn in perspective. If an object is to move away from the viewer, I'll draw the first arrow in Figure 1. If it's coming toward the viewer, I'll draw one like in the second arrow. You can use start/stop lines with these too.
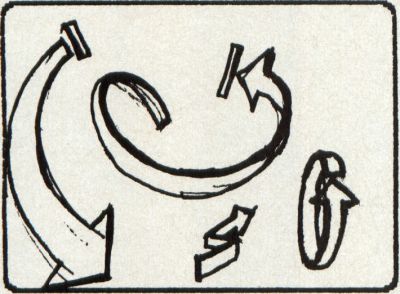
For more complex actions, like objects turning, twisting, spinning and so forth, you can use one complex arrow or a number of arrows. Figure 2 shows examples.
For vibrating actions, like shivering, shaking and so on, you can use movement lines like those in the frame where the bitten hand shoots into view and shakes. Fast actions can be indicated with speed/blur lines, like the frame of chaotic action just before the ant appears on the blanket.
Camera angles
Although we really don't have a camera per se when making a "movie" on a computer (although some programs have digital equivalents), when planning your animation it's still best to act as if you did have a real camera. Watch any movie or television show, and you'll notice that the viewpoint changes constantly. When a character is the center of attention, you'll often get a tight close-up of that person. When several characters are interacting, you'll get a medium shot of the group, interspersed with close-ups. Wide angle "establishing shots" are used to give the viewer a look at the setting and surroundings, before moving in to closer angles on the characters. There are also what are known as "insert shots," where the camera focuses on a small but key action, like a finger closing on a trigger, a picture falling behind a desk, a spider walking down Phoebe Cates' cleavage. Uh, you get the idea.
There are still shots where the "camera" doesn't move; pans where the camera spins to one side of the scene or the other (an extremely fast pan is known as a "whip pan"). There are even dolly shots where the camera moves sideways, in addition to trucking into and out of (forward into and backing out of) a scene.
There are also point-of-view (POV) shots, such as seeing the scene from the viewpoint of one of the characters in it. In most films the viewpoint is omniscient, meaning it is not of any character in the scene—sort of like the POV of someone who isn't there!
You should try to determine which type of viewpoint is best for a given shot, which angle and range of "closeness" is best to clearly display the action planned. At the same time, you don't want to do a lot of boring side views. Try to avoid ordinary camera angles. If you want to see a lot of camera work, watch some music videos. They truck, pan, dolly, zoom and bank constantly, and cut from extreme close-ups to long shots to medium shots with reckless abandon.
You must also be careful about choosing camera angles that are dramatic, but inappropriate. For example, a high overhead view of the ant when he gets smashed might be a neat angle, but it ruins the shot because we'd see the glass falling toward him too soon, which would warn the viewer what was going to happen and ruin the gag. By the same reasoning, I never show the kid who is holding the magnifying glass. This is an ant's-eye view of the situation, so I keep to what is in the ant's world. Besides, showing the kid isn't relevant. Showing him would add nothing and probably detract from the effect because what was a faceless threat would suddenly be a person, a character. Showing the kid would raise questions I don't want to answer, and I don't want to answer them only because those questions are irrelevant to the story I'M creating.
Revisions
Did you notice that I haven't discussed actually drawing this revised storyboard? Why? Because there's not much different in regard to drawing this one than the previous one. You just sketch and explore different views until you get what you want and/or think works (they are not always one and the same). You go through your idea as I did, linking the sequences together with new action, and so forth, using interesting and clear camera positions, and draw it again and again until you get something usable. It's not as easy as it sounds sometimes.
There is one other thing that would be useful when storyboarding, particularly if you're going to use some characters and not inanimate objects, and that's "posing." But, posing is related to character design, and that's part of the next installment. So don't put away your sketch pad yet; the revised storyboard you draw may very well not be the final one!
Th-th-th—class dismissed
Okay, we're finished with Storyboarding 101. Next time it's down to the final preproduction phase, including character design, posing and something actually computer-related (gasp!): deciding which software to use and if your idea will work with the tools you have.