The Personal Publisher:
USING THE MIGRAPH "ART DEPARTMENT"
BY DONAVAN VICHA
Migraph's latest ads read, in part, "Let Migraph staff the desktop art department of your dreams." This is no small claim. It's no hype, either, considering that their product list reads Touch Up, Supercharged Easy Draw, Easy Tools, DrawArt Professional, Scan Art and OSpooler. Migraph has us covered! In this first column, I'd like to share with you some of the things I've been doing with these products in order to give you an idea of what they can do.
First, some background on the particular project I was handling. Contemporary Books, a major trade book publisher in Chicago, had been tinkering around with the idea of creating a desktop-publishing unit within the company. Since they already had a leading-edge typesetting system with software to incorporate graphics handling, they really didn't need DTP capabilities to handle books. Nevertheless, they contacted me to design a book on the old "Munsters" TV series.
You've seen these kinds of books; they rely heavily on design and photos rather than erudite text for appealing to potential buyers. Thus, we looked toward DTP as a means of getting text to wrap around silhouette-type treatments of some of the photos, as well as to add graphic borders to pages and to sprinkle doodads throughout the text.
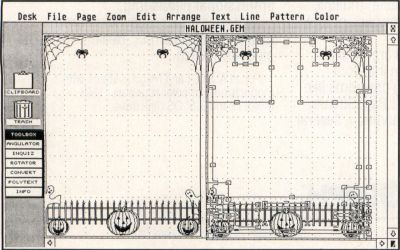
I found the perfect page border ready-made in Migraph's DrawArt Professional Package (see illustrations). I loaded the HALLOWEEN.GEM file into Easy Draw (EZD) and began to break it down into its separate groups so as to delete most of the Halloweeny aspects—the pumpkins, ghosts, fence, and spiders (much too cutesy for the Munsters).
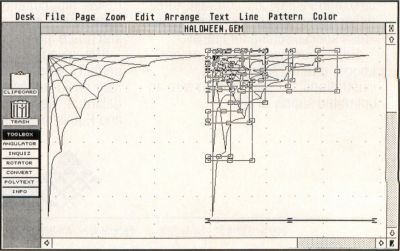
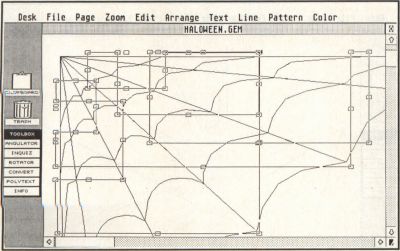
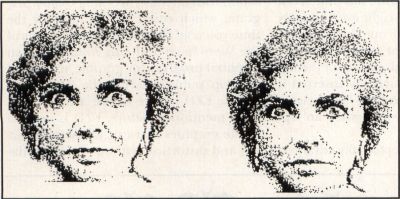
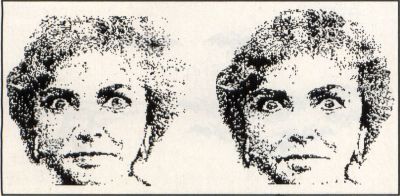
An added bonus of the Draw collection is its GEM pedigree, which allows you to take its images apart and modify them for your needs. That's the real beauty of EZD: You can build such graphic files, as you can with any object-oriented drawing package. The GEM header contains information about all of its pieces so that the graphic can be manipulated—resized, reproportioned and broken down—without loss of detail, which is what can happen to bitmap art files from painting programs. (The EZD "GEM" header is mainly for use with its Outprint program.) For instance, the full-page snapshots (Figure 1, combined from two separate shots) of the HALLOWEEN.GEM file dramatically show that what looks like a fairly simple drawing on the left actually breaks down into a mass of parts (objects) when exploded (the command accessed under the Arrange menu of EZD). Further snapshots (Figures 2 and 3) illustrate the "explode" process in Zoom and 2x-size Views.
One thing I ran into early on in this project was the fact that Contemporary's art director insisted we would eventually send my DTP pages to a Linotronic service bureau for final, camera-ready printing. Thus, in my opinion, the whole project was doomed from the start because these services charge a minimum of $6 to $10 per page, plus as much as $2 per minute extra after a page has passed a certain time limit in the printing process. Add my modest per-page charge and the cost of doing the book would become prohibitive, considering the book's cover price had to be kept under $10. For instance, let's say the per-page production cost of this 192-page (projected length—usually an optimistic estimate at best) was $10, which in effect cuts me off from any remuneration for my efforts. That puts the cost of just getting camera-ready pages at close to $2,000. Add the actual printing and paper costs, and production of the book nears to between $12,000 and $22,000. You've gotta sell a lot of books at $8.95 to make back that cost!
I was aware that the Lino service would sink this book if I didn't find a way to keep document file size down. While the full-page web frame without the Halloween doodads looks like a fairly simple graphic, it took the size of a single Page-stream page with required text to around 167K! That's why I broke the web down further to a mere corner of the original, which I could duplicate and rotate for use in the opposite corner within PageStream. (I could then frame the whole thing with a slightly heavier box, which would print better—something unobtainable with the limited line weights provided by EZD.)
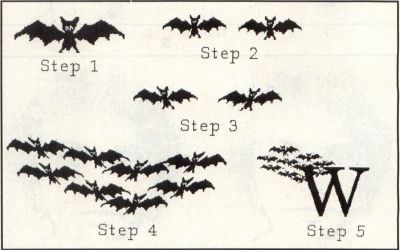
Another graphic treatment I worked out for the book was a drop-in cap with bats flying up from it (Figure 4). It started with a single bat (the mammal, not the sports tool) from J. B. Brabson's clip art collection for XLent Software's TypeSetter Elite. I cleaned it up with the Touch Up's Lightning mode's Fatbit editor, then duped it. From there, I used the skewing function to get a spreading-in-flight effect from a group of reproduced bats. In Text mode, I came up with a letter "W" in Schoolbook to match the text it would lead. Then I reduced the bats in Clip mode, placing them toward the left-front of the letter. This effect may be modified and used with a heading rather than drop caps; because there are close to 30 so-called chapters in the book, using the bats with a drop cap on each chapter would clearly be a case of overkill.
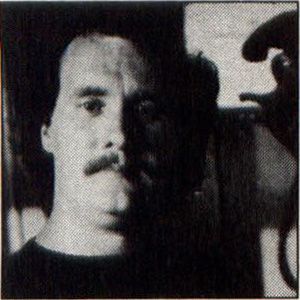
Touch Up is truly a boon to desktop publishers. To illustrate further Touch Up's powers, let's look at a scan I did of Liz Taylor from a photocopy of a National Enquirer cover (Figures 5 and 6). To get her chin and neck using PictaScan, I had to start the scan where it cut off part of the top of her head, so the original image has a flat top and a lot of background black to it. Rather than use the square eraser in Lightning mode to remove the background, I used the spraypaint tool set at medium size and 82% saturation, turning the color and fill to white and black. This erases the background fine and leaves some texture at the edges of her hair. Stray pixels can be cleaned up using the process icon under the Drawing mode. This clean-up also took some detail away from her face.
I made a duplicate of the cleaned-up image so I had something to fall back on and compare with my working image. My first attempt to restore the top part of her head/hair was to readjust the spraybrush and spray it in; but it didn't look right. The lower-right side was especially lacking in detail, so I clipped part of the darker, lower-left hairline, flipped it to the right and fit it in where it looked good. I performed this using the transparent mode, since overwriting generally leaves gaps somewhere around the operation site.
To do the top of her head, I spraypainted away most of it, then used the lasso brush to capture the top part of the original. I included a part of the forehead where I'd lost some detail on my working image. I fit this part of her hair onto my working image, pasted it on, then cleared the lasso brush and lassoed a smaller part of the original in a shape to round out the flat top. When I got the proper size and shape, it blended right in.
To make the eyes more natural-looking—although part of the "charm" of this particular photo was the bug-eyed expression on Ms. Taylor's face—I went in first with the Fatbit editor, but pulled out when I'd botched the right eye. Using 2x mode, I then clipped out the offensive right eye, disposing of it with L-mode's eraser, and clipped a duplicate of the left eye, flipped it and carefully inserted it into the right socket. A little Fatbit clean-up and voila! Touch Up—what an apt name.
There's nothing exceptionally advanced in what I've done with these programs. Each one has such depth, you can get your creative juices flowing once you've learned the basic functions. Both work similarly in using the mouse buttons, with Touch-Up getting the nod for user-friendliness with its many icon-driven tools versus the menu approach of EZD. Then again, EZD has many more functions to work with as far as precision drawing goes, so it is more intimidating as well as essentially more powerful. Let's keep in mind that Touch Up is the front end of a set of scanners that Migraph will be releasing; its main market is for touching up digitized art, while EZD is aimed at graphic artists for creating original digitized art.
EZD has been around for quite a while and therefore has perhaps not attracted new ST/Mega users to its cause. It is quite unique, actually, not a true CAD program and not a flashy kilo-color paint program. But if you've been waiting for something more "state of the art" just for the sake of its newness, don't bother—it doesn't exist yet for the ST/Mega. (Although the publishers of Calamus have stirred a sensation with their forthcoming Outline program, which could be available by the time you read this.) With its extensions of the Supercharger and Easy Tools, EZD is an essential program for graphic artists and desktop publishers. For the Atari computers, EZD is state of the art.
As mentioned before, EZD is used to create graphics that can withstand resizing and distortion without any degradation in the image. It does not have the tools commonly used by paint programs; you do not "freehand" draw, but put together pictures with various shapes, each overlaid on each other in such a way as to create a new combined image.
The example files that come with the package, as well as those found in the DrawArt package, truly show what this program is all about. For instance, there is a drawing of a house that can be broken down by clicking on the parts showing its facing side. Delete them, and what you see next is the interior of the house, which can also be deleted to show the other rooms and the other side of the structure. Your basic EZD "drawing" tools are boxes, ellipses (circles), arcs, lines and versatile polylines. Supercharger allows you to convert and import bitmap images as objects to be used for building images or for framing, or being framed by, other objects drawn with EZD. EZD can readily be used to draw various business graphics, architectural or engineering drawings and clip art for desktop-publishing purposes.
The Easy Tools component of EZD is an excellent extension of the program, which shows Migraph's commitment to keeping EZD on the cutting edge. It loads as an accessory (about 75K worth) and takes up a slot under the Desk menu. But it actually appears on the left-hand side of the EZD workscreen as a toolbox for accessing the following functions: Angulator, Inquisitor, Rotator, Converter and Polytext. When you click on one of these items, you get a button box for selecting further functions. For the Angulator, you produce a dialog box and a small ruler that can be used to measure the length and angle of figures or objects on-screen.
The Inquisitor dialog box allows you to check and change an image's coordinates and dimensions numerically, rather than by using the mouse. Depending on the kind of object being "quizzed," other attributes (such as the angle of rotation, wedge or arc) can be determined as well. Obviously, these first two tools provide greater precision for working with detailed or scaled drawings. The Inquisitor also allows you to customize your working (snap-to) grids to your precise needs.
The Rotator, as the name implies, allows you to define a point about which to rotate a polyline object, or rotate it about its center. You may also choose to make copies to be rotated about a center-point, thus giving you the ability to create spirals and toroids. This function alone is worth the price of the package. Keep in mind, however, that it cannot be used to rotate text or a bitmap object imported via the Supercharger.
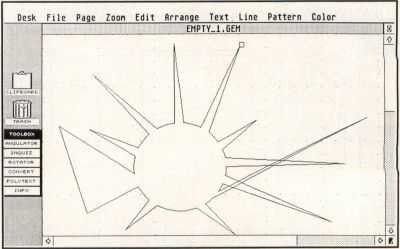
The Converter allows you to create polylines, which work somewhat like the Bezier or B-spline curves in Touch Up. Choosing either Coarse or Fine, you can break an object's lines into segments with multiple "control" points, which can be edited using the Edit Polyline menu item. The example illustrated in this column (Figure 7) is a variation on one shown in the manual. I took a circle and reshaped it into a sunburst, with a control point pulled out from the surface of the circle to form a pair of rayed lines (an inverted V). The Converter is also a feature that by itself is worth the price of the package.
Finally, there is the Polytext function, which allows lines of polyline text to be rotated, resized and otherwise manipulated. Only one set of such fonts is included in the package, but they leave information in the manual for creating your own polyline fonts. This is a useful feature for creating captions that need to be rotated.
Thus, Migraph has kept their "old" program new. The company has now announced EZD 3.0, which incudes B-spline curves and the ability to lock bitmap images in place for tracing purposes. By tracing the bitmap or raster image, you create a vector or object-oriented image that can withstand resizing and other manipulations.
A variety of new printer drivers is also becoming available, including a driver for PostScript laser printers. These will be tied to Migraph's OSpooler, which, as the name implies, is a printer spooler for handling DTP-type printouts. It works as a desk accessory as well as in conjunction with the OUTPRINT.PRG components of the Migraph graphics programs. And it works with other GDOS-oriented programs, like WordUp and Timeworks Desktop Publisher ST (and the unreleased but promising Wordflair). It looks very flexible, and, of course, background printing of text and graphics pages is a welcome feature for any ST publisher. I just want to warn laser printer and 24-pin dot-matrix printer users that they will need the Migraph drivers, or, if they already have the drivers, may need to update them. This means laying out a little additional cash.
Clicking Off
While I didn't get to handle "The Munsters" book completely on my system, doing the design made me realize just what a complicated process such an assignment is. It was a situation aggravated by the vagaries of flaws in my software choices and my ignorance of a program's capabilities. These experiences do lead to frustration at times, but the knowledge gained is invaluable. For instance, I chose not to use Desktop Publisher ST because of its limited runaround abilities, and also because, with this program, I found my PostScript capabilities limited in the number of fonts available to me. Or so I thought. I recently had the opportunity to use a Mega 2 and NEC PostScript laser printer. I had installed Desktop Publisher ST on my meg-upgraded 520 ST for the PS laser and was only able to access two fonts. Since it was on my hard disk when I hooked up the Mega, I made no changes. Well, folks, little did I know that Desktop Publisher's install program did not take my upgrade into account and short-changed me in the font department. I don't know how many PS fonts install on a 1040, but on the Mega 2 it fills all slots.
On another front, I was using a corrupted import module for GEM metafiles for PageStream, so I didn't know that with the proper import module I could have stripped down that HALLOWEEN.GEM file in PageStream, avoiding the need for EZD and using a less-than-satisfactory .IMG file in its stead. These instances do not bear out the old saying that "Ignorance is bliss." Rather, ignorance can cost you a contract!
If something big in Atari's brave new world of desktop publishing doesn't distract me, next time I'll continue what I started this month and discuss the steps involved in handling the production of a book. I'll also get into describing some ins and outs of PageStream (previewing the beta versions of PageStream leading to 1.6) in creating the design of The Munsters, which could be on sale even as you read this.
Donovan Vicha has been writing about desktop publishing on the Atari ST for three years. He uses a Mega ST2 system for his freelance editorial service, adapting 12 years of book-publishing experience to this growing field.