NOISE DOODLING ON YOUR ST
By Gary Levenberg Program by Lee Actor

Open your ears to the amazing possibilities of Near Synthesizer Quality sound with the ST computer. Here's a brief tutorial on electronic sound plus a prototype sound editor you can find in the SOUND.STQ folder on your START disk.
Sounds computers make include the din of video arcades, the almost human voice of the telephone-number reader at information, the beeps and squeeks of your corner banking machine, and the sophisticated sounds of modern music synthesizers. Your Atari ST computer contains a sound-generator chip that directly drives the speaker in its monitor, or any other acoustic device to which it is properly connected, and it's capable of making a wide range of musical notes and sound effects.
Atari chose the Yamaha YM2149 software-controlled sound generator for their ST computers. Designed originally by General Instruments, this chip has been around for a number of years and, with all the current developments in sound generation, it seems obsolete by comparison. But don't be discouraged; with the help of the ST's high speed microprocessor, our humble sound chip can generate sounds nobody would have dreamed of.
Lee Actor and I are computer and music professionals enthralled by the complexity and excitement of computer sound generation. Currently, we are developing an inexpensive graphic-oriented sound editor called GIST (General Instruments Sound Tool) for the Atari ST which will soon be available. A motivating force in designing GIST is the opportunity to establish NSQ-Near Synthesizer Quality-as a standard on the Atari that can be shared by developers and hobbyists alike. We intend to make entire libraries of sounds available through bulletin boards, users groups, and magazines such as START.
To promote this standard, what we've given you here is NSQ.PRG, a version of GIST minus some of the professional features we intend to include in the final package. With it, you can design and save to disk sounds that are every bit as sophisticated as those created by GIST and begin building your own sound library. We are not, however, able to include the source code, which is, after all, the core of our product. The final product will include source code and drivers for a number of languages. We hope you will enjoy experimenting with this version. Any sounds you create and save now will be compatible later with GIST.
Before we look at what sound really is, let's play around with NSQ.PRG and make some noises with your ST. Several sample sound files, designated by .SND extenders, are included on the START disk. Turn up the volume on your monitor, insert your START disk (for color monitors, select medium resolution), open SOUND.STQ, and double-click on NSQ.PRG. A standard GEM menu bar will appear at the top of the screen. Point the mouse to the File drop-down menu and select Open...
In the item-selector box find SQUARE.SND and load it. As the GEM window appears, listen carefully. You'll hear a sound effect as the window zooms open. It also makes a sound when it closes. As far as we know, this is a first: a GEM function accompanied by a sound effect.
To hear the square wave sound you just loaded, click Sound on from the Play menu. It sounds a bit like an old electric alarm clock. Pretty boring, but the square wave is an important and fundamental sound which we will analyze in some detail later. For now, let's listen to something more interesting. Use the above procedure to load DRWHO.SND and play it. That's more like it! Move your cursor under Frequency and click on Nominal. Within the alert box, change the number 31 to 100 and press [Return]. Play the sound again to hear the difference.
These procedures work with any of the sounds on your START disk. Feel free to explore and change the parameters in the drop-down menus. You can have three windows open simultaneously, each representing a sound. To close a window, click on the upper-left corner, or select Close from the File menu. If you have made any changes, an alert box will ask you if you want to save them. It is a good idea to copy the entire SOUND.STQ folder to a blank disk and save your new sounds there. If you want to save them under another file name, choose Save as... from the File menu and a dialog box will let you enter a new name.
Now that you've explored NSQ.PRG and perhaps created some weird sound effects, you may be wondering just what it is that you have been doing. What are all those parameters for? What is ADSR, Frequency, LFO?
SOUND THEORY
Before we can understand electronic sound, we should first review sound in general-whether electronic or natural. Any sound you hear can be described as a disturbance, or vibration, in the atmosphere. Our inner ear is sensitive enough to detect the disturbance and convey it to our brain as sound. In physics, sound is treated as a displacement of pressure in the air. We can graph this as a function of changes in pressure over a period of time (see Figure 1a).
By labeling the horizontal axis time and the vertical axis pressure displacement, we have a graphic representation of a sound, called a waveform. The waveform gives us a picture of the sound which is instrumental in visualizing the underlying physics. Waves can he in many different forms. The waveform in Figure 1a is called a sine wave.
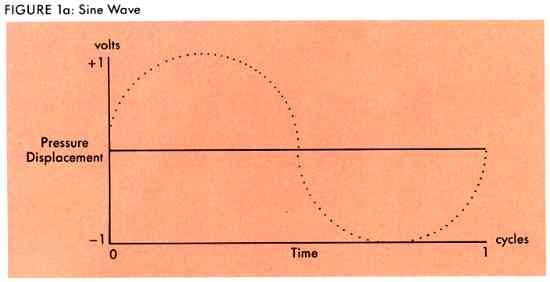
SINE WAVE
The smooth rounded curves of the sine wave make it a "perfect" sound, but it is never actually heard in nature. An electronic device called an oscillator can generate a sine wave. The oscillator produces a voltage that smoothly rises to a maximum value (the peak of the sine wave) and then falls to its minimum value (the trough of the sine wave). One time through this process of climbing, falling, and returning to the original starting point is called a cycle, and the rate at which these cycles occur is called the frequency. Frequency is expressed in cycles per second, or Hertz (Hz).
This continuously changing voltage, when amplified and applied to a loudspeaker, moves the diaphragm of the speaker back and forth at the same rate as the voltage driving it. The oscillating speaker creates disturbances which travel through the air to our eardrums. The result is an electronically generated sound we perceive as coming from the speaker. The higher the frequency of the waveform (the more cycles per second), the faster the speaker will vibrate, and the higher the apparent pitch of the sound.
The pure sine wave has none of the frequency components that occur in complex natural sounds like musical instruments or voices. Because it changes smoothly, the sine wave is considered an analog sound. It can only be imitated by the digital ST computer. Let's look at waveform that can be generated by the ST
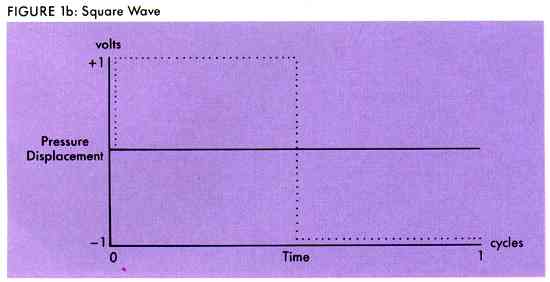
SQUARE WAVE
If you were told to draw a sound wave, but could only use straight lines, one obvious wave you could create would be a square wave (see Figure 1b). This is pretty much the way your computer looks at it; it doesn't know about curves.
The square wave, with its perfectly straight lines, is just as unnatural as the perfectly rounded sine wave. But it's simple to generate digitally, so it is the foundation of all sounds generated by the ST sound chip. Load the SQUARE.SND sound again and play it. The frequency of this sound is already set at 31 which is the lowest it can go. If we could go even lower, the buzzing sound would become a series of distinct clicks as the speaker vibrates back and forth. Whereas the sine wave required a smoothly changing voltage to generate its characteristic curve, the square wave only requires two voltages, one for the wave at its peak and one for its trough. Two voltages mean binary, and binary means digital.
NATURAL SOUND
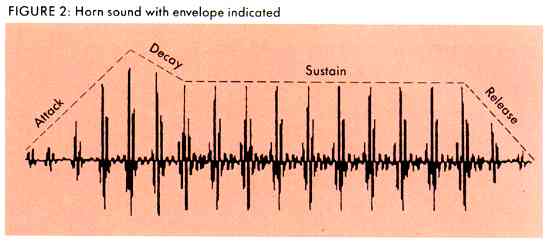
Its important to realize that both the sine wave and the square wave look artificial and, more importantly, sound artificial. What distinguishes them from the natural acoustical sounds we hear every day? Let's look at the waveform of an acoustic sound, such as a horn. Compare Figure 2 to the static sine and square waves. Immediately, you see that the acoustic sound is irregular, with several peaks and troughs within the basic cycle. This illustration is a only a snapshot" of the sound; each time the horn is played the waveform will look slightly different. These slight differences are crucial to our hearing this as a "real" or "live" sound.
Examining waveforms reveals the many ridges and troughs that make the sound complex. These are frequency components. Sharp edges indicate many frequency components and thus a more complex sound.
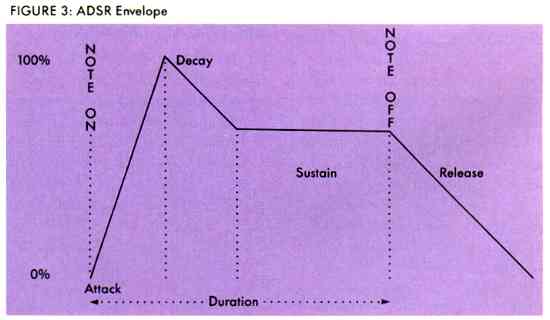
THE ADSR ENVELOPE
Most waveforms have an overall shape-a beginning, middle and an end. This is sometimes called the ADSR envelope because the shape of any sound can be broken down into four parts: Attack, Decay, Sustain and Release (ADSR). Many synthesizers have ADSR capability, i.e., they can generate the Attack, Decay, Sustain, and Release. (See Figure 3.) The ST sound chip has four control bits labeled Continue, Attack, Alternate, and Hold-but it does not have true ADSR.
When a horn player begins blowing a note, the first part is characteristic of the instrument as it responds to the changing air pressure. Typically the volume rises quickly to a peak. This is the Attack, and is what makes a horn sound like a horn. If you heard the same sound with the first part cut off, it would sound like an organ.
The Attack is usually louder than the rest of the note. It reaches a peak, then Decays back down to the level you will hear for the duration of the note. This level is called the Sustain level. When the note is over, the horn player stops blowing, but the air left in the horn enables the sound to linger for just a short time as it fades away. This is called the Release. The Release is second only to the Attack in your perception of a sound. In contrast with the horn, a square wave has no basic shape and thus when heard without any modification, starts and ends abruptly.
ADSR is an abstract structure that has been applied to sound for purposes of analysis. The horn player has never heard of it-nor has the horn. But for us to be able to manipulate sound electronically, we must place a structure on it. An electronic ADSR follows a prescribed pattern: When the note is begun it is called a NOTE ON. The NOTE ON initiates the Attack phase of the sound, during which the volume of the sound goes from zero to its maximum value. This value is the actual or nominal volume of the sound. The Decay portion follows immediately after the attack as the volume decreases. The Decay time is the period it takes to reach the Sustain level.
It is important to realize that Sustain is a level, not a time. It is the volume of the tone after the decay. The time is indeterminate and depends on the Duration of the note. The Duration is the length of the note and can range anywhere from a few milliseconds to minutes. When the Duration is over, it is called a NOTE OFF. But the actual sound is not over; NOTE OFF signals the beginning of Release.
In designing sounds electronically, the goal is to create a sound that is "alive," i.e., dynamic, not static. A pure sine wave-or square wave-is static. What distinguishes a live acoustic sound from an electronic one is how it changes over time. A horn is a constantly changing sound, as is the ocean or rain. If you add dynamic control through the use of envelopes and other devices, the electronic sound has a much better chance of sounding like what we want. Dynamic control is the ability to modify the sound as it is happening.
Digital sound generation relies heavily upon envelope control, which is one of the techniques used in NSQ.PRG to enable Near Synthesizer Quality. It allows you to "shape" a waveform which, in the case of the ST, is the only way you can make a square wave sound like so many different sounds. The envelope is a means to dynamic control of electronic sounds.
DIGITAL vs. ANALOG
Let's take a look at how we create and control a digital sound. For this purpose we will use a square wave; it is easier to generate than a sine wave and it is the basic sound source on the ST.
To create a waveform with a computer, we use numbers to represent each part of the waveform. These numbers, often called samples, encode the waveform digitally. A digital waveform differs from an analog waveform much the same way a digital watch differs from an analog watch. Time changes smoothly and continuously in an analog watch as the second-hand sweeps across the face. whereas the seconds pulse by one at a time in a digital timepiece. Similarly, a digital waveform has discrete points where the shape of the waveform changes.
A square wave is a simple digital pattern. We can use the number 1 to represent the highest possible positive displacement of pressure, and -1 to represent the lowest (a negative displacement). But a digital waveform is not enough because an acoustic speaker needs an analog voltage to operate. The samples can be converted to voltages using a device called a Digital-to-Analog Converter (DAC). Thus, in order to create a digital square wave, the sound chip alternately sends out l's and then -l's to the DAC, which is in turn connected to an amplifier and speaker which produce the sound.
One cycle of the square wave is the point at which the waveform begins to repeat itself. Therefore, the rate at which each sample is sent to the DAC (the sampling rate) determines the frequency of the square wave. If, for example, it takes 100 samples to represent one cycle of the square wave (fifty l's followed by fifty -l's), a sampling rate of 1000 samples per second will generate a square wave with a frequency of 10 cycles per second, or ten Hertz (Hz). The formula is: Frequency equals Sampling Rate divided by Number of Samples in One Cycle:
Frequency = 1000 / 100 = 10 Hz
In the case of a single square wave, its frequency will be perceived as pitch: the higher the frequency, the higher the perceived sound. A frequency of 262 Hz, for example, is middle C on a piano. The lowest note on a piano is about 27.5 Hz. It is difficult to hear tones below that, and it takes a very good loudspeaker to produce them. At the other end of the spectrum, few people can bear frequencies above 15 KHz to 20 1KHz (KiloHertz = 1000 Hz). The range of the ST sound chip is 31 Hz to 125 KHz! You will probably not use frequencies much above 4 KHz (4192 Hz is the highest note on a piano). The lowest frequency you will probably use will be about 50 Hz. The speaker is unable to effectively reproduce sounds below that.
The volume of a digital square wave is set by the actual value of the samples. Each sample is multiplied by a constant number (the volume parameter in NSQ.PRG) and the resulting output of the DAC is a larger voltage. The larger the voltage, the greater displacement of pressure and the louder the sound. The ST sound chip allows four bits of audio-level control of the DAC, which means zero equals no sound and 15 is the loudest.
Some of the same limitations found in digital graphics are found in digital sound. If you draw a diagonal line on a low-resolution graphic screen, you get what is referred to as a "stair-step" effect-a line of jagged pixels. The higher the resolution, the smoother the line appears. The same is true with digital sound; the higher the resolution, the smoother the sound. The amplitude resolution of digital sound is determined by the number of volume levels. With the 15 levels available on the ST, you can hear a "stair-step" effect as the volume of a sound is gradually increased. Load in STAIRSTP.SND to hear this effect. If you change the volume more rapidly, this is not noticeable.
THE ST SOUND CHIP
We want to get the best possible sound from our ST. Now that we have a better understanding of sound, let's take a closer look at the ST sound chip. We can't improve it until we understand it. [See also "ST Sound," Antic, Nov 85.]
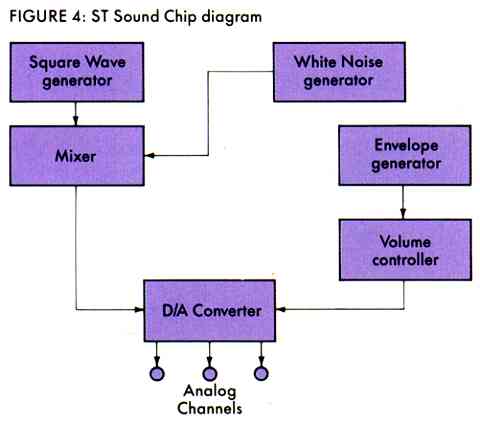
The ST sound chip consists of a square wave generator with frequency control, volume control, and an envelope control for each of three channels, or voices (see Figure 4). The frequency range extends over eight octaves and the volume of the sound can be any of 16 levels. Three independent square waves (the voices) can be played simultaneously, each with its own frequency and amplitude.
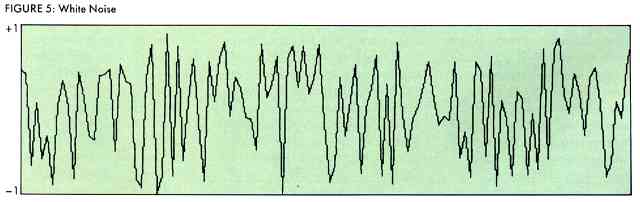
The sound chip also has a noise generator (see Figure 5) which generates pseudo-random numbers (not statistically perfect) that are sent as samples to the DAC. This waveform has many frequency components, yet, unlike the square wave, they are happening at random times. This irregular sound is called white noise because, like the color white that contains all colors, it contains many frequencies combining together to form a distinguishable but rough sound.
To hear the noise generator at work, select New on the File menu. (This will create a default window that just happens to contain a square wave.) Tum off the square wave by selecting Nominal under Frequency and clicking on Disable. Then select Nominal under Noise, click on Enable to turn on the noise generator, and give it a number from 1 to 31. The higher the number, the lower the frequency components. Just as the frequency of a square wave is increased by generating the waveform more often, the frequency components of the noise are increased by generating the random numbers more frequently.
The noise generator is used to create sounds ranging from a gunshot (try GUNSHOT.SND) to a banging sound (try HAMMER.SND). On each of the three channels on the ST you can use either a square wave, or noise, or mix them together. However, there is one severe limitation: There is only one noise generator. If you change the frequency of the noise, it will affect all channels in which it is mixed.
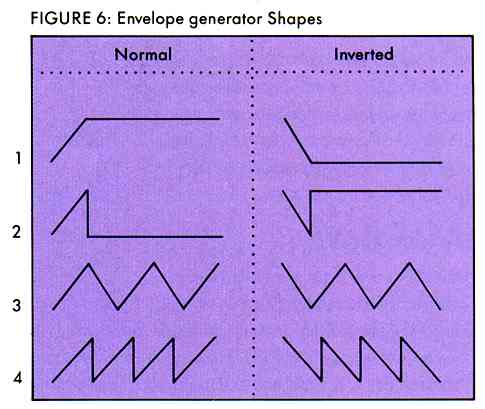
The ST sound chip has one envelope generator which governs all three channels. There are eight built-in envelope shapes to choose from (four of which are inverses of the others (see Figure 6). The envelopes employ a technique dubbed amplitude modulation, or AM. This envelope is actually a second waveform which serves to modify, or modulate, the amplitude of the initial square wave.
To help you visualize the AM envelope, imagine a standard square wave at constant frequency of, say, 200 Hz. A 200 Hz square wave goes through a high-low cycle 200 times per second. This initial square wave is called the carrier wave. Now, we can use a second waveform to modify the amplitude of the carrier and achieve an overall different sound. The triangle wave is a standard AM envelope on the ST sound chip. The basic shape of a triangle wave resembles (surprise!) a triangle with sharp diagonal lines (see Figure 6). Every cycle of a triangle wave, the amplitude begins at zero and ramps up (increments at a constant rate) to a maximum value, then, at the same rate, ramps down to zero again (the inverse works just the other way around). This waveform is then used to modify the amplitude of the square wave. To hear what this kind of amplitude modulation sounds like, try AMPMOD.SND.
The ST sound chip has limited envelope features. First, the only way to really shape a sound is to use a portion of one of the built-in envelopes, but there is no way to make a general shape that will work in all cases. For example, if you change the duration of the sound, the rate of the envelope generator must also change. But it gets worse. There is only one envelope generator. If you want to make an organ sound on one channel and a bell on another, it isn't possible using the built-in controls.
NSQ DYNAMIC SOUND
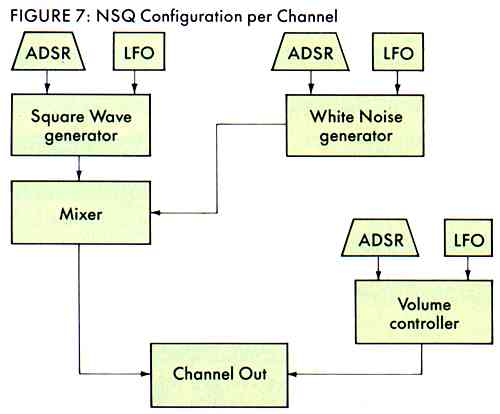
Now that we know the problems we can examine the solution - and play with the sounds in greater detail. Lee Actor and I developed the NSQ (Near Synthesizer Quality) system after we discovered that, with all its limitations, the ST sound chip is programmable. So we took its basic features, letting the chip generate the initial square wave, and built upon, added to, and, in some cases, entirely circumvented the available controls. We've added two flavors of envelopes (ADSR and LFO) to volume, frequency, and noise (see Figure 7). These modify the general waveform in real-time (at incredibly high speeds, as the sound is actually made), allowing dynamic control of sound generation. Using the NSQ program, you too can make truly exciting sounds on the ST.
NSQ.PRG does not use the built-in ST envelope generators. The confinement of only a single envelope generator with a very limited set of shapes prompted us to design a system which would allow a higher degree of control. We replaced the single envelope generator with three ADSR envelopes and three LFO's, one apiece for each channel. (LFO's will be explained later I promise.)
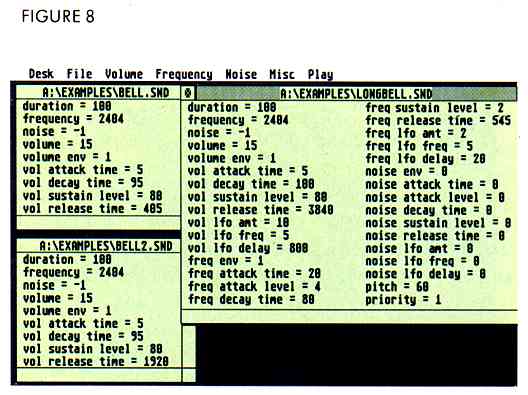
Load BELL.SND and listen to it. This uses an ADSR envelope to generate the distinctive "twang" of a bell. Look at the values for the volume ADSR. They are listed as Attack time, Decay time, Sustain level and Release time. All times are in milliseconds (msec-0.001 second, or 1/1000 of a second). The Attack time, 5 msec, is as fast as it can go. It takes 5 msec (almost instantaneous) for the level of the sound to reach full volume, the value designated in nominal volume. This is the Attack and sounds no different than the sharp ON of a square wave. What makes this sound like a bell is the Decay and Release. Once full volume is reached, the sound decays to the Sustain level in 100 msec, about 1/10 of a second. The Sustain level is 80 percent of the full volume (a value of about 12). The time it takes to reach the Sustain level is the sum of the Attack time and the Decay time. In this case, 5 msec + 100 msec = 105 msec
When you play the sound by selecting Sound on from the menu, the Attack phase is initiated. When the time designated by Duration has elapsed, the Release phase is initiated. A Sound on command plays the sound at the frequency determined by the nominal frequency parameter. Note on differs from Sound on in that it is more like pressing and holding a key on a MIDI keyboard: the Sustain level is maintained indefinitely. In order to begin the Release phase of the ADSR envelope after a Note on, you must select Note off, which is like releasing a MIDI key. Also, a Note on uses the Pitch parameter to select the frequency of the sound, not the nominal frequency. Pitch is a musical term related to notes: musical notes have a set frequency, but not all frequencies correspond to notes (see Table A with the MIDI sidebar). Besides, a designed sound might alter a frequency so that you don't hear it as a note of a given pitch.
| NOTE
|
FREQUENCY
|
MIDI/PITCH
|
NOTE
|
FREQUENCY
|
MIDI/PITCH
|
NOTE
|
FREQUENCY
|
MIDI/PITCH
|
| C1 | 33 Hz | 24 | F3 | 175 Hz | 53 | A5# | 932 Hz | 82 |
| C1# | 35 Hz | 25 | F3# | 185 Hz | 54 | B5 | 988 Hz | 83 |
| D1 | 37 Hz | 26 | G3 | 196 Hz | 55 | C6 | 1047 Hz | 84 |
| D1# | 39 Hz | 27 | G3# | 208 Hz | 56 | C6# | 1109 Hz | 85 |
| E1 | 41 Hz | 28 | A3 | 220 Hz | 57 | D6 | 1175 Hz | 86 |
| F1 | 44 Hz | 29 | A3# | 233 Hz | 58 | D6# | 1245 Hz | 87 |
| F1# | 46 Hz | 30 | B3 | 247 Hz | 59 | E6 | 1319 Hz | 88 |
| G1 | 49 Hz | 31 | C4 | 262 Hz | 60 | F6 | 1397 Hz | 89 |
| G1# | 52 Hz | 32 | C4# | 277 Hz | 61 | F6# | 1475 Hz | 90 |
| A1 | 55 Hz | 33 | D4 | 294 Hz | 62 | G6 | 1568 Hz | 91 |
| A1# | 58 Hz | 34 | D4# | 311 Hz | 63 | G6# | 1661 Hz | 92 |
| B1 | 62 Hz | 35 | E4 | 330 Hz | 64 | A6 | 1760 Hz | 93 |
| C2 | 65 Hz | 36 | F4 | 349 Hz | 65 | A6# | 1865 Hz | 94 |
| C2# | 69 Hz | 37 | F4# | 370 Hz | 66 | B6 | 1976 Hz | 95 |
| D2 | 73 Hz | 38 | G4 | 392 Hz | 67 | C7 | 2093 Hz | 96 |
| D2# | 78 Hz | 39 | G4# | 415 Hz | 68 | C7# | 2217 Hz | 97 |
| E2 | 82 Hz | 40 | A4 | 440 Hz | 69 | D7 | 2349 Hz | 98 |
| F2 | 87 Hz | 41 | A4# | 466 Hz | 70 | D7# | 2489 Hz | 99 |
| F2# | 93 Hz | 42 | B4 | 494 Hz | 71 | E7 | 2637 Hz | 100 |
| G2 | 98 Hz | 43 | C5 | 523 Hz | 72 | F7 | 2794 Hz | 101 |
| G2# | 104 Hz | 44 | C5# | 554 Hz | 73 | F7# | 2960 Hz | 102 |
| A2 | 110 Hz | 45 | D5 | 587 Hz | 74 | G7 | 3136 Hz | 103 |
| A2# | 117 Hz | 46 | D5# | 622 Hz | 75 | G7# | 3322 Hz | 104 |
| B2 | 123 Hz | 47 | E5 | 659 Hz | 76 | A7 | 3520 Hz | 105 |
| C3 | 131 Hz | 48 | F5 | 698 Hz | 77 | A7# | 3729 Hz | 106 |
| C3# | 139 Hz | 49 | F5# | 740 Hz | 78 | B7 | 3951 Hz | 107 |
| D3 | 147 Hz | 50 | D5 | 784 Hz | 79 | C8 | 4186 Hz | 108 |
| D3# | 156 Hz | 51 | G5# | 831 Hz | 80 | |||
| E3 | 165 Hz | 52 | A5 | 880 Hz | 81 |
TABLE A
Select Sound on from the menu. Since the duration of the sound is 105 msec and the length of the attack/decay sequence is also 105 msec, as soon as the Sustain level is reached, the Release phase begins. But, even without the Sustain portion, we still hear a sound! The Release phase of the sound is the part that is heard after the note is turned off. To understand this better, you can compare this to another similar sound. Without closing the current sound, load in BELL2.SND and turn it on (this means to select a Sound on unless specified otherwise). Note how much longer this sound lasts. To play BELL.SND again, click anywhere on its window to make it active, then turn it on. Listen to both sounds again.
Compare the parameters for each sound (see Figure 8). The only difference is the Release rime. BELL.SND is 405 msec and BELL2.SND is 1920 msec, nearly two seconds. Try different values for yourself to hear the effects.
DURATION
Duration is important enough to merit a special case. For example, the horn player knows how to blow the horn for a very short duration. But what happens when the duration is less than the attack and decay time? Try it. Set the duration to 10 msec. The sound still sounds basically the same. That is because it is important when designing a sound to consider what might happen when the duration is extremely short. The rule is this: if a Note off occurs before the sound reaches its Sustain level, it goes into its Release phase. Remember: Note off signifies the end of Duration. If the Note off is issued during the Attack, the sound will not reach full volume and will immediately begin the Release phase at its current volume. If it is in the Decay phase, the Sustain volume will not be reached and the Release phase will begin starting at the current volume. Change the Release to 5 and leave the duration at 10 msec. You will hear a very short sound.
It is important to consider what the likely duration of a sound is going to be during its design. If a duration of less time than the sum of the Attack and Decay time is possible, you should specify an appropriate value for Release. Try your sound with both long and short durations. That is the best way to be sure of what is going to happen.
Consider another way to make the bell sound. Load in BELL3.SND. Move it so you can still see both BELL.SND and BELL2.SND. Its Attack time is the same, but the duration is 500 msec, the Decay is 490 msec, and the Release is 5. Yet, it sounds very similar to BELL.SND. The difference is that this sound is complete when the Duration has elapsed. There is no Release phase. Try playing this note with a duration of 100 msec. It will just stop mid-note after 100 msec. But if you set the Sustain level to 80 and the Release to 405, it will sound more like BELL.SND. You can experiment with the Sustain level to make it sound just like BELL.SND (you could of course change the Decay time, but you can leave the Decay at 500 and adjust the Sustain level instead). This is just to show you the variety of ways you can alter sounds.
Now close BELL3.SND and open LONGBELL.SND (see Figure 8 again). This is a more complex version of the BELL sounds. First of all, notice that the Release time is longer Set BELL2.SND to the same Release time (3840 msec). Now compare the two sounds. Notice how much more interesting LONGBELL.SND is. Some of the differences are subtle, but this is a simple example of how intricate you can get.
LFO
The main enhancement in LONGBELL.SND is the use of the LFO's with both volume and frequency LFO stands for Low Frequency Oscillator and is a type of cyclical AM envelope we use to shape the sound. The LFO's are triangle waves that modify a parameter by repeatedly increasing, then decreasing the parameter value at a specified rate. For example, the volume LFO in LONGBELL.SND modifies the volume by 10 percent. Since volume is 15, it will range over a value from 15 to 15 minus 10 percent of 15, or a range from 15 to 13.5. The maximum LFO frequency is 50 Hz. That means the fastest triangle wave you can have will cycle at 50 times per second. The LFO frequency for LONGBELL.SND is 5 Hz. Therefore, the volume will continuously change its value between 13.5 and 15 at a rate of 5 times every second. The delay rate is how long the LFO waits before its modulation begins.
Frequency LFO works the same way, but it modifies the frequency instead. The example, LONGBELL.SND uses both volume and frequency LFO to give the bell a more realistic quality. Typically, an LFO on volume is called tremolo (listen to TREMOLO.SND), and on frequency is called vibrato (listen to VIBRATO.SND). An example using both LFO's is EERIEFLY.SND.
LFO's at lower frequencies (under 15 Hz) add a "wobbling" effect to your sounds (like tremolo and vibrato). This is because the changes are happening so slowly that your ear is able to resolve them. LFO's at higher frequencies (from about 15 to 50 Hz) can actually change the basic characteristics of the sound. Load VIBRATO.SND and listen to it. Adjust the frequency LFO to change the frequency and amount to its maximum value. Now play the sound. It sounds nothing like the original sound. You can do the same with TREMOLO.SND, however, the result is not quite as pleasing.
You can get a tremendous variety of sounds just with the frequency LFO. For example, listen to DRWHO.SND, EXPLODE.SND, and LASER.SND. This is just a small sampling of the sounds you can make.
Another very important control is the frequency ADSR. It is very similar to the volume ADSR, but the difference is important. When you select any ADSR, one input line is called Attack level) You can't change this value on the volume ADSR, because the volume Attack always remains at 100 percent. But the frequency ADSR can be varied beyond the limits of your speaker (and probably your hearing). Any positive or negative number (not exceeding five digits) is read as a percent change. A 100 percent change equals one octave, so the value -350 would lower the frequency ADSR by three and and a half octaves.
Similarly, the Sustain level can be over the same range. The Release will always bring the sound back to the original pitch. But if you put in a large enough Release, for example, 65000, and a much shorter volume Release, possibly 100 msec, the original pitch will not be heard. This is the case with the DRWHO sound.
Another use of this type of control is evident in PLUCK.SND. The beginning of the sound appears to have a "plucked" sounding attack. This is made possible with a very short frequency Attack and Decay and a large Attack level. This technique is very useful in many percussive sounds.
The final control to be discussed is the Noise ADSR and LFO. This ADSR acts just like the frequency in that it can go both posrive and negative and allows you to adjust the Attack level. Also like frequency you are shaping the frequency components of the white noise. Choose New under File. Now turn off the square wave by selecting Nominal under Frequency and clicking on Disable. Now select Nominal under Noise and click on Enable and enter the value of 1. Play the sound. It sounds like steam being released or someone telling you to "Sh-h-h-h." This contains mostly high frequency components. Now change the nominal noise value to 31. It is a much raspier sound. This higher value contains the mostly lower frequencies. This is difficult to hear as pitch. What is important is to remember what each end of the range sounds like.
You can make useful sounds just using noise. Load in SNARE.SND. Experiment with the nominal noise value to hear the difference. To hear examples using the noise LFO, load in NOISELFO.SND. Remember the ADSR on noise does not affect the volume of the noise. The volume is controlled by the volume ADSR and LFO. It will affect both the square wave and the noise. The noise ADSR and LFO alter the frequency components of the noise.
CONCLUSION
With this much background, you are now on your own. There are other example sounds which make use of all the different controls in a variety of ways. Listen to them and look at how they are made. Do not be afraid to change these sounds. It would be a good idea to use the Save as option to change the filename of any sound you modify so that you don't clobber the original sounds. With a little imagination and persistance, you will be able to build a library of sounds in no time at all.
REFERENCE:
- Technology of Computer Music. Max V. Mathews, MIT Press, Cambridge, MA. 1969.
- Musical Applications of Microprocessors . Hal Chamberlain, Hayden Book Company, Inc., Hasbrouck Heights, NJ. 1980.
- Digital Audio Signal Processing, An anthology . John Strawn, ed., William Kaufman, Inc., 1985.
| If you have a synthesizer with a MIDI port,
you can use it with this program (NSQ.PRG on your START Disk). MIDI is
an acronym for the Musical Instrument Digital Interface standard, a convention
of the musical and computer industries that permits electronic instruments
and computers to work together. The Atari ST computers have a MIDI interface.
The MIDI keyboard generates sound frequencies that we hear as musical notes. The MIDI standard assigns numbers to each musical note (see Table A for a correlation of MIDI pitch numbers and frequencies.) This is the number the keyboard sends to the computer, and that the computer's MIDI interface interprets. The duration is determined by the length of time you hold down the key. NSQ.PRG will read notes from any MIDI keyboard, for example a Casio CZ-101. If you plug a MIDI cable from the MIDI OUT of your keyboard to the MIDI IN of your ST, pressing keys on the musical keyboard affects the sounds generated by NSQ.PRG. Any sound loaded in the active window will play when a MIDI key is depressed, using the pitch of that key for the frequency of the NSQ.PRG sound. The effect is that you are playing that sound from the keyboard. The ST sound chip has three voices, so up to three MIDI keys can play simultaneously, each adding to the sound you hear If no windows are open, you will hear no sound. It is important to understand how the ADSR envelope works to fully appreciate what is happening when you play the keyboard. Pressing a key signals a Note on which begins the Attack phase. After the Attack, the sound Decays to the Sustain level where it stays until you release the key, signalling a Note off and beginning the Release phase. |