DESKTOP
ICON EDITOR
CUSTOMIZE YOUR DESKTOP ICONS!
By Alex Leavens
Kick out those old file cabinets and throw away your trashcan. With START's Desktop Icon Editor, you can replace your standard icons with whatever you want-a scroll, a wooden door, or even your favorite cartoon characters! Full GEM editing capabilities! Plus a desk accessory loader-find it all inside the ICON.ST folder on your START disk.
 If
you've used your ST for more than, say, thirty seconds, then you've seen
icons. What? Aren't
If
you've used your ST for more than, say, thirty seconds, then you've seen
icons. What? Aren't
icons Russian religious artifacts that'll get you tossed in the gulag
after some humorless KGB agent finds them in your luggage at Moscow Airport?
Da, tovarischch. But don't worry, they're not the subject of this article.
What I'm talking about are ST computer icons.
Icons on your ST are the small, bitmapped graphics appearing on your desktop shortly after you boot up your machine. The first icons you see are filing cabinets, representing your disk drive(s), and a trashcan, representing your file delete function.
When you double-click on one of the drive icons, a window will open, showing the contents of the disk in that particular drive. The window then shows the remaining icons: a folder, usually a sub-directory representing programs with similar functions; a pile of paper with a dog-eared corner, representing, say, a resource file, or simply program data; and a memo pad, indicating programs executable from the desktop.
Icons gained their present foothold in computer operating systems for a very simple reason: Human beings are almost completely visually-oriented. In the past, people used their eyes to espy sabertoothed tigers from afar, and prevent said tigers from munching on them. Now, skip forward a few zillion years to the computer age. Before icons, people struggled with cryptic instructions on their PCs just to open files. With the advent of input devices such as mice, coupled with bit-mapped graphics, pictorial representations of computer hardware and software have made opening files easy. Now you just point and click.
But let's say you don't want to point and click on a dog-eared pile of paper. What if you want to click on the Banana Jr. 6000 character from Bloom County to run a program? What if you want to trash a file by dragging it over to the gaping maw of Sesame Street's Oscar The Grouch? In order to accomplish these aesthetic transformations, you need a specialized program to alter your icons. You need...
THE START ICON EDITOR
There are a number of files which make up the icon editor, among them EDITOR.ACC, LOADICON.ACC, MAKEICN2.TOS, ICON.DAT and EDITME.RSC (see specific disk instructions in the sidehar and on the Disk Instructions Page). EDITOR.ACC is a desk accessory allowing you to do all sorts of wonderful things, which I'll tell you about in a moment. EDITME.RSC is the resource file for the accessory. MAKEICN2.TOS is a program executed at boottime by the accessory, and ICON.DAT is the icon image read in by MAKEICN2.TOS. LOADICON.ACC is a small desk accessory that will load your icons but won't let you edit them. In the second half of this article, I'll discuss the program take-apart, but first let's see how we edit icons.
CHANGING ICONS
Whenever you boot your ST, one of the first things it does (after loading in GEM) is to load and execute any files with the extender .ACC from your boot disk. These are desk accessories, which are really independent multi-tasking programs. There are many desk accessories already, performing such diverse tasks as checking your spelling and buffering files that you want to print. EDITOR.ACC is a desk accessory that at boottime, loads in a set of custom icons from a disk file. Once your ST is running, it also allows you to edit icons on the ST desktop.
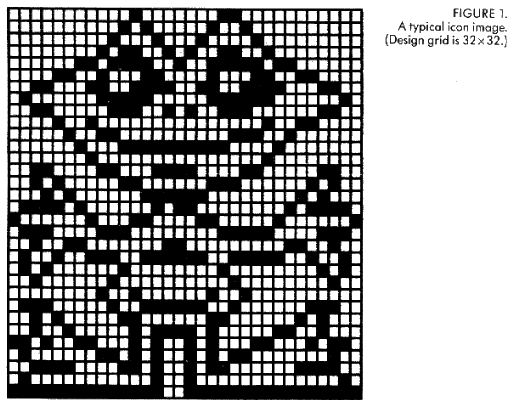
Figure 1 shows a typical icon picture. By "coloring in" specific pixels on a 32 x 32 grid, we can form a picture. This is what the desktop does-each of the desktop icons is a series of on and off pixels which combine to form an image. For the desktop, these images are contained in a file called DESKTOP.RSC, which (in a ROM-based ST system) is located in ROM.
you want to trash
a file by dragging
it over to the
gaping maw of
Sesame Sheet's
Oscar The Grouch?
RUNNING THE PROGRAM.
At boot time the editor accessory will try to open a file called ICON .DAT This file should contain the custom icons you want loaded. If there is no file ICON .DAT, no icons are changed, although the accessory will still run. Once your ST has booted, the desk accessory ICON EDITOR will be available from the DESK menu. Clicking on this line will bring up the control panel for the accessory. From the control panel you EDIT the foreground mask, edit the BACKground mask, CLEAR both masks, CLONE (copy) the foreground mask into the background mask, LOAD a foreground/background mask set, and SAVE a foreground/background mask set. You can also LOAD and SAVE an entire group of masks, which will load (or save) one of each of the five types of mask sets. (For a detailed explanation of masks, see the sidebar) Here's a breakdown of each of the six functions:
EDIT: Edit the foreground mask of an icon.
The foreground mask of an icon is the actual icon picture-this is what will be displayed for a normal, unselected item on the desktop. When you click on this option, you will he put in the edit window, with a copy of whatever's currently in the foreground mask for this icon. (I'll explain the edit window in detail in a minute.) Note: The pictures you create using the editor will remain in the icon masks, even if you leave the desk accessory. This means that you could edit part of the picture, exit the accessory, come back to it later and your picture would still be there (assuming you haven't turned off your computer).
BACK: Edit the background mask of an icon.
The background mask of an icon performs two tasks. Before an icon's foreground mask is placed on the desktop, the background mask is logically OR'd with the desktop surface. Thus, whatever shape is in the background mask will show up as a hole on the desktop. Think of the background mask in this sense as being a "cookie cutter," which will punch out a hole in the desktop, leaving only empty space.
Once the background mask has been used to punch a hole on the desktop, the icon mask is placed here. This is the normal, unselected state. However, when you single- click on an icon (or drag something to it, for example) the background mask comes into play again.
This time, the background mask is XOR'd
(eXclusive ORd) with the foreground mask. This is
what gives us the "negative image" effect when you select an icon.
Editing a background mask works exactly the same way as editing a foreground mask. (The edit window is discussed in detail, below.)
CLEAR: Clear the current images from both the foreground and background masks.
You will be prompted with an "Are you sure?" message if you haven't yet saved your current images to disk. If you have saved your images, then the masks will simply be cleared.
CLONE: Copy the current foreground image mask (the icon itself) into the background image mask.
You use this function primarily when you're creating a new icon and want a basic pattern to work from to create your background. If there's something already in the background mask, you will be prompted with an "Are you sure?" message.
LOAD: Load an icon (or icon set) from disk.
Icon files are assumed to have a .DAT extender There is nothing about an icon file that tells it which icon it should replace. That is, you can create a file icon, save it, and load it back in as a program icon or any other type of icon. Also note the program does not distinguish between single icons (created using SAVE of an individual icon) and icon sets (created using SAVE of ALL icons.) If you attempt to LOAD an icon set into a single icon mask, you will get the first icon image's foreground and background. Additionally, if you select load all and use a file with less than all images, you will get error alerts for the icons which have no data. This is normal.
SAVE: Save an icon image (or set) to disk.
This works the same as LOAD, except that you're saving an icon (or icons) to disk. Note: Whenever you save an icon, a flag is also saved, indicating whether this icon is in use or not. (The program defines completely blank icons as being not "in use. ") This flag is unimportant for single icons (you're not likely to be saving out blank space), but it is very important when you save out an icon set. This is because the program MAKEICN2.TOS (which is the actual icon loader/editor) looks at the usage flag for each of the icons it loads in, and edits the icon based on that flag. Here's an example.
With the icon editor accessory, I create a new program icon, a new file folder icon and a new text (non-program) icon. However, I don't do anything with either the disk icon or the trashcan icon. (I haven't loaded anything into them from disk, either). This means that the file icon and trash icon are blank, while the program icon, the text icon and the folder icon are non-blank. Now I select SAVE ALL from the icon menu, and choose as my filename ICON.DAT. What happens?
* The file icon mask is marked as unused, and 128 bytes of zeroes are saved to disk.
* The trashcan icon mask is marked as unused, and another 128 bytes of zeroes are saved to disk.
* The program icon mask, being nonzero, is marked as used, and the images in the foreground and background masks are saved, foreground first (64 bytes), then background (64 bytes). The same thing happens for both the text and folder icons.
Now, when MAKEICN2.TOS is run (either from the desktop, by double-clicking it, or at boottime by the accessory), it will attempt to load in ICON.DAT. Once it does, it discovers the images for the file and trashcan icons are unused. It then searches through memory and replaces only the icons which are used (in this case, the program, text and folder icons).

USING THE EDIT WINDOW
We've examined the main menu functions of the icon creator. Now let's take a look at the actual icon editor built into it. Figure 2 shows what our icon editing window looks like. You'll notice several things about our window:
* At the top is the name of the icon mask we're currently editing, such as "File Icon Mask" for the foreground mask of the file icon, or "Trashcan Icon Background" for the background mask of the trashcan icon.
* On the left of the screen is the actual edit, window. This is the area you will either PAINT or DRAW or make a LINE in.
* In the middle top of the screen you'll see three small boxes. The top-most box corresponds to our edit window-this is where you'll see a real-size image of the one that you're creating. This is how the icon will look on the desktop. The middle box corresponds to the other mask of the icon you're currently editing. Thus, if you're editing the foreground mask of an icon, the background mask will be displayed here. Similarly, if you're editing the background mask of an icon, the foreground mask will be displayed here. The lower box shows what happens when the foreground and background masks of the icon are put together. In other words: The image which will result when you select the icon. Where AND and XOR are logical bit operations, the process used to determine this window is:
(Foreground mask AND Background mask)
XOR Background Mask.
On the right hand side of the edit window you'll see eleven buttons. These are: PAINT, DRAW, LINE, CLEAR, INVERT, UNDO, SHIFT MIRROR, SWAP, ABORT and EXIT. They perform the following functions:
* PAINT, DRAW and LINE are toggle buttons to select the drawing mode for editing. The current mode is displayed by the button in normal text- the other two modes are displayed in lightened text. Any of the buttons may be clicked at any time. Clicking a button that's already active has no effect. When in PAINT mode, pixels will be drawn in the edit window as long as you hold the mouse button down and move the mouse. Painting stops when you release the button. The color you're PAINTing in is determined by the color of the pixel that you first click on. If you click on a white (empty) pixel, you'll be painting in black. If you click on a black (filled) pixel, you'll be painting in white. PAINT mode is useful for drawing large outlines and filling in spaces.
For detailed editing work, use DRAW mode.
In DRAW mode, you turn pixels on and off, one
at a time, by pointing to a particular pixel and clicking on it. Clicking
on a blank pixel will turn it on, and clicking on an activated pixel will
turn it off.
LINE mode is used for drawing lines. When you first click on a pixel, you mark that pixel as being the starting point of your line. Then, as long as you hold down the button, you'll have a rubber-band line that follows the mouse around the screen. When you release the mouse button, you define the ending pixel for that line. The program then draws a line between the two points. (Note: Since the program uses integer math in drawing a "best fit" line, it may not always be perfect.)
* CLEAR will clear the edit workspace. You will be prompted with an "Are you sure?" message.
* INVERT reverses the current image (black pixels are turned to white and white pixels are tumed to black.) Useful for creating background masks.
* UNDO works intuitively and undoes the last operation you performed. You can also use the UNDO key on the ST keyboard. You have 9 levels of UNDO, which means you can undo the last 9 previous functions.
* SHIFT gives you the ability to shift the entire image one pixel in any direction (up, down, left, or right). Very useful for when you thought you had that image centered. The arrow keys on the keyboard also activate this function.
* MIRROR allows you to draw with mirroring on, similar to DEGAS and DEGAS Elite. The best way to understand this feature is to play with it!
* SWAP allows you to switch to editing the other icon image. If you're editing the foreground image, you would start editing the background image and vice-versa. You will be prompted with an "Are you sure?" message.
* ABORT will allow you to abort your current edit, leaving the current icon you're working on unchanged. You will be prompted with an "Are you sure?" message.
* EXIT exits the editing process and copies the contents of the edit buffer into your icon buffer
In addition to the control panel features, there's another function which is not listed, but instead accessed through the mouse. This is the "Area Select" feature, and is used in conjunction with the CLEAR, INVERT and SHIFT functions. Normally, these functions work on the entire image that you're editing. However; you can also select a smaller area for these functions to work on.
While pressing the RIGHT mouse button down, move the mouse cursor to the pixel that you want in the upper left corner of your selected area. Now press the LEFT mouse button down. (Once you've pressed the left mouse button you can release the right one). You should now see a rubber box sitting with its left corner where you clicked the mouse. Now, as long as you hold the left mouse button down, you'll be able to drag the rubber box around. Once you release the mouse button, the box will snap inwards to the nearest pixel boundaries and highlight that area. This is your selected area. You can now use the CLEAR, INVERT and SHIFT functions, and they will only affect this selected area and not the entire image.
The selected area will stay in effect until you (1) cancel it explicitly by pressing on any area outside both the edit window and the buttons or by selecting a new area, or (2) Cancel it implicitly by starting to paint, draw, or draw a line.
As a final note, avoid selecting any options from the menu bar when in edit mode. To make updates more efficient, I ignore most GEM redraw messages. Hence, if something overwrites the edit window, it'll stay there. If you insist on trying this, any key (except UNDO or the arrows) will force a redraw and repair the window.
INSTALLING NEWLY-CREATED ICONS
You'll note that once you exit the START Icon Editor (from the QUIT option inthe main menu), none of your icons have been changed. This is normal. The Editor is simply an icon editing tool In order to actually change the icons on your desktop you must:
1) Create new icon(s) and or load old ones from disk.
2) Save out all icons, in a file named ICON.DAT (If you already have an ICON.DAT file, you can save it out as something else, and rename it as ICON.DAT later.)
3) Exit the Icon Editor
If you already had an ICON.DAT on disk and saved your new icons as something else do the following: Single-click on ICON.DAT. Type the letter "X." Type RETURN. You've now renamed ICON.DAT to be ICON.DAX. Next, single click on the filename you just saved. Hit [ESCAPE], then type ICON.DAT followed by a [RETURN]. You've now renamed your other file to be ICON.DAT.
4) Double-click on MAKEICN2.TOS. This program will read the file ICON .DAT, and install the new icons you've created.
Hurrah! You're finished. Now, let's see how this stuff works.
HOW NOT TO BOOT A 22K DESK ACCESSORY EVERY TIME
Also included on your START disk is a program called LOADICON.ACC. This is a very small desk accessory performing only one function: It loads in your custom icons at boot time. Once you've created a set of icons you like, you can remove EDITOR.ACC from your boot disk, and replace it with this one. (Of course, you won't he able to edit icons then.)
ICONS, GEM AND THE DESKTOP
The ST desktop icons are contained in a file called DESKTOP.RSC, which (in a ROM-based ST system) is located in ROM. Yes, you're right. DESKTOP.RSC is the desktop resource file. This brings us to a little-known fact about the desktop: It's just another GEM program, like any other It makes calls to the AES and VDI libraries, accesses DOS, and reads the mouse using evnt_multicalls. It has a resource file, too, where it gets the menu bar you see on the desktop, where it gets other information, and where it keeps all the information needed by the desktop.
But, how can our program alter desktop images stored in ROM? It can't, of course. However, when you boot your machine, one of the first things TOS does is copy DESKTOP.RSC down into the low memory of your ST. Then, when the desktop program is started up, it gets its information from the RAM copy of the resource file and not out of ROM.
When I wrote this program, I thought, "All I have to do is find the copy of DESKTOP.RSC in low memory, and change the icon pictures to whatever I want!" Unfortunately, it wasn't that simple.
The first stumbling block is the fact you can't predict exactly where the resource is going to be loaded. All of the following things (and others) affect where DESKTOP.RSC finally ends up: How many drives (both physical and logical) you have, whether or not you have a disk cacher program installed, how many accessories you've got and how much memory your machine has. It's loaded into the general area at 0x10000 ("0x" is a C sign for hexadecimal numbers)-but it can be higher or lower than that, sometimes by as much as 0x2000 bytes! This means that we're going to have to search for it every time we boot the machine.
MAKEICN2.TOS does exactly that. It loads in and then, starting at 0x50000, searches downward through memory for the string DESKTOP.RSC. Once it finds it (and if it doesn't find it, there's something seriously wrong!), it calculates the offset from the beginning of the resource file to the place where icon images are kept. This is a fixed number (at least for this release of the GEM ROMs), arrived at through experimentation-this value is not one that Atari guarantees to be the same in future releases. This means that MAKEICN2.C will not necessarily work with future releases of the ROMS . . . but by that time, I'm sure I'll have figured our where the new icon images live.
of the background
mask as a
"cookie cutter."
Anyway, the problem of finding the images in memory was insignificant compared to the second one: The desktop program loads the icon images it needs out of the resource into another area of memory, and thereafter doesn't look at the resource unless it tells itself to. In other words, at boot time, the desktop makes its own copy of the icon images, and never looks at the resource file again, unless it absolutely has to. And unfortunately, our changing the images in the resource file doesn't qualify.
Let me explain further. After some fooling around, I'd managed to write a simple little program which went down into low memory, found the DESKTOP.RSC, determined the offset from the start of the resource file to the start of the actual icon images, and then patched the images to be something else. I had no tools for actually building a data file of images-the program I wrote simply had a different image (a floppy disk) coded into it, which it used to replace the file cabinet image. I drew the disk image by taking a piece of graph paper, plotting it out, and then converting that plot into integers, which I stored in an array. But back to the story.
Now I had this program. which I would execute from the desktop. Doubleclick on it, it would execute, then leave, the desktop would come up again. And voila! there was the image I had stuffed in - a little 3.5" disk instead of Atari's filing cabinet. Great! I thought. I'll just write a little desk accessory which will execute this program at boottime. I won't have to change anything at all. Wrong, wrong, wrong. I wrote a pathetically simple desk accessory All it did was:
event_timer (4000, 0); /* Wait for 4000 milliseconds */
Pexec(My little program); /* Execute my icon program */
loop: Goto loop; /* simply wait for ever, since */
/* desk accs never end. . .*/
(Pexec, by the way, is simply a DOS call that allows you to load and execute another program.) Now I ask you: How much simpler could things be? Not much. And my accessory worked, too: The machine would boot, the Desktop would come up, and 2 or 3 seconds later, the drive light would come on, indicating my little program was being loaded and executed. But nothing happened. The desktop icons remained unchanged. What was going on? I examined low memory with a debugger, and sure enough, my program was working-the icon had, indeed, been changed. So why hadn't the changes shown up? And then to further confound me, when I exited the debugger, there was my icon staring me in the face! Aaaargh! What was going on?
I finally figured it out: The Desktop, instead of going to the resource each time it wanted to draw an icon, was going there just once, copying the icons somewhere else and using that copy from then on. There was no way to force the Desktop to go back to the resource, ever. The only time it would do it was when you executed something from the Desktop, like running a program, or showing a file. After you run a program, the desktop decides whatever information it has lying around is hopelessly scrambled, and goes and gets a fresh copy of everything it needs from DESKTOP.RSC. Of course, once it does that, it now has a copy of your new icon, and so the new image shows up on the Desktop.
Unfortunately, there was no method-no system call, for example-I could've used to force the Desktop to look at DESKTOP.RSC, after it had looked at it the first time. And once I phrased it that way the answer became obvious: Sure, there was no way to get it to look at the resource again after after it had already looked at-but how about before it had looked at it? Was there a way I could get at the resource file before the Desktop did?
In a word, yes. When your ST first boots, there is a very brief period after DESKTOP.RSC has been copied into low memory, but the Desktop hasn't yet been executed, and thus the Desktop hasn't had a chance to load the icon images out of the resource. If I could get to the resource file during that time, then I could alter the icon images, and they would be used by the desktop from the beginning. After about a day of experimentation, I came up with a timer value for my desk accessory that was long enough so the DESKTOP.RSC had been loaded, but short enough so the desktop itself hadn't yet read the images out of it.
After that, it was relatively easy I had built a series of images by hand, and I had a little loader program (MAKEICN2.TOS) which would load them in. Now what I needed was a tool to let me edit those images, save them to disk and load them later. So, how long was it going to take to write that program?
Would you believe less than 48 hours?
PROGRAMMING MADNESS: (Or, how to write a 2000 + line GEM program in less than 2 days)
I know what you're thinking: There's simply no way I could've written, compiled, and debugged all the code in EDITOR.C in less than 48 hours. I admit it: First, I stole a couple of the routines from other places, and second, some of the auxiliary routines (like the stuff handling the buttons inside the edit window) I wrote over the next several days (bringing the grand total to 1 week of programming). Most notably, I stole sho_lform(), a very handy little utility for displaying dialog boxes. I also stole the basic shell of an accessory from the Atari Developer's Kit, but I gutted it so much only about 50 lines were left. The fact remains I wrote, compiled and debugged something like 1900 lines of C code in less than two days (and 90% of the code was written in a single frenzied 12-hour programming session). And this points to one of the reasons I like GEM so much: It's easy to write effective, useful programs, in a short amount of time.
WHAT IT ALL MEANS
Actually there is no cosmic significance to this program, but I've had a lot of fun creating it and playing with my Desktop. You'll find the Desktop icons that I use in the ICON.DAT file on your START disk. Use them as a starting point to see how to create little animation tricks (in particular, look at my program icon), and just have fun. I hope to see lots of custom icons floating around soon! (Editor's note: For oodles and oodles of the best icons, look on our own Antic ONLINE. Type GO ANTIC at any CompuServe prompt. For more information on CompuServe Information Services and Antic ONLINE, circle 163 on the Reader Service card.)
Lessee...I'll trade you two program icons for a trashcan. . .
| Running the
Icon Editor The START Icon Editor is one of the finest programs to he published in any computer magazine. If you bought the $4 non-disk version of START and would like to order the Icon Editor and the other programs which appear in this issue, send us the bound-in order card or mail $10.95 to: START DISK #4, 544 Second ST., San Francisco, CA 94107. Be sure to specify issue number 4. This issue's START Disk is so full of great software, we found it necessary to squeeze all the Desktop Icon Editor's files. To use your Icon Editor, you must first follow these steps: 1 Open the ICON.ST folder on a backup copy of your START Disk and copy the following files to a blank, formatted disk: EDITOR.AQC
These files are in a squeezed format and must first be unsqueezed using the UNSQ3I .PRG file program. 2 To unsqueeze the files, place the disk you just copied to into drive A and double-click on UNSQ31.PRG. The Unsqueeg program will run and an item selector box will appear, asking you for the name of a squeezed file. Click on the EDITOR.AQC file (the "Q" as the second letter in the filename extender indicates a squeezed file). Another item selector box will come up, asking for a destination file. Just click on OK to use the default filename (in this case, EDITOR.ACC). 3 Repeat this process for the other our squeezed files (EDITME.RQC, MAKEICN2.TQS, LOADICON.AQC, and ICON.DQT). If you need more help, please consult the Disk Instructions Page in this issue. 4 The four files of import are: ED1TOR.ACC
You must copy these files to the root directory of your boot disk. The boot disk is the disk you place in drive A when you turn the machine on, and the root directory is the directory which appears when you first open up a disk (by double-clicking on the famous file-cabinet icon)- that is, it is the directory outside of all folders. This allows the desk accessory to be loaded at boot time. Hard disk owners may copy these files to the root directory of drive C instead of drive A. 5 Insert your boot disk into drive A, turn your machine off, and then on again. When your Desktop appears, you should have a new set of icons (from the ICONDAT file) and an option titled "Icon Editor!" under the Desk menu. Click on this to run the editor. 6 Remember: Even though the Icon Editor has inserted the ICON DAT images into the Desktop, there are no icons loaded into the editor This may seem confusing, so just keep in mind: you must load a .DAT file if you wish to edit any already saved icons. Additionally, to use your own icons, you must make a new ICON DAT file and reboot your machine before they will actually be installed on the Desktop. 7 Once you have an ICON DAT file you like, you can avoid loading the entire editor by replacing the ED1TOR.ACC file with the LOADICON.ACC file on your disk. (You don't actually need to delete the EDITOR.ACC file; you can just change the .ACC extender to something like .ACX.) Be careful not to have both the EDITOR.ACC and LOADICON.ACC accessories active at the same time. |
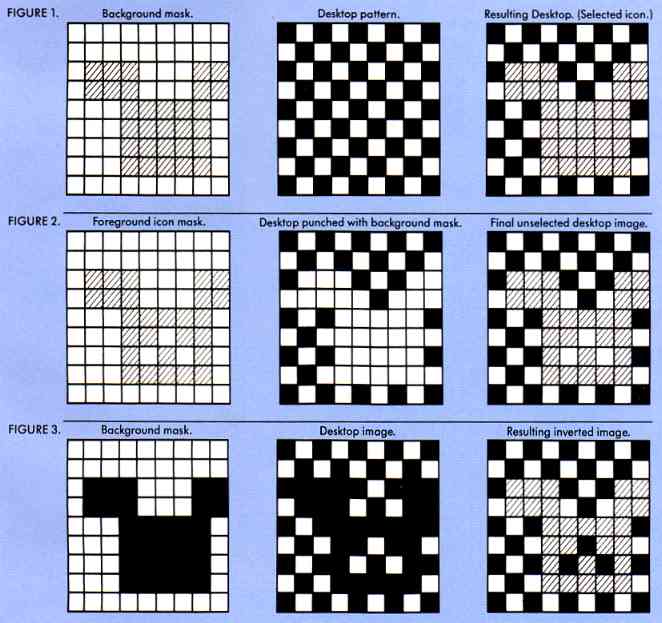
| How the Desktop
Draws Things Throughout most of this article, I've yammered on about foreground and background icon masks, with nary an explanation of what the darned things actually are. Never fear, an explanation is at hand. Whenever the Desktop draws itself, it does a couple of things. First, it draws a solid background pattern. This is the pattern appearing when there's nothing else such as an open window or an icon to interrupt it. On color monitors (w/ TOS in ROM), this pattern is simply solid, all pixels on (and, if you haven't altered the desktop palette color, green). On monochrome monitors the pattern is a little more complex, and is known as a "dithered" pattern, consisting of one pixel off, one on, one off, etc. Think of it as hundreds of little checkerboards, all linked together OK, the Desktop has drawn the background. Next, it draws the icon images for disk drives and the trashcan, and then draws any open windows. It's the second stage of this process we're interested in. Remember: our icon image is nothing more than a pixel pattern 32 bits wide and 32 lines high. If we simply dropped this image down on the desktop, without regard to what was underneath, the results would be, at the very least, unaesthetic. This is what will actually happen if you create an icon image with no background mask. It'll just get slapped onto the desktop any old way, and it looks very ugly... So what we need is something to clear out a space on the desktop before we plop our icon image there. This is what the background mask is for Let's take a closer look at the actual process of drawing the icon mask on the Desktop. (Note: To avoid confusion, when I'm speaking about the desktop program, I'll say GEM. When I'm referring to the actual physical Desktop on the screen, I'll say "the Desktop.") Step 1: GEM takes a copy of the background mask for an icon, and does a "replace" function with it on the Desktop. Wherever a pixel in the background mask is ON, the corresponding pixel on the desktop will be turned OFF (set to the background color, normally white), without regard for what that Desktop pixel was originally. If a pixel in the background mask is OFF, then it has no effect on the desktop (See Figure 1). Note how the little figure has effectively punched a hole in the desktop pattern. Step 2: GEM takes a copy of the foreground mask for the icon (usually just called "the icon' and uses it to do a "replace" function on the Desktop (See Figure 2). Notice how it's difficult to see the edges of the final icon-they just seem to blend in with the desktop. Because of this, it's a good idea to make your background mask at least one pixel bigger than your image. That way, you'll be cutting out some "white space" around your image, so that the edges of it will be visible. See the icon images on your disk for examples of this. This is the normal, unselected state of an icon. But what happens when you single-click on an icon, or cause it to be highlighted (like dragging something to the trashcan, for example). The same two steps listed above are performed. Then a third step takes place, which is: Step 3: GEM takes a copy of the background mask, and performs an exclusive OR with the current desktop image. An exclusive OR does the following: * If both pixels are ON, the resulting pixel is OFF
The result is an inverse image of the original pixel image (See Figure 3). Note that wherever the image was ON now contains whitespace, but the three pixels (the "eyes" and "nose" of our little figure) which were off are now ON.
|