A PERSONAL PASCAL DRAWING PROGRAM
by Dale Giarratana
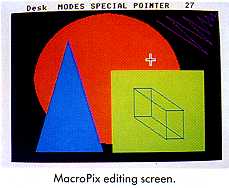
An object-oriented GEM graphics program written entirely in Personal Pascal, MacroPix also serves as a graphics macro utility for animated title screens and a source of memory-efficient graphics for your programs.
I can't draw a straight line; for that matter, I have a pretty hard time with circles, squares and squiggles. So, I turn to computers for help. I had wanted to try my hand at programming in Personal Pascal, and a drawing program seemed the ideal choice. It would give me an opportunity to learn many of the graphic-oriented GEM routines which were why I bought an Atari ST in the first place.
Basically, there are two ways to store computer graphics information, whether on disk or in memory: direct screen memory storage, or object information storage. The first method is used by paint programs like DEGAS or NEOchrome which save the actual screen memory-an array of the pixels. This results in a disk file at least 32K in size. Object information storage is more complex and varied. There are several methods, hut the principle is the same: object-oriented "draw" programs- such as EasyDraw or CAD 3-D-"record" the coordinate and vector data along with the commands used to create the drawings. The commands are "played back" using the saved data, and the complete picture is redrawn. For example, a line can be expressed by two points and the command to draw a line between those two points. Unlike direct screen-memory picture files which are always the same size, object information files vary in size, depending on the complexity of the picture. Usually they are quite a bit smaller.
MacroPix is an object-oriented graphics program. Each time you execute a graphics command-whether to draw a circle or to fill a box-that command's special number code is added to an array along with any necessary data values (such as X and Y position coordinates).
PROS AND CONS
The picture files created by MacroPix vary in size depending upon the number of graphics moves made, but they will usually add up to no more than several kilobytes, as compared to the 32K of most paint program files. The small file sizes offer a viable method to include several graphic screens in an application with little memory overhead. Also, if you're thinking of writing a graphics/text adventure, which requires many pictures in one program, this is the technique for you. Sierra Online has been using it for years.
thinking of writing a
graphics/text
adventure, this is
the technique
for you.
Unfortunately, whereas paint pictures slap themselves quickly to the screen at the speed of a memory move, MacroPix has to go through and redraw each command. Depending upon the complexity of the picture, this will usually take more time than a paint file. The screen redraw, however can be used to your advantage: You can take the redraw into account and create simple animations. Although paint program boo-boos may be painted over leaving no one the wiser, draw over a mistake in MacroPix and it will briefly rear its ugly head during each redraw. But take heart. I have added an editing feature to MacroPix to take care of just this problem.
HOW TO USE MACROPIX
Okay spread out the magazine and stick a paperclip at this place. We're going to do some drawing. Boot your START disk, click open the folder MACROPIX.ST, unsqueeze and run MACROPIX.PQG. (See the Disk Instructions page for information on unsqueezing- decompressing- the MacroPix program.) MacroPix is very easy to use. You could probably figure it out without reading a bit of this, but it's always nice to have some documentation.
You can run MacroPix from any resolution. For our purposes, well describe an operation in low resolution because we like to play with all the colors. When you click and run MicroPix, you will first see a title screen telling you to press any key So-press any key (I'm partial to [K], some people prefer [T].)
You are now in the familiar GEM environment with a menu bar across the top of your screen revealing the choices: Desk, MODES, SPECIAL, and POINTER. Desk contains any desk accessories you may have loaded plus a title box under the heading, MacroPix. Run your mouse cursor along the other menu bars and check out the options. Instead of listing them all in order, let's just draw something and take advantage of each option as we need it.
When the program starts, you're all set to plot points. Move your mouse cursor around on the screen and click the mouse button a few times. Little black dots will appear here and there. (In monochrome these dots may require a magnifying glass to see, but rest assured, they do exist. Also, those people with monochrome monitors should ignore our upcoming references to color No matter what color we mention in this article, you will see either black or white. You're probably used to this by now.) Now, move up to the drop-down MODES menu and-yup, you can tell by the check mark that you are in POINTS mode. This is the default mode of MacroPix, along with the default color of black. Notice the number on the right of the menu bar. This index shows you how many graphics instructions you have stored so far. Since you are in POINTS mode, the number will correspond to the number of dots you placed on the screen.
As long as you are in the MODES menu, move on down and click on LINE. Point your cursor anywhere on the drawing screen and click the left mouse to anchor the first point of your line. Move the mouse and you will see a "rubber" band line. When you have your line where you want it, click the right mouse button to draw the line and release the rubber band. If you want to continue drawing a line from the second point to a third, and so on, click the left mouse button instead. Play around with this until you have a messy bunch of lines all over the screen. In fact, experiment with all the MacroPix features as they're described. (Note: Pascal is not as fast as assembly language, so the mouse buttons are not as responsive as you may be used to. Make very deliberate clicks if this is a problem.)
OK, enough lines. And you're probably tired of black anyway. Let's change colors. (Monochrome mavens can tune out for awhile.) Move your cursor up to SPECIAL and click on COLOR. Another screen appears with a color palette and a different menu bar. Select any color by clicking on it. If you wish to alter any color in the palette, move up to RED, GREEN, or BLUE, and click on the intensity value (0-7) until satisfied.
Now that you have an attractive puce or avocado, click on DONE to return to your drawing screen, choose CIRCLE from within the MODES menu, click the left button to set the center of your circle somewhere on the screen, move the mouse until the rubber circle is the proper size, and click either button to set the circle. Simple.
 Go up and
choose BOX. Click to establish the upper-left corner of the box, then move
the rubber box to a nice size and click again. Let's put up another box.
Click for the first comet, move the mouse and-wait, you decide you don't
really want it there. While the box is still rubber, press [Undo] and the
operation is aborted. The Undo key will abort most operations in mid-stride.
What if your boo-boo is post-stride? Let's try it. Create another box and
set it. Now, press [Delete] and the box disappears. [Delete] removes the
last move. Press [Delete] again. The other box disappears. Notice, also,
your index counter decreases. You may delete each graphic move in this
way until nothing is left. But if you want to clear the whole screen, there
is a faster way: From modes, click on CLEAR. A friendly alert box will
caution you (go ahead, choose YES, the screen is a mess anyway). Next,
an alert box will ask if you want to return to default colors. You decide.
Go up and
choose BOX. Click to establish the upper-left corner of the box, then move
the rubber box to a nice size and click again. Let's put up another box.
Click for the first comet, move the mouse and-wait, you decide you don't
really want it there. While the box is still rubber, press [Undo] and the
operation is aborted. The Undo key will abort most operations in mid-stride.
What if your boo-boo is post-stride? Let's try it. Create another box and
set it. Now, press [Delete] and the box disappears. [Delete] removes the
last move. Press [Delete] again. The other box disappears. Notice, also,
your index counter decreases. You may delete each graphic move in this
way until nothing is left. But if you want to clear the whole screen, there
is a faster way: From modes, click on CLEAR. A friendly alert box will
caution you (go ahead, choose YES, the screen is a mess anyway). Next,
an alert box will ask if you want to return to default colors. You decide.
3-D Box, click...
yes, it's a rubber
perspective box.
Now that we have a nice, clean screen, let's make some new goodies. Choose TRIANGLE, click somewhere on the screen, move the mouse and. . . that's right! Tom Hudson, eat your heart out. And we don't need to stick with solid lines. Choose LINE TYPE in the SPECIAL menu, then use the new drop-down above to choose a line number. Return to the drawing screen by clicking on DONE. Subsequent drawings will use the new line type.
Now, change the color again, go back to a solid line, and let's try the next widget. Choose 3D-BOX, click and create a box just like the other ones. Next, move the mouse and. . whoa! Graphic Artist, roll over. Yes, it's a rubber perspective box. Make a few more. When you grow tired of 3D boxes, try 3D-TRIANGLE. (Sorry, no 3D CIRCLE. Miracles take time.)
So, what else do we have under MODES. How about FILL AREA? Click on FILL AREA, then click inside some area with a solid perimeter. Presto! Solid color. Don't like solid color? OK, move on over to SPECIAL and click on FILL PATTERNS. A special screen appears with all those built-in GEM fills. Select a nice fill (I like that little pebbly one) then click DONE, return to the drawing screen, and fill a bunch of stuff. Sometimes it's hard to see the arrow cursor during a FILL. Look under POINTER and choose OUTLINED CROSS, for a different look in cursors.
You may have noticed the AUTO-FILL option within MODES. Depending upon the drawing mode you've chosen, it may or may not be available (as indicated by the solid or grey text). Once you choose AUTO-FILL, certain drawing modes automatically fill in whatever pattem you've chosen.
All that's left in MODES is CLEAR and QUIT We've already used CLEAR and you're not yet ready to QUIT (I hope). But when you are: Remember, you saw it here.
We've also covered a good portion of the options under SPECIAL. D-DRAW FILES will give you the option of saving or loading your complete pictures (really a collection of instructions, remember?). You may also save and load color palettes by using COLOR FILES. Apart from the colors changing, loading color files will not affect the drawing in memory. Both of these options use the familiar GEM file selector box.
If you don't now have a whole bunch of patterns and drawings on the screen, go out and scribble some, then come back here when you're through. Finished? Okay, within the SPECIAL menu, click on REDRAW. REDRAW clears the screen and recreates your drawing from scratch. Now, click on EDIT, choose ALTER DELAY, press [ESC], enter an amount like 20, and press [RETURN]. Click on REDRAW again to see the difference. This delay time is saved with your picture.
Click on EDIT and choose EDIT MOVES. This will place you in a special screen showing just the first drawing move. Each click of the left button executes a move until you have marched entirely through the drawing. At any point, you may press [ESC] and be given the choice to EXIT, DELETE (that move), or CONT(inue) stepping through the moves. Should you choose to DELETE a move, you won't notice it is missing until you REDRAW the screen. (Deleting moves can cause some pretty strange things. If, say, a box was originally drawn and later filled, and you go back and delete the BOX move, when the FILL move comes along, much of the screen may be flooded.)
If you just want to delete a portion of your drawing, but don't want to do it one step at a time, choose EDIT then MULTIPLE DELETES. This will prompt you for the number of moves you wish to delete, in descending order (from most recent to first).
Looking again within SPECIAL, DELETE MOVE will perform the same function as pressing the [DELETE] key. NULL MOVE is a feature primarily added for those interested in creating simple animations. At some point, you may want nothing to happen. A click on NULL MOVE will increment the move counter and delay without drawing anything.
I think we've covered all functions. Let's try a simple animation. Click on CLEAR to begin fresh. Make sure you're using solid lines and you have a nice variety of colors in your palette. Choose a blue from the COLOR screen. Go to the FILL PATTERNS menu and choose the pattern of quarter-inch cross grids. Now, activate AUTO-FILL, select BOX and draw a big, blue, grid-filled box that takes up most of the screen.
Change to a red color. Turn off AUTO-FILL (by clicking again on it). Choose the solid pattern from the FILL PATTERNS menu. Click on FILL AREA. Now, fill each square in the blue grid with solid red in some pattern. Spell your name, or just snake around. Remember, when you play this back, the fills will appear in the same order, one at a time.
Now that you have an interesting pattern of dots, change colors again -maybe green. Select CIRCLE, find a spot to start it, and draw a small (quarter-inch, or so) circle. Click at the center of this circle and draw one slightly larger. Repeat this until you have a huge, screen-filling circle. All right, we're almost ready to roll the projector, but, first, let's get rid of the grid.
From the COLOR screen, select the blue in which your grid was drawn and change the RED, GREEN, and BLUE values to match the background (probably 0,0,0 for white). Now, go back to the main screen and choose REDRAW. If the whole thing is too fast, choose ALTER DELAY from EDIT and try a higher number.
When working with animation, keep in mind that some drawing functions
work faster than others. Experiment until you get the results you want.
Programmers may want to use their drawings in their own program. This can,
of course, be done. (Non-programming artists can drop off here. Beyond
this point speak we computereze.)
|
|
COMMAND | DATA VALUES |
|
|
plot point | Color, X, Y |
|
|
line | Line type, Color, X, Y, X2, Y2 |
|
|
outlined circle | Null, Line type, Color, X center, Y center, X radius, Y radius |
|
|
outlined box | Null, Line type, Color, X upper left, Y upper left, Width, Height |
|
|
filled circle | Fill type, Line type, Color, X center, Y center, X radius, Y radius |
|
|
filled box | Fill type, Line type, Color, X upper left, Y upper left, Width, Height |
|
|
triangle | X apex, Y apex, X corner, Y corner, Line type |
|
|
area fill | X, Y, Color, Fill type |
|
|
3D box | X upper left, Y upper left, Width, Height, X2 upper left, Y2 upper left, Color, Line type |
|
|
3D triangle | X apex, Y apex, X corner, Y corner, X2 apex, Y2 apex, Height, Width, Upsidedown triangle flag, X lower right corner, Line type, Color. |
|
|
add 3 to DP | |
|
|
add 6 to DP | |
|
|
add 7 to DP | |
|
|
add 7 to DP | |
|
|
add 7 to DP | |
|
|
add 7 to DP | |
|
|
add 6 to DP | |
|
|
add 4 to DP | |
|
|
add 8 to DP | |
|
|
add 12 to DP |
FIGURE 1
|
FILE STRUCTURE
MacroPix stores picture files on disk in much the same manner as it does in memory: as a series of instructions. All the variables stored on the disk are in integer form (two bytes). The variables are stored as follows:
TIME-variable used in the delay procedure. (0 = no delay).
MP-Total number of moves executed (number of values in the MODE array).
DP-Total number of integers saved as data for the drawing moves (number of values in the DATA array).
COLORS - red, green, and blue values for the 16 colors. 48 integers in all.
MODE-integers put in the mode array Amount defined by MP
DATA- integers put in the data array Amount defined by DP.
The MODE array holds a sequential list of the commands executed. Each command is stored as an integer value. The DATA array contains information needed by the commands in the MODE array such as the X and Y positions, fill color and line type. (See Figure 1.) Note that there is not a one-to-one correspondence between the elements in the two arrays. In fact, the DATA array can be six to seven times larger than the MODE array because all draw commands require at least three integers; some commands even require more. For example, a point needs only three values, whereas a 3D triangle can't live without 12. In many cases, I did not use the most efficient method of storing data, opting for less complicated code. The table in Figure 1 documents the MODE and DATA contents. The last ten commands (11-20) are used by the edit routine when you delete moves from within a sequence. Rather than actually restructuring the entire array for a delete (which would have been tricky), the program merely adds ten to the mode value, creating a command which instructs the redraw routine to skip over those DATA values. A delete from the end of a sequence actually removes the elements from the arrays.
Drawing the picture using all this data is fairly straightforward. First, the screen is cleared, then a command is pulled from the MODE array. Depending on the instruction (for example, draw circle), a corresponding routine is executed. This routine uses information from the DATA array to draw a line, fill a circle, or whatever the particular command happened to be. The pointers to the two arrays are incremented, and the whole procedure is repeated until all the elements have been drawn.
All this may be confusing right now, but if you know anything about Pascal you could probably look through the source code to figure out how to use the picture files.
choose AUTO-FILL,
certain drawing
modes automatically
fill in whatever
pattern you're
chosen.
MISCELLANEOUS
 MacroPix is
a very long program, thus to go over every step would take far too many
pages. Instead, I will try to cover the more important procedures and techniques
that I used. Many of the tricks demonstrated by MacroPix were realized
only after long telephone calls to OSS, the makers of Personal Pascal.
The technical support staff at OSS was invaluable during this program development
and I must commend them for a job well-done.
MacroPix is
a very long program, thus to go over every step would take far too many
pages. Instead, I will try to cover the more important procedures and techniques
that I used. Many of the tricks demonstrated by MacroPix were realized
only after long telephone calls to OSS, the makers of Personal Pascal.
The technical support staff at OSS was invaluable during this program development
and I must commend them for a job well-done.
Personal Pascal has most of the VDI routines already built into the language but not all. Calls for seed fills or other not-so-simple tasks were left out. Many of these can be accessed by calling the VDI routines directly. To make VDI calls copy the procedure VDI_CALL, the variables CONTROL, INT_INA, INT_OUTA, PTS_INA, and PTS_OUTA, and all the TYPE declarations from the MacroPix source code. To use this call you must first define the integers-in under the array INT__INA and points-in under the array PTS_INA (such as INT_INA[0]:= 1). You then can make the VDI call as follows: VDI_CALL(command #, sub command #, number of integers in, number of points in, CONTROL, INT_INA, INT_OUTA, PTS_INA, PTS_OUTA, true or false) ;
The last declaration for true or false depends on whether you want translate the points in (PTS_INA) and points out (PTS_OUTA) relative to the current origin (this declaration is usually false). If the call involves the returning of any parameters they can be found in the arrays PTS_OUTA and INT_OUTA. You will be able to find some examples of the call in the program. If you need more information on VDI calls you can send a self-addressed stamped envelope to OSS requesting information on VDI and AES calls.
run MacroPix
from any resolution.
The Personal Pascal documentation on using IO_CHECK and IO_RESULT is a bit confusing. I found that if you don't declare these commands as global variables (after the type declarations) you will get a compiler error. To declare these as global you must add the following lines to your global variable declarations.
PROCEDURE IO_
CHECK(FLAG:BOOLEAN) ;
EXTERNAL
;
FUNCTION IO_
RESULT :INTEGER ;
EXTERNAL
;
You can now use the commands as explained in the manual.
The simplest way to write text to the screen is the DRAW_STRING command provided with Personal Pascal. Unfortunately, this only works with strings. But what if you wanted to output an integer or any other variable type besides a string to the screen? The WRITE command is a partial solution, but the text can show up just about anywhere on the screen. To correct this problem, copy the procedure GOTOXY into your own code. To move the cursor make the call: GOTOXY (x-position, y-position), where x-position and y positions are the coordinates in character positions. The procedure then adds 32 to the x and y variables and makes the call WRITE(CHR(27),CHR(89),CHR(Y), CHR(X)) ; to move the cursor to the x and y positions.
Dynamic variables offer you a powerful, albeit confusing, way to move large blocks of memory for tasks such as saving the screen. MacroPix utilizes dynamic variables when it switches to and from the color selecton and fill selection screens. This technique also provides a simple way to redraw the screen after a dialog box. To switch screens like this you must first turn off the pointer range checking ({$p-}). Then, you must then declare two type constants as follows. The first one allocates enough array space to hold entire screen and the second sets up a pointer into this array:
SCREEN = PACKED ARRAY
[0..31999] OF BYTE ;
SPTR = ^SCREEN ;
After declaring the type constants you must declare two pointers under the global variable table as follows.
SCR1,SCR2 :SPTR ;
To get the address for the physical base of the graphic screen you make an xbios(2) call. To do this add the following lines:
FUNCTION PHYBASE :SPTR ;
XBIOS(2) ;
You then set the pointer SCR1 equal to PHYBASE (SCR1:=PHYBASE ;). Now you may save the screen in memory by the following:
NEW(SCR2) ;
SCR2^ :=SCR1^ ;
To restore the screen from memory do the following:
SCR1^ =SCR2^ ;
DISPOSE(SCR2) ;
(Note: you must make the call DISPOSE(SCR2) ; before you can do the save screen commands again.) This is probably the shortest and easiest way to save screens in memory. For more information on this, contact OSS.
 FOR
YOUR OWN USE
FOR
YOUR OWN USE
If you are programming in Personal Pascal, you can easily use the MacroPix pictures in your own program by copying all procedures in the MACROPIX.PAS listing that are labeled with an asterisk (*). You must then copy the MACROPIX.PAS global variable table to the beginning of your code. To use the loading procedure, define the string FNAME to the file name of the picture and call the procedures LOADSCR to load the picture into memory, then REDRAW to redraw the screen in memory. (Note: You must delete some of the lines in the procedure REDRAW as commented in the source code).
REFERENCE
-
Personal Pascal
Optimized Systems Software
1221B Kentwood Avenue
San Jose, CA 95129
(408) 446-3099
$74.95