Organize your disk library
by ROBERT PYLE
As the number of programs in your library grows, so does the amount of time you spend shuffling diskettes to and fro, searching through seemingly endless subdirectories. Sometimes you think you've lost forever that elusive little utility that will save your computer from exploding if you can just. . . . find. . . it. . . in. . . BLAM!!! Ah, if only you'd had The Director, START's program for curing your disk library blues.
You'll find the program for this article on your START disk; the source code is in the compressed file DIRECTOR.ARC.
It seems to be a natural law that whichever program you're looking for will always be on the last disk in your library. If you've looked at the commercial and public domain disk library programs, you've discovered that they are basically simple database managers with the ability to read disk directories. And you probably already have a better database program than any of the ones included in these programs.
To get the best of both worlds, I've written The Director, a program that will read your disk directories and generate a file that can be read by most database programs. In this file you can include just the information you want, custom tailoring the data and using the full power of your database to fit your requirements. If this sounds interesting, read on.
Customize The Director
You must be in medium or high resolution before starting. Copy the
file DIRECTOR.PRG from your START Disk to a fresh working disk and double-click
on it. Once the control screen is in front of you, your first action should
be to configure the program to your specifications and then choose the
Save Settings option located on the left side of the screen to record them.
If you save the file as SETTINGS.CFG and include it on the program disk,
these options will load automatically when you run the program. Or you
can have a number of different .CFG files and load them with Load Settings
as you need them.
To create a library file, you should first decide which files (if any) you do not want included. For instance, you probably aren't interested in seeing every resource file or every documentation file on your disks. To exclude these, click on the appropriate file extension in the large box on the right of the screen. The highlighted extensions will be ignored when the disk directory is read.
In the center column is a box labeled "Extensions" containing the choices Include All and Exclude All. These provide a way to either clear or highlight all of the extension names, giving you an easier starting point. Also, any of the extensions shown can be changed to the letters of your choice- click both mouse buttons simultaneously while pointing to the extension you want to change and you will be asked for the new name. After you enter it, the new name will appear in the box. To retain these changes, use the Save Settings option.
On the left side of the screen you will see a box containing the options File Maximum and Folder Maximum. File Maximum refers to the number of files that can be retained in memory be fore outputting the information. Folder Maximum refers to the maximum number of folders (subdirectories) that can be in any one directory. These limits can be changed by choosing the Set File Maximum or Set Folder Maximum items located in the Control Settings box. (Editor's note: Because of a bug in the ST operating system ROMs, opening more than 40 total folders in a session may make system operation erratic. This was corrected in the new Mega ROMs. If you have an ST and a hard disk, we strongly recommend that you obtain one of the public domain programs that increase the 40-folder limit.)
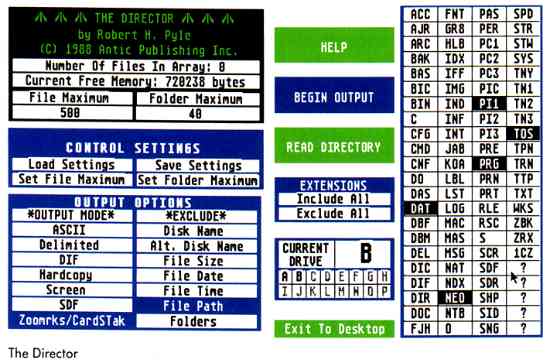
It is important to note that changing the File Maximum will erase any directory data that is currently in memory. Similarly, if you load a new .CFG file with a different File Maximum, you will be warned that changing this maximum will wipe out any data in memory and you will be given a chance to change your mind. The number of files in memory is shown in Number Of Files In Array and the approximate free memory remaining is shown to let you know when you need to save this information before reading further directories.
You are now ready to read the directories. Choose the disk drive you want to read by clicking on the desired letter in the Current Drive selector in the center column; then click on Read Directory. You will be prompted to insert the disk, and the reading will begin. Warning: Mixing disk formats (different numbers of tracks or sectors) can cause the program to crash. This apparently occurs somewhere in GEM, as it can also happen on the desktop. It is thus best if you separate disks by their formats.
First, the name of the disk (if any) will be shown. Some of the formatting programs in circulation insert nonprintable characters (i.e., less than ASCII 32) in the disk name. The Director adds 32 to this value to avoid problems during output; if you see punctuation marks in the disk name, this is why they are there.
Next, The Director will ask if you want to enter an Alternate Disk Name. You should give each disk a unique name or serial number to help you find it later. This name is not recorded in the disk's directory-it is for reference in the disk catalog only. You should record it on the label of the diskette. The Director will read the directory into memory and then ask if you want to read another disk. Continue reading directories until you are finished or want to change settings.
Whistle While You Work
It may take a while to read all of your disk directories into memory,
especially if you occasionally change the settings. Any time there are
already files in memory when you click on Read Directory, you will have
the option to either replace the old information with the new or add the
new information to the old. The Director will let you know if free memory
is getting low. If you continue to read directories, The Director will
repeat the warning until free memory is almost depleted, at which point
it will tell you to save the data in memory; if that happens, the directory
currently being read will not be included in the save.
After you have read all the directories for the current session, you are ready to set the Output Options. Select the items you don't want to include in the Output file under the *Exclude* section. The file name and extension are always included, but you can exclude the Disk Name, Alternate Disk Name, File Size, File Date, File Time, File Path and Folders. Any of the items that you select will be highlighted and omitted from the data file. If you entered an Alternate Disk Name, you may want to exclude the Disk Name. File Size is the length of the file in bytes. The File Date and File Time show when the file was created or last modified. The File Path shows the location of the file within the disk's folders; if the file is in the root directory (outside any folder), the path shows as a backslash (\).
The Folders option is a little different. If this is highlighted, none of the folders will be listed separately. However, you will still know which folders have which contents if the directory includes the File Path. If you exclude the Folders option, empty folders will not be listed at all. Otherwise they will all be listed, with the File Size shown as FOLDER (except in the DIF file format- in that case the folders are indicated by a value of -1).
Getting Out The Information
You are now ready for the final step- outputting the file. Select a
format option under *Output Mode* and then click on Begin Output. If you
want to preview the directory information, you can set the Output Mode
to Screen or Hardcopy. The files will be displayed in the order they were
read. If you prefer browsing through the listing in a word processor, simply
select the ASCII option and enter a file name.
Data File Formats
Most databases use their own format for storing information, but most
also let you read certain other data storage formats to make transfer between
different programs possible. Check your database documentation to see whether
it understands Delimited format, DIF (Data Interchange Format) or SDF (Standard
Data Format). The last button is Zoomrks/CardSTak, which accommodates two
of the card-style databases: Zoomracks and CardSTak. Each of these uses
a unique format. (Editor's Note: You'll find the "CardSTak" program
on this month's START Disk; the companion article is "Stack it". Also,
see "File it" in this issue for a review of Zoomracks.)
If you need to give your database field length information before it will read the data, it is as follows: File Name (8 characters, left justified); File Extension (3 characters, left justified); Disk Name (12 characters, left justified); Alternate Disk Name (12 characters, left justified); File Size (7 characters, right justified); File Date (8 characters, left justified); File Time (8 characters, left justified); File Path (maximum of 64 characters- this field is only as long as the path name except in an SDF file, where it is padded with spaces to 64 characters).
In a DIF file, the File Size will be a numeric value rather than a string, with a value of -1 if this is a folder name. The File Name and File Extension are output in separate fields to facilitate sorting and handling. Because CardSTak is a free form database manager that doesn't use field definitions, you can simply load the cards into CardSTak without worrying about setting up a format.
You now have a file that you can read into your database and manipulate to your heart's content. Add a comment field. Add a program type descriptor Sort it on anything. Delete what you don't want. Merge it with whatever Search it for MUGWUMP.PRG. Now you're in charge! And if you get lost, brief descriptions of all the options (as well as a recap of the file structures) are available by clicking on the Help box or pressing the Help key.
If you would like to examine the GFA BASIC listing of this program, unarc the file DIRECTOR.ARC on your START disk (if you are unsure how to unarc a file, refer to the disk instructions page). Then run GFA BASIC, select the Merge option and click on DIRECTOR.LST Alternately you can double-click on the file from the desktop and list it or print it out.
I wrote The Director because I didn't like any of the disk catalog programs that I tried. If you feel the same, I hope you find The Director as useful as I do!
If you'd like more articles like this, circle 210 on the Reader Service Card.
Robert Pyle has been programming since 1968, and his ST is his third personal computer. He lives in La Grange, Texas, and enjoys sailing, fishing, reading science fiction, and writing professional and shareware BASIC programs.