ON DISK!
Getting Started
Using a RAM Disk
by Gregg Pearlman, START Assistant Editor
and Heidi Brumbaugh, START Programs Editor
START presents Intersect's RAM Baby RAM Disk--file RAMBABY.ARC on your START Disk.
If your ST has only one disk drive, you've probably grown very tired of the repeated disk swaps needed to copy files between disks. There are alternatives, such as a second floppy or even a hard disk drive, but those alternatives are just not cheap. Your best bet is a RAM disk.
A RAM disk is neither a disk nor a drive. When you install a RAM disk, your ST reserves a portion of its available memory and treats it as if it were an actual disk drive. Since it's not an actual physical disk drive, there are no moving parts, resulting in greatly increased disk access speed.
Copying with a RAM Disk
On a single-drive system, you must drag files from the A Drive window to the B Drive icon or window to copy files from one floppy disk to another. This becomes tedious when you try to copy more than a single file to another disk. Your ST will tell you to "Insert Disk A into Drive A," then to "Insert Disk B into Drive A," then to "Insert Disk A into Drive A," then to.... Worse, you might accidentally insert Disk B when you should insert Disk A, or vice versa.
With a RAM disk, you may treat it as if it's a physical second floppy disk drive. To copy files from one disk to another, drag the filenames or icons from Disk A to the RAM disk icon or window. When this copy is completed, insert a second disk into your drive and copy the files from the RAM disk to the second floppy. Not only is this much, much faster, but you only have to swap disks once.
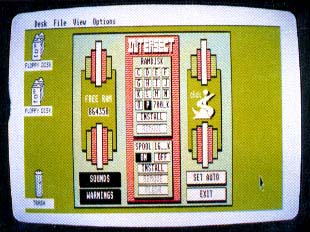 |
| Intersect's RAM Baby RAM disk and print spooler. At top center are the drive icon selector buttons, the size of the RAM disk and the RAM disk INSTALL/ REMOVE buttons. At bot- tom center are the print spooler ON/OFF buttons, spooler size and INSTALL/REMOVE/FLUSH buttons. Clicking on the SET AUTO button ensures that the RAM disk is present every time you boot. |
Programs load almost instantly from a RAM disk. For example, let's say you're reviewing a fabulous animation program. You can load the program from the RAM disk, check out a few features, exit, load your word processor, write a few words about what you've just seen, exit the word processor, load the animation program, etc.--without having to wait around for tedious disk access.
Some RAM disk programs will automatically copy files into the RAM disk at boot time. This way your favorite word processor or other application is always in the RAM disk, ready to run.
Baby, It's You
RAM Baby from Intersect Software is a public domain RAM disk and print spooler by Randy Mears. You can install RAM Baby as any drive from C through P. Both the print spooler and RAM disk can be set for any size (up to the limit of your computer's memory). You can also remove and reinstall them in different sizes and save startup settings so that the RAM disk, print spooler or both will be installed automatically at bootup.
To use RAM Baby, first copy the files ARCX.TTP and RAMBABY.ARC from your START Disk to a blank, formatted disk and un-ARC RAMBABY.ARC following the Disk Instructions elsewhere in this issue. You must then copy RAMBABY.ACC to the root directory of your boot disk and reboot your computer to install it automatically. Full documentation for the RAM disk and print spooler is also in the file RAMBABY.ARC.
(Editor's note: There are many different RAM disks--commercial, public domain and shareware. We chose RAM Baby because it's powerful and easy to use. RAM Baby is not "reset-proof," which means that if you press the reset button on the back of the computer you will lose the contents of the RAM disk.)
Using RAM Baby
To use RAM Baby, just click on "INTERSECT Rambaby" in the Desk menu. RAM Baby will then open a dialog box containing the selector buttons for the RAM disk and print spooler. To install the RAM disk, simply enter the desired size in kilobytes, click on the drive letter you want it to be and then click on INSTALL. You can remove the RAM disk by clicking on REMOVE. (Be sure to remove the RAM disk and print spooler before changing screen resolutions.) Keep in mind that if you remove the RAM disk or print spooler, any data in them will be lost forever.
Installing a RAM Disk Icon
To access a RAM disk from the Desktop, you must create a new drive icon. From the Desktop, single-click on any existing drive icon. Then go to the OPTIONS menu and click on Install Disk Drive. On the Drive Identifier line, replace the letter that's there already with the drive letter you've chosen for RAM Baby. (Whatever you do, don't use a lowercase "c"--that stands for "cartridge.") Now move down to the Icon Label line, press the Escape key and enter any name you want for the new drive icon. ("RAM Disk" seems to work fine.) Click on INSTALL, and the new icon will appear on the Desktop. Since RAM Baby is already installed, your new disk icon--and RAM disk--are ready to go.
Be sure to save your Desktop to your boot disk, or the RAM disk icon won't be present the next time you boot your computer.
Beat the START Disk Blues
Using a RAM disk to un-ARC the contents of your START disk can save you time and frustration. First make a backup copy of your START disk as usual. Then open the RAM disk's drive window and copy ARCX.TTP into it. (This is the only file you will need to copy to the RAM disk.)
Now, in the RAM disk window, double-click on ARCX.TTP. In the box that comes up on screen, type in the name of the file that you want to unARC. Because ARCX.TTP and the file you want to un-ARC are in different drives, you will need to preface the file name with A:\ to indicate that the file is on drive A.
For example, to un-ARC ST Writer 3.0 on this issue's disk, you would type in A:\STWRITE3.ARC and then press Return. ARCX will show you which files are being un-ARC'd as usual, but they will un-ARC directly onto the RAM disk at greatly increased speed. When you return to the Desktop, all the files associated with ST Writer will be in the RAM disk. Just insert a new disk into your floppy disk drive (drive A) and copy the files from the RAM disk to the floppy disk.
What's a Print Spooler?
Your ST can send data to your printer much faster than the printer can take it and while the printer prints, you can't use your computer. Therefore, if you're printing a sizable document, about all you can do is twiddle your thumbs until the printer's finished printing.
A print spooler, however, intercepts printer output before it's sent to your printer, stores it in a pre-determined portion of memory and then sends it to the printer as fast as the printer can accept it. The print spooler acts like a funnel: it receives information as fast as the ST can send it, fooling the ST into thinking that it's sending data to a printer that can keep pace with it--and thus freeing up your computer quickly so you can work with it while the spooler sends the data to the printer itself.
There are software and hardware print spoolers. RAM Baby includes a software print spooler that you can install when you install the RAM disk. Just set the spooler at any size you want, provided you have enough memory to handle it, and from now on, whenever you print a document with RAM Baby installed, you won't have to wait for your printer to finish printing.