OVERFLOWING DISK
STORAGE BOXES
VHS Tape Holders Make a Great Place to
Store Floppies
BY JOHN DAMIANO
Beset by mercilessly marauding memory, our hero survives using ingenuity, a few bucks and some sacrificial file folders.
It started out subtly. I first noticed them lounging innocently in the corner. Before long they were sitting on top of the monitors and printers, eyeing my last six square inches of available desk space, watching me as I typed. The Night of the Overflowing Disk Storage Boxes had begun.
Between hard disk backups, copies of software and public-domain downloads, floppies proliferate like rabbits. What starts out as a few boxes of newly purchased blank disks soon turns into a couple of 25-unit holders. Then after a while, a 100-disk holder hogs your desk and all those little boxes are still full! But I finally solved the problem. Now I have inexpensive, large-scale storage with quick and easy access to every disk.
My Primary Weapon
While shopping with my wife I noticed a nice-looking storage unit for
VHS tapes that cost less than $10. Possibilities sprang to mind. One of
these simulated-walnut beauties would hold every 3-1/2 inch disk I would
ever have! So I bought two -just in case. It took a little work to configure
them correctly, but it was worth it. I now keep all my disks in one place,
with all the related floppies together.
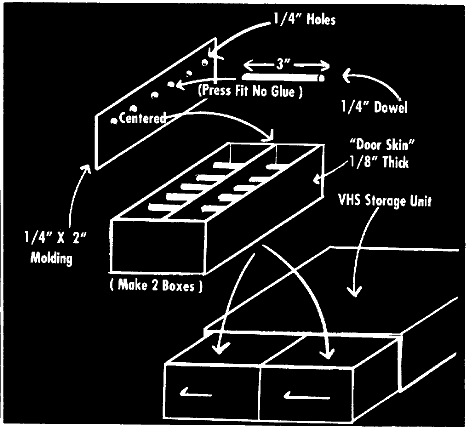
The trick is to make a drawer that fits inside the tape holder's drawer. You can use almost anything to make it: poster board, wood, plexiglass -anything. I chose a durable wood product called door skin. I must warn you that door skin comes in 4x8-foot sheets, which makes enough drawers for your whole computer club.
The Basic Features
Measure the inside dimensions of the VHS drawer. The bottom of the
VHS drawer is divided into slots for tapes. Your inside drawer will sit
upon these, so measure its height from the top of the slots. Each VHS storage
unit has two drawers, so cut out two sets of the five pieces (four sides
and a bottom) needed for each inside drawer. Glue the pieces together and
sand, if necessary.
Each drawer you make will hold two rows of disks. I added a center divider to separate the rows. You can use scrap molding or make it out of the same material you used for your inside drawer. Whatever you chose, be sure that it is thin enough so that each half is at least 3-5/8 inch wide.
The Chic Flourishes
You can get fancy with the center divider, adding cross bracing to
divide each row into smaller sections. This prevents an unfilled row of
disks from falling over. Or, like me, you can take the easy way out and
cut up some foam packing to shove behind the short row. When the disks
increase (they never decrease) I just trim the foam.
For my next refinement, I brutally sacrificed some manila file folders to make dividing labels. Cut them 3-1/2 inches wide by four inches tall; the extra height gives you room to write at the top.
Attack!
Armed with my new weapon, I attacked my overflowing disk storage boxes.
I sorted, inserted and labeled. Soon I had conquered them; 300 disks were
subdued and organized for less than $12. I can reach into my storage unit
and find any disk in seconds.
Oh, if anyone is interested, I have a lot of little-bitty disk boxes for sale cheap.
John Damiano runs his Fresno, Calif., avionics business with the help of his 1040ST. He lives with his wife, two children and a home-based ST.