BY JAMES ROBINSON
Making Your Life a Little Easier
Do you forget birthdays? Lose track of appointments? Want to know exactly how much time you have left before that next deadline? Help is on the way! With Schedule Maker, you'll always be on time. The program runs in either color or monochrome.
Stay on time with SCHEDULE.ARC and SCHEDDAT.ARC on your START disk.
Schedule Maker is a powerful time-management tool that will help you keep track of important dates and times. Not only does it record information in a fast and easy way, it lets you view up to four months in advance with all those special days highlighted. Schedule Maker will also trigger your memory- months, weeks or days before appointments -with its automatic "tickler" function, which searches your calendar by subject and date. Now you'll not only know exactly what appointments you've made, but you'll know to the day, to the hour and even to the minute, how much time you have until it arrives.
The best way to learn Schedule Maker is to experiment with it. It runs in medium or high resolution and the ST's familiar drop-down menus, dialog boxes and windows make it user-friendly. About the only typing you'll do is for entering records - everything else is accomplished with the mouse. I've included a few sample files, but the program is extensive and you should play around with it to realize its potential.
Getting Started
Schedule Maker and its data files are contained in the files SCHEDULE.ARC
and SCHEDDAT.ARC. Format a new disk and label it "Schedule Maker Disk."
Copy SCHEDULE.ARC and ARCX.TTP onto the Schedule Maker disk and un-ARC
the file, following the Disk Instructions elsewhere in this issue. Now
delete SCHEDULE.ARC from your Schedule Maker disk. Do not delete any files
from your START disk or START backup disk. Copy SCHEDDAT.ARC onto your
Schedule Maker disk and un-ARC the file. When you return to the Desktop
you will see SCHEDULE.PRG, some data files and some sample files.
Schedule Maker's record files use the extension .REC. Printer files use the extension .COD. Report files use the extension .RPT; tickler files use .TIK; and window files use .WDW. Macros use the extension .MAC. If you save your current configuration, Schedule Maker will create a file called SCHEDULE.INF; the next time you run Schedule Maker it will load all of your settings files automatically. The resource file SCHEDULE.RSC must be in the same directory as Schedule Maker to run.
Double-click on SCHEDULE.PRG. If you have not already set the system clock, Schedule Maker will prompt you for the current date and time.
A Guided Tour
To see how easy Schedule Maker is to use, let's go through the process
of creating a file and adding some records. Schedule Maker's default record
file format has a field for the date and starting rime of the event, a
15-character subject field and two lines (40 characters each) for a description
of the event; see Figure 1.
To change the default record format click on Set Fields. . . under the Records menu. Click on NO next to the ENTER TICKLER category. Add a new field by clicking on the edit line under the LABEL heading and typing CLIENT. Next, set the length of the field to 15 by clicking on the line under LENGTH and entering 15. The Set Fields screen should now look like Figure 2. Click on OK to accept the changes.
Ticklers
One of Schedule Maker's most important features is that it can automatically
add "ticklers," records that remind you that an event will take place in
a certain number of days. Let's say you're an attorney and you want ticklers
created automatically for all your trial dates. Click on Auto Ticklers.
. . under the Prefs menu. Enter the category you want to set ticklers for,
in this case TRIAL, and press [Return]. Now enter the number of days for
the tickler. Type 30 [Return], 60 [Return] and 90. Press [Enter] or click
on OK to leave the Auto Ticklers menu; the screen should look like Figure
3.
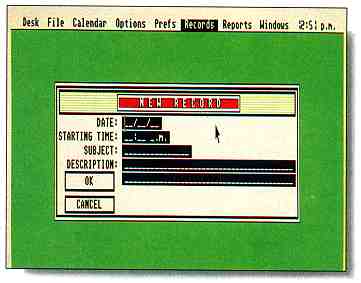
Figure 1. This is Schedule
Maker's default record format.
You can modify It by
clicking on Set Fields.. under the
Record menu.
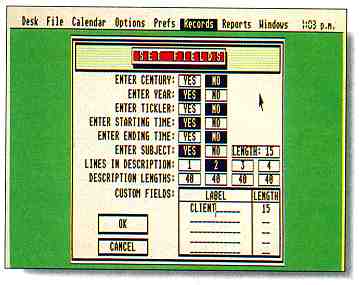
Figure 2. This is the
modified Set Fields screen, with an
extra field added for
CLIENT. You can add up to four new
fields and can use one
to four lines for descriptions.
Up to 10 different Auto Ticklers can be defined per file If you need more than 10, you can load other previously saved Auto Ticklers (.TIK) files before entering records.
To add new records to the file, click on New Records. . . under the Records menu. Let's say you have to prepare for an important trial set for January 29, 1990 at 2:30 p.m. Enter this information in the following format: for January 29, 1990 type "012990"; for 2:30 p.m., type "0230p". Note that neither slashes nor colons are necessary.
Now type in TRIAL as your Subject. Let's make your Client's Name "Andrew Reese' and for the Description, type in "The People vs. Reese" Click on OK. The next window shows an Auto Tickler record; click on OK to confirm the trial tickler record and the program will inform you of the tickler date Since the Auto Ticklers menu is set for three ticklers, confirm each tickler in turn. Next, the program will ask you if you want to enter any more records; click on No.

Figure 3. Schedule Maker's
"ticklers" feature automatically
creates special records
to remind you of upcoming events.
In this case, ticklers
are set for TRIAL subjects 30 days, 60
days and 90 days before
the event.
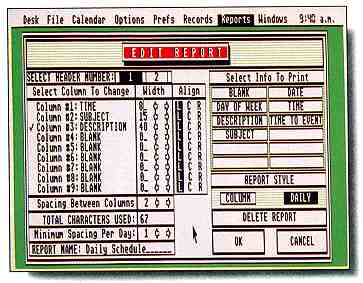
Figure 4. The Edit Report
menu lets you set column contents
and spacing for reports
sent to disk, printer or windows on screen.
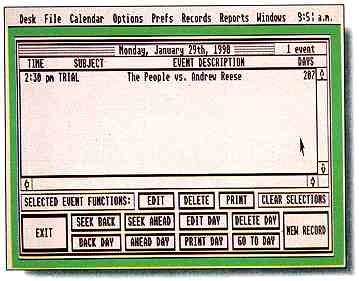
Figure 5. The calendar
menu comes up when you click on
a date in a calendar
window. You can examine, edit, print
out or delete records
for a specific date.
Click on Load Reports. . . . under the Reports menu and select STANDARD.RPT. This reports file contains six report formats-Daily Schedule, Daily Time to Event, Reminders, Columnized Schedule, Full Columnized and Double-header. To modify a report to work with your file, click on Edit Reports. . . under the Reports menu. Select the report Daily Schedule and click on OK. At the Edit Report menu seen in Figure 4, click on Column #3 ("Description") under the Select Column To Change heading; this line should now have a check mark. Click on the CLIENT button under the Select Info To Print menu; this will make the CLIENT field the third column in the report. At this point the check mark will advance to Column #4. Click on Description under Select Info To Print. Click on OK to save the modifications to the report. (Note: You can only select a Description column once in a report. Schedule Maker will print each line of Description information in the final report automatically.) To generate a report window, click on Print Report. . . under the Reports menu. Click on OK to bypass the record selection dialog box (see below under "Record Template" for instructions on how to access specific records). Select the report Daily Schedule and click on OK. Next, highlight the button under the window icon and click on OK. The report window will open on the screen. Set the window to the size you would like.
Calendars
Under Calendars click on Monthly Window. . . In the first dialog box,
set the year and month of the calendar to January 1990. in the second dialog
box, determine which records you want reported in the monthly calendar
if you want to report all records, click on OK.
You'll then see a traditional monthly calendar set to the year and month you defined in the first dialog box. Change the year of the calendar by clicking on the scroll bars or by moving the slider. Click on the arrow buttons to change the month. The year and month can also be changed by clicking Edit All Windows. . . or Edit Top Window... under Windows.
Days are highlighted in the calendar if one or more records are scheduled for that day. Click on a specific day to call up a window that tells you the events scheduled for that day; the screen in Figure 5 will use the current report format. You can make changes to the calendar report by clicking on Edit Report under the Calendar menu. You can select one or more records in the report screen by clicking on the records. Selected records will be highlighted.
At this screen you can:
CLEAR SELECTIONS: Clear the highlighted (selected) record list.
EDIT: Edit the selected records.
DELETE: Delete the selected records.
PRINT: Print the selected records.
EXIT: Exit dialog.
SEEK AHEAD: Find the next day with reported events.
SEEK BACK: Find the previous day with reported events.
AHEAD DAY: Go to next day.
BACK DAY: Go to previous day.
EDIT DAY: Edit the day's reported events.
DELETE DAY: Delete the day's reported events.
PRINT DAY: Print the day's reported events to printer or disk.
GO TO DAY: Jump to a specific date.
NEW RECORD: Enter new record(s).
Program Basics
Schedule Maker uses the standard GEM dialog boxes with the exception
of the [Return] and [Enter] keys. Press [Return] to go to the next field
within a record. Press [Enter] to exit from the form; press [Alternate]-[Enter]
to cancel the form.
To move to the beginning of a field, press [Insert]; to move to the end, press [Clr Home]. These two keys toggle so you can press either key to switch from beginning to end of the field. [Tab] will move the text cursor ahead a word. Press [Shift]-[Tab] to move the cursor back a word. Press [Shift]-[Delete] to delete the information to the end of the field. [Alternate]-[Tab] will erase any word that follows the text cursor. Press [Esc] to delete the entire contents of a field.
Schedule Maker also makes use of the ST's function keys. The first two function keys are used to cut and paste Press [Fl] to copy information in the current field into a buffer. Press [F2] to paste the contents of the buffer into another record. [F3] is a real time-saver because it pastes your last entry into the current field. For example, if you're entering several records with the same date, all you have to do is enter the date for the first record, and press [F3] for the other records. Press [F4] to place the system date (the current date) into the date field. This key is particularly helpful when printing reports to a window.
The [F5], [F6], [F7] and [F8] keys are used to manipulate the date in the current field. Press [F5] to decrease the date by one day. Press [F6] to increase the date by one day. Press [F7] to decrease the date by one week. Press [F8] to increase the date by one week. [F9] and [Fl0] manipulate the time in the current field. Press [F9] to subtract an hour from the current time, [F10] to add an hour.
you view up to four
months in advance.
You can also create your own text macros in Schedule Maker Macros can be defined for any [Alternate]-letter key combinations. Create or view macros by clicking on Macros. . . under the Prefs (preferences) menu.
To see a list of keyboard commands, click on Help With Keys. . . under the Options menu.
Record Template
Whenever you edit, delete or transfer records, print reports or edit
windows you'll be presented with a Record Template dialog box. Here you
select your records. If you want to see all of the records, click on OK.
If you want only certain records, however, you can define them in the subject
field. For example, if you only want records that refer to a planned party,
simply enter 'Party" into the subject field. There are also logical commands
to make other types of decisions possible For instance, if you want to
print a report of everything except your party enter "Party" into the subject
field and click on "<>" (not equal to). The logical definitions are:
"IN" (contains), "<" (less than), >" (greater than), "<=" (less than
or equal to), ">=" (greater than or equal to), "<>"(not equal to) and
"=" (equal to). One logical operator can be used in each field.
The Drop-Down Menus
The rest of this article discusses some of Schedule Maker's more complicated
options. Schedule Maker's menu options are described in the sidebar accompanying
this article. However, the best way to learn this program is by experimenting
with it and by examining the sample files.
Printing Reports
If you're sending a report to the printer, the PAGE SETUP dialog box
will let you select your printer options. If you are writing to disk, you'll
need to name the new file or select an existing ASCII file with the file
selector. Select an existing file and choose to either WRITE to or APPEND
this file. Next you will be presented with a smaller PAGE SETUP dialog
box where you can enter the title and define the header, date, time and
name of the record file.
If you write the report to a window, each record for the window can be selected by clicking on the record. Selected records will be highlighted and can be edited, deleted, printed or transferred to another file by clicking on the appropriate item under the Records menu. To clear any selections made, click on Clear Selections under Records. You can also clear selections by clicking on the window title bar.
Editing Reports/Making New Reports
Pull down the Reports menu and click on New Report or Edit Report.
(If you choose to edit an existing report you must then select the report
to edit.) The Edit Report dialog box sets up all of the report generating
functions. The different types of information that can be printed are under
Select Info To Print. The column you are working on is indicated by a check
mark. You can change the column to work on by clicking on the appropriate
Column # label. When making new reports, this is not necessary because
the column to work on initially is the first column. After you click on
an Info To Print (Date, Time, Subject, etc.), the column to work on is
automatically set to the next one.
The Info To Print categories are self-explanatory except for the Time To Event item. The Time To Event dialog box asks which format you want to use (short, medium or long). If you only want to print the number of days until each event, use the short format. If you want to print the number of days plus the hours and minutes to each event, you can use either the medium or long format. Examples of the different formats are:
SHORT: 27
MEDIUM: 27,2:15
LONG: 27 days 2 hrs 15 mins
SHORT: 0
MEDIUM: 5:30
LONG: 5 hrs 30 mins
SHORT: 0
MEDIUM: 25
LONG: 25 mins
After you've selected the information to print check the Total Characters Used value. If this value is greater than can be printed on a line by your printer, there are several things you can do to make the report fit. First, you can change the size of some or all of the columns by typing the new width into the width column or clicking on the left or right arrow buttons. Second, you can reduce the Spacing Between Columns value in the same manner. Third, you may not need to view one of the fields you are printing. Finally, you can make the report a "double-header" in which you can print twice as much information in the same number of columns. You can change the current header number by clicking the 1 or 2 button next to the SELECT HEADER NUMBER: label. To see an example of this load the STANDARD. RPT file and examine the Double Header, report.
You can define the way text is aligned, at the left, center, or right of each column. Dates and numbers look best when they are aligned to the right. Other information is usually aligned to the left. Text is rarely aligned in the center of the column, however, in double header reports, it sometimes makes information easier to read.
There are two different styles of reports to choose from. A column style is simply a set of columns. A daily style heads the records for a specific day with the date
Column Style:
9/20/89 Wed 10:00 am
Example record. . .
9/20/89 Wed 12:00 pm
Example record. . .
10/12/89 Thu 8:00 am
Example record. . .
Daily Style:
Wednesday, September 20th, 1989
10:00 am Example record. . .
12:00 pm Example record. . .
Thursday, October 12th, 1989 8:00 am Example record. . .
| Schedule Maker Drop-Down Menus | |
| FILE | |
| New. . . | Start a new record file. |
| Open. . . | Open a record file. |
| Merge. . . | Merge records from another file. |
| Save. . . | Save the current record file. |
| Save As. . . | Save the current records under a new filename. |
| Abandon. . . | Abandon any modifications made to the current records. |
| Delete. . . | Delete a file. |
| Rename. . . | Rename a file. |
| Quit | Exit the program. |
| CALENDAR | |
| Edit Report. . . | Edit the calendar report. |
| Monthly Window. . . | Open a monthly calendar window. The month, year is chosen and then decision statements for record fields can be set. |
| OPTIONS | |
| Calculate Between Dates. . . | Determine the amount of time between two dates and/or Times. |
| Calculate From Date. . . | Determine the result of a calculation from a date. |
| Enter System Date/Time | Set the current time and date. |
| Send Printer Code. . . | Send an ASCII code to your printer. |
| Help With Keys. . . | Help dialog box showing function keys and editing keys. |
| PREFS | |
| Auto Ticklers. . . | Define/Load/Save Auto Ticklers |
| Macros. . . | Define/Load/Save Macros |
| Printer Codes. . . | Set your ASCII printer codes. |
| Other. . . | Display time/date, set the ASCII disk reports file extention, set backup record file on or off. |
| Save Configuration. . . | Save the filenames for Auto Ticklers, Macros, Printer Codes, Windows, Reports, and Records to the SCHEDULE.INF file. These files will then be automatically loaded the next time the program is run. |
| RECORDS | |
| New Records. . . | Enter new record(s). |
| Edit Records. . . | Modify some or all records. |
| Delete Records. . . | Delete some or all records. |
| Transfer Records. . . | Copy/Move some or all records to another file. |
| Clear Selections. . . | Clear report window selections. |
| Print Selections. . . | Print selected records. Records can be selected in report windows. |
| Set Fields. . . | Set the record fields. |
| Information. . . | Display information for the current record file. |
| REPORTS | |
| New Report. . . | Create a new report. |
| Edit Report. . . | Modify an existing report. |
| Print Report. . . | Print a report to window, printer, or disk. |
| Load Reports. . . | Load a report file. |
| Save Reports. . . | Save the current reports. |
| WINDOWS | |
| Close All Windows. . . | Close all open windows. |
| Edit All Windows. . . | Just like Edit Top Window except that allopen windows are edited. |
| Edit Top Window. . . | Look at and modify the top window's information. Editing a report window will allow you to change field decision statements and to chasnge the report. Editing a calendar window lets you change the month and year and the field deciusion satements. |
| Mark Position. . . | Mark the slider positions for the top window. |
| Goto Mark. . . | Go to the marked position for the top window. |
| Load Windows. . . | Load a window configuration file. |
| Save Windows. . . | Save the current window configuration. |
Calculating Between Dates and Times
This function performs the same task as the Time To Event report feature
except that it uses the system date and time as the starting data. Both
functions will tell you how many days and/or hours and minutes there are
between two dates and/or times. Pull down the Options menu and click on
Calculate Between Dates. . . Enter the starting date and ending date to
calculate the numbers of days between those dates. You can also enter the
starting and ending times if you want to know the hours and minutes between
those times. Click on OK to display the result.
Calculating From a Date
Calculate from Date. . . under the Options menu tells you the resulting
date of a certain number of days ahead of or back from a date In this dialog
box, enter the date for which the calculation is based on, then select
the direction of the calculation. Enter the number of days to calculate
Clicking on OK gives you the result.
Configurations
Records, reports, windows, printer codes, macros and Auto Ticklers
are all kept in separate files. Rather than loading each file manually,
you can use the Save Configuration. . . feature to load all of the files
automatically after you run the program or open a records file.
James Robinson is an ST enthusiast who has been using Atari computers for seven years. He hopes to someday write commercial software for a living. This is his first publication in STA.RT.