 |
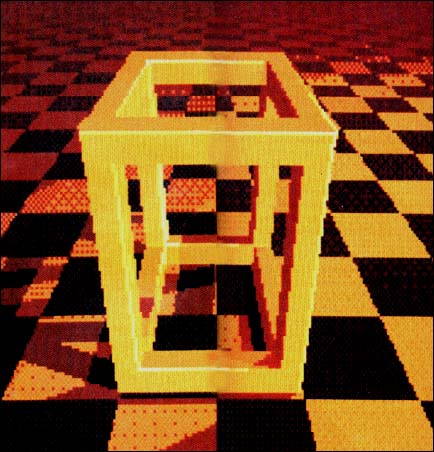
| RezRender will ray trace and cast shadows from one object onto another, onto itself or onto the checkerboard background. Images created in this manner are some of the most striking images available on the ST. |
ON DISK
RezRender
Ray Tracing and More on Your ST!
BY RICHARD PARKER AND PHILLIP BURGESS
Are you a Cyber fan? Have you spent hours creating animations in CAD-3D 2. 0 wishing you had the advanced shading and rendering techniques from high-end graphics computers? Wish no more! RezRender is a powerful rendering package that adds Gouraud and Phong shading and ray tracing to CAD-3D objects! You won't believe your eyes! RezRender requires a color monitor and at least one megabyte of RAM to utilize all of its features.
You won't believe your eyes! The file REZRENDR.ARC is on Side 1 your START disk.
Although at one time, Antic Software's CAD-3D 2.0 was considered to have amazing shading capabilities, it is very dated by today's graphics standards. No longer are users content to produce animations that depict "faceted" spheres, cylinders and teapots. The age of realistic lighting and shading is upon us.
RezRender is a program that will take 3D objects built with CAD-3D 2.0 and give them accurate, smooth shading with highlights and shadows. Spheres will now look spherical, cylinders will look cylindrical and teapots will look ... teapotical? This process of generating realistic images is known as "rendering" hence the name RezRender.
It is important to note that RezRender just renders--that's all. It is not an object generator and it does not interact with Cyber Control. RezRender is a completely stand-alone program that can be run without even owning CAD-3D 2.0. The only communications that it has with the other Cyber Studio programs is through the .3D2 object files generated by CAD-3D 2.0.
Getting Started
RezRender will run on any Atari ST or Mega computer with a color monitor. You'll also need a source of 3D objects, such as those created by CAD-3D 2.0 or Cyber Sculpt. RezRender will not read CAD-3D 1.0 objects (.3D filename extender), but if you own CAD-3D 2.0, you can load objects created in the old format and resave them in the 2.0 format (.3D2 filename extender). To run RezRender, boot this month's START disk--the START menu runs automatically. At the main screen, click on Prepare, then select "RezRender." The program will un-ARC directly onto the destination drive you specify. After the program un-ARCs, click on REZRENDR.PRG at the Desktop.
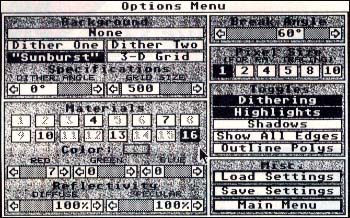 |
| One of the most complex dialog boxes ever created in GEM, this is RezRender's Options Menu. Here, you can adjust object colors and mat- erials, set the background and set a number of toggles that vary the image type. |
Using RezRender
Upon booting RezRender, you will be in the Main Menu. There will only be two active buttons initially: Load 3D and Quit. Click on the Load 3D button. Using the standard GEM file selector (or any accessory file selector you may have installed), select one of the sample 3D object files included with the program on your START disk and click on the OK button. RezRender will load the object(s), optimize them by eliminating redundant lines and activate most of the remaining Main Menu buttons.
The successfully loaded object will appear in the black rectangle in the upper left area of the screen; this rectangle is called the Camera Viewport, and represents our current view of a virtual 3D-space simulated by the computer. There are five sliders around the Camera Viewport, which you can use to change your point of view. After adjusting the sliders to your liking, click in the Camera Viewport. You'll briefly see the message Projecting at the top of the screen, and then the the image in the Camera Viewport will be updated. Projecting means that RezRender is processing the 3D data to create the 2D viewport image.
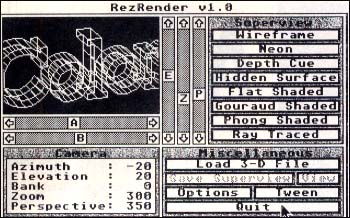 |
| RezRender's Main Menu. From here, you can load in objects, set the camera view point and choose the rendering mode. Once an object's been rendered, you can save the image as a DEGAS .PI1 file. |
The camera control sliders and their functions include:
Azimuth (A): This slider controls the horizontal (right/left) rotation of the camera around the center of the 3D universe. In CAD-3D 2.0, this function is called Horizontal, but being of the Science Nerd persuasion, we chose to use a more technically descriptive term.
Elevation (E): Known as Vertical in CAD 3D, this slider controls the vertical (up/down) rotation of the camera control around the center of the universe.
Bank (B): This controls the tilt of the camera, like a dog tilting its head when it hears something unusual.
Zoom (Z): The camera's magnification is changed with this slider. The larger the zoom value, the larger the 3D object will appear in the Camera Viewport.
Perspective (P): An object's "3D-ness" is set with this slider. Larger values here will result in objects looking more "massive." Carried to the extreme (999), this effect is similar to that produced by a fish-eye camera lens.
Rendering
Once you're satisfied with the camera view, click on one of the Superview buttons along the right side of the screen. Each will generate a full-screen image in a particular rendering style or mode. If you're using a 520ST or have loaded an extremely complex object, some of the Superview buttons may be disabled. Each mode has its own particular memory requirements and will be deactivated if those requirements cannot be fulfilled. Similarly, each mode has its own preprocessing requirements (calculations that must be made before an image is drawn). As a rule, more realistic images take longer to create. RezRender will keep you updated on its progress by displaying pertinent messages with accompanying time bars at the top of the screen.
The available rendering modes include:
Wireframe: This is simply a fullscreen image of the Camera Viewport. Only one preprocessing step--Projecting--is necessary, so images are created quickly. Surfaces are not created, only edges, so that all of the lines in an object are visible at once.
Neon: This is a variation on the wireframe theme. The resulting image is made up of lines that glow, producing a neon sign effect. While not the most practical thing in the world, the results are usually interesting. No additional pre-processing is necessary, but the actual drawing of the image takes much longer than Wireframe mode
Depth Cue: Another Wireframe mode, Depth Cue mode gives a somewhat better sense of depth by varying the color of the lines according to their relative distance from the camera. The closer a line is to the camera, the lighter in color it will appear. There are two additional pre-processing steps required for Depth Cue: Distancing, which calculates the brightness of each point based on its distance, and Depth Sorting, which makes sure that the object is drawn from back to front (lines nearer to the camera must be drawn on top of lines further away to give a convincing 3D effect).
Hidden Surface: This rendering mode will produce an image of the complete object, including its surfaces. The object will have a solid appearance, but will not be shaded. This mode does not require the Distancing operation, but introduces two new ones: Calculating Normals, which determines which direction a polygon is facing, and Backfacing, which eliminates polygons not visible from the camera position, thus speeding up the drawing of the image.
Flat Shaded: Flat Shading draws a faceted, solid object and shades it according to the light sources that were defined in CAD-3D 2.0. This mode is very similar to its CAD-3D 2.0 counterpart, but much more accurate; RezRender will display specular highlights (bright areas seen on a shiny object where light reflects almost directly into the camera) on the object's surface RezRender also uses the technique known as Dithering (dot patterns that expand the range of apparent available color) to simulate hundreds of colors instead of just 16. Flat shading requires an additional preprocessing step: Illuminating, which assigns an appropriate color and brightness to each polygon.
Gouraud Shaded: CAD-3D 2.0's flat-shaded images always have the characteristic faceted appearance associated with microcomputer-generated images. The technique of Gouraud shading, named after its inventor, can create the illusion of smooth surfaces while still using the same polygonal data. This requires an additional pre-processing step, Smoothing. The Smoothing process is fairly time-consuming, but fortunately only needs to be done once for the first Gouraud-shaded Superview and not again until another 3-D object is loaded.
Phong Shaded: This technique, also named after its inventor, uses a slightly different approach to solving the faceting problem. The results are significantly more accurate than Gouraud shading, particularly the rendering of specular highlights and it actually requires a little less memory and pre-processing. But there's a catch: Phong shading is much slower than Gouraud shading.
Ray Traced: Ray Tracing is the most realistic of the available rendering modes and, unfortunately, by far the slowest technique of all for generating realistic images. Although Ray Tracing is often associated with mirrored spheres floating over a 3-D grid, creating these effects with only 16 colors is just not feasible. RezRender's Ray Tracing will flawlessly handle object intersections of any complexity, even those with which the simpler rendering modes may have difficulty. The shading of Ray Traced images is also more accurate than Phong shading.
Ray Tracing requires a few additional pre-processing-steps: Ray Analysis, which analyzes the 3-D object(s) in memory to eliminate redundant calculations later on. Bounding has to do with objects that cast shadows on each other (explained later), and Ray Backfacing, which like the Backfacing routine used in the other rendering modes, lets us ignore those polygons that cannot be seen. Ray Analysis and Bounding are only performed during the generation of the first Ray Traced Superview.
After the computer is done generating the Superview, press the right mouse button to return to the Main Menu. If you want to abort RezRender's drawing process (even during drawing the Camera Viewport), press any key on the keyboard. To abort a Superview, press any key then right-click.
Once you have generated a Superview, the Save Superview and View buttons on the Main Menu will be enabled. Click on Save Superview to save the most recently generated Superview as a DEGAS .PI1 picture. Click on the View button to display the Superview screen; right-click to return to the Main Menu.
Take a few moments now to play with the camera controls and rendering modes to get a thorough feel of the program before we continue on.
The Options Menu
The options menu (which currently holds the record for being the most crowded GEM dialog box ever conceived) is divided into several distinct sections: Backgrounds, Materials, Break Angle and Pixel Size Setting, Toggles and Miscellaneous. Before these topics can be effectively explained, it is first necessary to understand how RezRender handles color
The color scheme used by RezRender is radically different than that used by CAD-3D 2.0. In CAD-3D 2.0, the user must first build a color palette, and then assign these colors to the 3D objects. RezRender, on the other hand, lets the user just specify the desired colors, and then automatically builds a custom palette that takes into account object complexity, coloration and lighting. This method provides for the best possible range of colors at all times.
Why then do we use the word Materials on the menu rather than simply Colors? This is because in RezRender, we not only specify object colors, but some of their surface qualities as well. Varying the amount of diffuse reflectivity changes the overall brightness of an object's surface. Varying the specular reflectivity changes how shiny an object will appear. For instance a piece of white paper is light, but not shiny--it has high diffuse reflectivity but low specular reflectivity. A black bowling ball, in contrast, is dark but shiny--it has low diffuse reflectivity, but high specular reflectivity.
The Materials editor is located in the lower-left corner of the Options Menu. It consists of several buttons, each representing a material and sliders to control the color and reflectivity of the currently selected material. You'll notice that, depending upon the CAD-3D objects loaded, different materials buttons are in use. When objects are created in CAD-3D, the user assigns them a color number for lightest color available within a color set. RezRender uses this same color number to indicate a material number.
If you have two materials which you want to have the same color but with different intensities (for instance, light blue and dark blue), rather than manually setting the RGB values for each material to the desired brightness, set both materials to the same bright shade of blue, but reduce the diffuse and specular reflectivity of the darker material. RezRender will recognize the similarity in color between the two materials and make a much more effective use of the palette.
Since RezRender builds a custom palette for each Superview, we can't load in a background image, as can be done in CAD-3D 2.0. We have however, built in several fascinating predefined backgrounds which use the custom palette. The backgrounds will be drawn with the color and attributes of the currently selected material.
The predefined backgrounds are:
None: The background is simply left black. If you own Spectrum 512, you could load a picture as a background and then overlay a RezRender-generated image without background over it.
Dither 1: This will create a smooth gradation across the background from dark to light and at the angle set by the Dither Angle slider. An angle of 0 produces a gradation dark at the left and light at the right.
Dither 2: Somewhat like Dither 1, except that the color gradation goes from dark at one end, to light in the middle, and back to dark, again at the angle set by the Dither Angle slider.
Sunburst: Another color gradation, Sunburst works in concentric circles from dark at the outside of the screen to bright at its center
3-D Grid: This will generate an infinite 3D checkerboard under your object. The grid itself is Ray Traced and then the 3D object is overlaid using conventional techniques. The size of the squares can be changed with the Grid Size slider--its units are those used in the CAD-3D 2.0 universe
At the middle-right of the screen are a series of toggles. These are simple on/off options.
The toggle options include:
Dithering: This toggles RezRender's dithering capability. Turning off dithering will speed up some rendering, but the results will usually be unspectacular. You may want to turn off dithering while trying out different views of an object, and then turn it back on when you're ready to create a final image.
Highlights: This will turn off specular reflection. Illumination will now be slightly faster, but image quality will suffer. Again, you have to balance image quality against your own patience. For flat-shaded images, you might want to turn highlights off, since this technique tends to exaggerate the faceted appearance. Highlights look wonderful with the other shaded rendering modes, however.
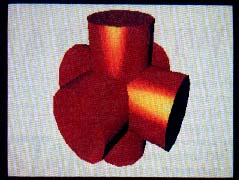 |
RezRender's Ray Tracing mode will not only do smooth shading, but also handle Intersections of complex objects flawlessly. |
Shadows: With this option, objects will cast shadows onto the 3D grid, if that background is enabled. In Ray Tracing mode, objects can also cast shadows onto each other, but be forewarned: ray tracing with shadows can literally take hours, so use these capabilities together only if you really mean it.
Show All Edges: CAD-3D 2.0 files are made up entirely of triangles, but many of the edges are invisible, so some objects appear to be made up of four-sided (or more) polygons. This option will unhide all of these invisible edges.
Outline Polys: In Flat, Gouraud, and Phong shading modes, this will outline each polygon after it has been drawn, sort of the Darrel Anderson mode!
At the top-right of the screen is a slider labeled Break Angle. When creating smooth-shaded images, this lets you determine which edges will appear sharp and which will appear smooth. A break angle of 0 degrees will mean that all polygon edges will appear sharp; a break angle of 90 degrees will cause all polygon edges to appear smooth (as a result, even cubes will look roundish). If you change this value, RezRender must perform a new Smoothing pre-processing operation when generating any Gouraud, Phong, or Ray Traced Superview for the first time. However, the Smoothing operation will not have to be repeated unless you change the break angle again or load a new 3D file.
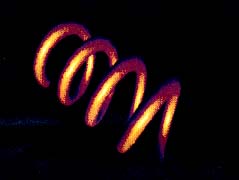 |
With Cyber Sculpt, it's easy to generate 3D springs and with RezRender, you can smooth them out until they appear to be metallic. |
Just below the Break Angle slider are a series of buttons under the heading Pixel Size. These buttons let you change the resolution of the 3D grid and/or Ray Traced images. Since the 3D grid and Ray Tracing functions can both take some time initially you may want to set the pixel size to a large value to generate draft views and, once you are satisfied, then set the pixel size down to 1, begin generating your final image and go have lunch.
Finally, in the lower right corner of the Options Menu, are the Misc. buttons. Save Settings will let you save all of your current settings including materials, toggles and sliders, even the camera view on the Main Menu. These settings files have the extender .RRS (RezRender Settings). Load Settings will let you load a settings file. However, if you previously saved a settings file with the same name as a 3-D object file (STUFF.3D2 and STUFF.RRS, for instance), the settings file will be loaded automatically when loading the corresponding 3-D object.
Animation
Well . . . sort of. Most of us involved with the development of RezRender were frustrated by the fact that it wasn't easy to use for creating animations; our quick solution was to add a simple tweening animation capability.
If you click on the Tween button on the Main Menu, it will bring up the Tween Menu with two Camera Viewports, each with its own set of slider controls. RezRender lets you select a starting and ending view and then automatically generates the in-between frames. The small Camera Viewports work just like the Camera Viewport on the Main Menu. (These slider settings will also be saved in a settings file.)
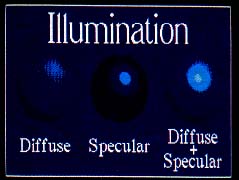 |
Every material has surface characteristics that determine its appearance. Specularity refers to the shininess of an object, its ability to show highlights, while diffusion refers in general to the overall brightness of a surface. RezRender lets you determine values for these characteristics for any object. |
You will notice that there is a Number of Frames slider in the lower righthand corner of the Tween Menu. This slider allows you to select how many frames you would like for RezRender to create when tweening from Before to After. Please remember that although selecting a larger number of frames will create a smoother animation, each frame will take up 32K on your disk.
The buttons in the lower-left corner of the Tween Menu let you select which rendering mode to use when generating the frames. Like the Superview buttons on the Main Menu, some of these may be disabled depending on available memory.
The Preview button will generate a Superview consisting of a series of overlaid wireframe images to give you a rough idea of what the final animation will look like. Each frame is drawn in a gradually brightening shade of blue so that it is possible to distinguish between them. Sometimes, these previews in themselves make pretty neat pictures and you can return to the Main Menu and use the Save Superview option to save the preview image.
Clicking on the GO button will bring up a file selector that will ask you to select which path to save the animation in. Any filename entered will be ignored, only the path is needed. Unfortunately, as a last-minute addition, RezRender's tweening does not save frames as a Delta or Sequence animation file, but as a series of DEGAS pictures. These can, however, then be spliced together with an animation program such as Cyber Paint. If you have a double-sided floppy drive and a blank disk, you can easily generate over 20 frames, enough for a reasonably smooth animation sequence. The program will check the available disk space before generating the frames, so you won't be stuck with half of an animation.
What? No Source Code?
Not this time. In our haste to meet START's deadline, the source code is completely uncommented! Furthermore, with the incredible complexity of the various graphics algorithms involved, it would take more pages to explain them properly than START can devote in a single issue (Editors Note: We're happy to report that we have agreed with RezRender's authors for a series of columns covering 3D graphics programming on the ST. Look for it beginning in the next issue of START.)
Richard Parker and Phillip Burgess founded RezCo with one simple philosophy in mind: there's too much mediocre computer software in the world---but why?
PRODUCTS MENTIONED
Cyber Studio, including
CAD-3D 2.0, $89.95
Cyber Paint, $69.95;
Cyber Control, $59.95;
Cyber Sculpt, $89.95;
and Spectrum 512, $69.95.
Antic Software, 544 Second Street, San Francisco, CA 94107, (800) 234-7001.
|