Cyber Corner
Marcus' Marvelous
Mug Maker
Part II of A Step-By-Step Guide
to Computer Cartooning
BY MARCUS BADGLEY
I've developed a technique for drawing cartoon faces that can be used by someone with little or no drawing experience. It's based on basic geometric shapes and the lines which appear in the human face. In a way, it's a combination of the two techniques I described in previous columns: drawing freehand with the mouse and using CAD-3D.
 |
| Figure 1 |
Figures 1 through 16 show the techniques step-by-step. Follow along on your ST as we go through them. You'll need DEGAS Elite, SEURAT, NEOchrome, Cyber Paint or any other paint program that you like.
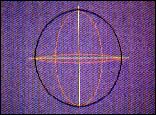
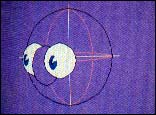
Figure 1. Starting with the first frame, our goal is to create a three-dimensional head. Imagine looking at a globe of the Earth with its lines of longitude and latitude; that's exactly how this method works, except that only one of each line is used. Begin with a cross-line in a color that contrasts with the background.
Then, with the Circle tool, create a large circle by placing the mouse at the 12 o'clock position and then moving the mouse toward the 12 o'clock position. One cartoon cranium coming right up!
Next, create two "dimension" circles. These are guides that determine the horizontal and vertical direction toward which the face is looking. To do this, use the Circle tool again and create the vertical ellipse (centerline) so that it intersects with the top and bottom of the cranium circle; do the same with the horizontal ellipse (eyeline), except that it is lined up with the width of the head.
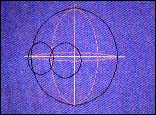
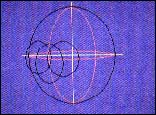
Figures 2 and 3. The next step is to create the eyes and nose of our character. Circles usually work best for eyes. Placed on the eyeline on either side of the centerline, unless you're trying for that abstract look. Next, add the nose. The nose can be virtually any shape of ellipse or circle. Once you have the shape you want, position it in between the eyes. (A tip: place the nose a tiny bit closer to the far eye to help enhance the sense of depth.)
 |
 |
 |
| Figure 2 | Figure 3 | Figure 4 |
 |
 |
 |
| Figure 5 | Figure 6 | Figure 7 |
 |
 |
 |
| Figure 8 | Figure 9 | Figure 10 |
 |
 |
 |
| Figure 11 | Figure 12 | Figure 13 |
 |
 |
 |
| Figure 14 | Figure 15 | Figure 16 |
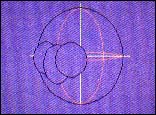
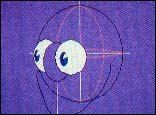
Figure 4. At this point, remove the undesired lines and the face will begin to take shape.
Figure 5. So far, all we have are a few dull circles and ellipses. Let's add some life! In the center of each eye we'll place a small black disc with the Disc tool.
Decide first from which direction you would like to have the light fall in the drawing, then use Polygon or K-Line with white Fill to cut the reflection arc out. Remember, all shading will be determined as a result of this operation. Next, Fill the eyes with white . . . and voila! Those glowing eyes affect some with fits of giggling, others with madness!
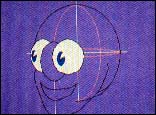
Figure 6. Now for our jaw. Quite simply all that is needed is a guide line that drops down from the base of the nose. The line I've shown is vertical, but this line can vary and will alter a character's appearance. Once this line is created, use K-Line to draw a jawline. Since this is a freehand technique, it requires a bit more effort, especially since the placements of the sides of the jaw are crucial in order to keep the perspective in alignment. You may have to do some touchup in Zoom mode.
Figure 7. When creating the mouth, use the same technique as with the jaw. Create a frown or a smirk; try creating several expressions on the same head--it's amazing how much the mouth alters the expression.
Figure 8. This is a transformation step. Use K-Line to add the shoulders and ear; then fill the character with a skin tone.
"Doctor! I think I saw it move!" Igor exclaimed.
"Don't be silly--it's been dead for over two weeks!" replied the doctor.
Figure 9. Now draw in the facial details. Again, using K-Line, freehand Draw and Zoom, develop the eyebrow lines, eyelids, the wrinkles in the cheek.
"Did you see that? It twitched again!" shouted Igor in fear.
Draw in the hair freehand with a smattering of airbrush here and there.
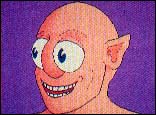
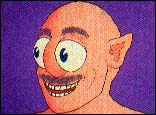
Figures 10 and 11. Here, you can begin to shade the character. Since I usually use low resolution, my punchy palette is limited to 16 colors and their usage is crucial. Since I want a more natural complexion I have dedicated four colors to the skin. First use K-Line with each of the skin-tones from dark to light, then Fill with the appropriate color. After this, use the airbrush to smooth things out a bit. On complex areas, work in Zoom mode.
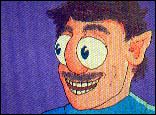
Figure 12. For the eyebrows and hair, use Freehand and Airbrush in several different shades of brown to create a more realistic look.
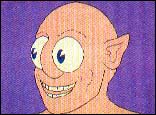
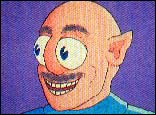
Figure 13. Take a figurative step back and look at your picture. The whole look could be enhanced by adding a slight highlight, just as you added the other shading colors. The character obviously also needs some clothing. I added a green garment, thus making him look like some insane dentist.
"Oh, no! Not a dentist!" screeched Igor with trembling knees.
"Yes, Igor! Your teeth are in terrible shape, and I'm in no position to fix them!" the doctor stated with a terrible calm.
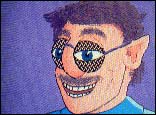
Figures 14 and 15. In these two frames, add more hair as we did before. My creature, at least, is nearsighted, so I added glasses by creating two black Circles in black, then filling them with a standard Fill Pattern. Adding the glasses makes the eyes less pronounced.
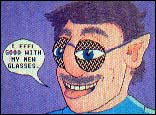
Figure 16. In this last frame I added the tongue and the word bubble, which completes this demonstration. Since he started out kind of quacky, I decided to finish him the same way.
Now it was the doctors turn for hysteria. He cried, "It's alive! It's alive!"
It's important to point out that we could have taken him in a completely different direction earlier on by altering the facial expression, ears, and skin color. With the addition horns and fangs he'd be another animal altogether. Also of note is that this particular technique is great for facial perspectives that are not too extreme. More extreme positions will require more development in the construction phase. The same principle, however, can be used to construct profiles, entire figures and other cartoon inventions.
Marcus Badgeley is proprietor of Gravity Design, a graphics arts studio in San Francisco, and frequent contributor to START.
PRODUCTS MENTIONED
Cyber Paint, $79.95. Antic Software, 544 2nd Street, San Francisco, CA 94107, (800) 234-7001.
NEOchrome, $29.95. Atari Corp., 1196 Borregas Avenue, Sunnyvale, CA 94088, (408) 745-2000.
DEGAS Elite, $49.95. Electronic Arts, 1820 Gateway Drive, San Mateo, CA 94404, (415) 571-7171.
SEURAT, START March 1989; for disk only, $10.95 plus $4 shipping and handling, for disk and magazine $14.95 $4 shipping and handling. START Back Issues, 544 2nd Street, San Francisco, CA 94107, (800) 234-7001.