ON DISK
ScoreST
Musical Desktop Publishing for Your ST
BY PHIL COMEAU
Just as desktop publishing gives you the power to create finished documents on your ST, ScoreST lets you prepare a finished musical score with ease of the ST's GEM point-click-and-drag interface. From an orchestral score to a worksheet for music students, ScoreST can do it all. Phil Comeau--author of Julia, START's buttonless drawing program for kids--wrote ScoreST. The program was written in C and requires a monochrome monitor.
Score one for START! Files SCOREST.ARC and INSTSST.ARC on side 1 of your START disk; SCORESRC.ARC is on side 2.
Writing a musical score by hand neatly enough to be read by sight is a wrist-cramping exercise that I'd just as soon never go through again. Clearly, musical scoring could benefit from the same advantages that word processors and desktop publishing packages have brought to text. ScoreST is a graphical music notation processor that provides just these advantages.
With ScoreST you can draw musical symbols like notes, clefs and staves on the screen using the mouse, print them and save them to disk for later recall and editing. It's completely GEM-based, and offers a number of features that will have you producing professional-looking scores in short order. ScoreST can be used by:
• Composers and arrangers to produce fair copies of their work.
• Performers to create custom scores for solos.
• Music teachers to create specialized lessons, examples, scale and fingering studies and exams.
• Musicologists to archive research material for reference and to create display figures for publication.
• Bands and orchestras to create individual parts from full scores.
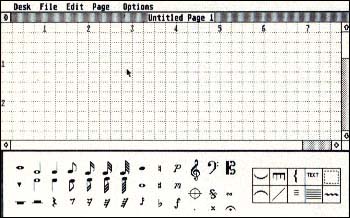 |
| Figure 1. The basic work area of ScoreST. At the top is the Editing Window with an optional overlaid grid at 1 /4-inch intervals. In the lower left corner is the Symbol Palette and to its right is the Tool box. |
ScoreST requires a 520ST or 1040ST with a monochrome monitor, but if you own a color monitor, fear not: I've tested ScoreST on a color monitor using the Monoware shareware monochrome emulator by Mick West and it works just fine. To print scores, you'll also need a printer with dot-addressable graphics capability. ScoreST comes preconfigured for Epson printers, but includes a program that lets you customize your own printer driver; see INSTSST.ARC on your START disk for instructions on how to do this.
Running ScoreST
To run ScoreST, boot this month's START disk; the START menu program runs automatically. At the main screen, click on Prepare, then select "ScoreST." The program will un-ARC directly onto the destination disk you specify. Then double-click on SCOREST.PRG; the file SCOREST.RSC must be in the same directory as SCOREST.PRG and SCOREST.CFG must be there if you wish to print your score. At ScoreST's main screen, click on New under the File menu and the Editing Window and Symbol Palette will appear as shown in Figure 1.
To customize your own printer driver, return to the START menu program, click on Prepare and select "Score ST Printer Driver." The printer driver program (INSTSST.TOS) and documentation (INSTSST.TXT) for this program will un-ARC directly onto the destination drive you specify. Double-click on INSTSST.TXT from the Desktop and click on Show or Print to view the documentation.
ScoreST was written in C and you'll find the source code on Side 2 of your START disk.
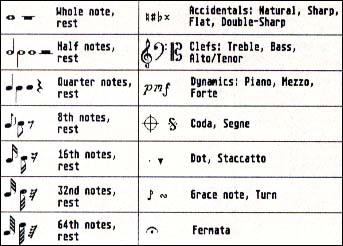 |
| Figure 2. ScoreST's symbol palette gives you almost all of the sym- bols you need to create a finished score. And those that aren't includ- ed can be created easily with the Tools in the Toolbox. (This chart was prepared with ScoreST and printed on an Epson dot matrix print- er.) |
The Symbol Palette
The musical Symbol Palette is a collection of symbols used in common musical notation (see Figure 2). If some of the symbols are unfamiliar, a book on music theory can help out (a good one is The Basis of Music, by Frederick J. Horwood, published by Gordon V. Thompson Ltd.).
To place a symbol, click the left mouse button over the symbol in the Palette, then move the mouse into the Editing Window. Click the mouse button again and the symbol is drawn where the mouse is positioned.
The Toolbox
Unlike the symbols, which have fixed sizes and shapes, you define how marks drawn by the tools in the Toolbox will look, usually by dragging the mouse. Like symbols, tools are selected by clicking on their icons (see Figure 3). You can modify most of the tools using the Options menu.
To use the Line Tool, click on its icon, then move the mouse into the Editing Window. Draw a line by dragging the mouse; the line is placed when you release the mouse button.
The Staff Tool is similar to the Line Tool, but only draws horizontally. The Beam Tool can draw at any angle, while the Trill Tool can draw only at ninety-degree angles. The Brace and Curve Tools also draw when you drag the mouse.
The Ledger-Line Tool, used for drawing extensions to the staff needed by very high or low notes, also draws by dragging the mouse. Position the mouse cursor squarely on the top or bottom line of a staff, then drag the mouse away from the staff until the required number of ledger lines appear.
The Selection Tool marks a symbol or group of symbols for further editing operations. To select a single symbol, click on the Selection Tool icon then click on the desired symbol in the Editing Window. The symbol becomes inverted. To select a group of symbols, drag a rubber-band box to surround them.
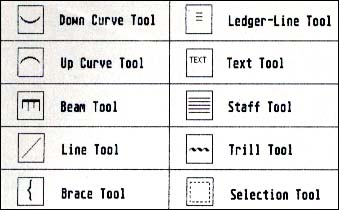 |
| Figure 3. The Toolbox contains ten tools to make score creation ea- sy. With the Selection Tool and the built-in clipboard, you can ea- sily cut and paste one symbol or an entire page. |
Note that only those symbols that are completely enclosed by the selection rectangle will be selected. You can change the lower-right corner of the selection rectangle by holding down one of the [Shift] keys while clicking the mouse. (You can use this technique to make a selection rectangle that's larger than the Editing Window.) The selected symbols can be deselected by clicking the mouse button anywhere within the Editing Window, but outside the selection rectangle.
Once you've selected something you can move the selected symbols by placing the mouse cursor anywhere inside the selection box and dragging the mouse. The selected symbols follow the mouse's movement and will be placed wherever the mouse is released. You can move selected symbols into and out of ScoreST's clipboard; see the reference sidebar for details.
Pages
The Editing Window shows a portion of the current page. When you draw a score, you're actually placing symbols and marks somewhere within the page. A page in ScoreST's terms is the same as a standard piece of 8-1/2-by-11-inch paper. This works quite nicely when printing, since a symbol placed four inches from the top of ScoreST's page will appear four inches from the top of the paper page. To facilitate symbol placement, ScoreST overlays the page in the Editing Window with a grid showing horizontal and vertical inch markings. Since the Editing Window makes only a portion of a page visible, use the window's arrows and scroll bars to see the rest of the page. The Page menu lets you select which page is currently in the editing window.
Making Music
ScoreST is like a desktop publishing program for music. The first thing you'll want to do when creating a new score is to lay out the page. Decide on the margin widths and the distance between the staves. Don't forget to leave room for titles, page numbers and copyright notices.
Fill the page with blank staff lines before you add music. Tricks and Tips, below, describes one technique for doing this. Now you're ready to draw the musical symbols.
Most musical symbols are available within ScoreST, but some you'll have to draw yourself using other symbols. For example, drawing a diagonal line through a grace note's stem transforms it into an acciaccatura. A repeat sign is formed by drawing two vertical lines, one thick and one thin, and adding two dots. Crescendo and decrescendo marks (which look like stretched less-than and greater-than signs) are drawn using the Line Tool.
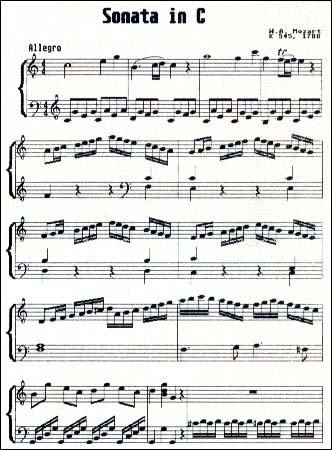 |
| Figure 4. ScoreST does produce nice, clean music scores. This page was printed on an Epson dot-matrix printer using the Final Print option. It's also fun to use! |
Figure 4 shows a typical page from a score created by ScoreST and printed on an Epson dot-matrix printer.
Drawing Beam Groups
Beam groups are probably the most difficult of all musical notation to master. Beam groups are groups of notes, often of similar time value, joined together by one or more thick lines at the ends of their stems. The number of thick lines defines the time value of the beamed notes and is the same as the number of flags that would appear on the notes' stems if the notes were drawn individually.
Beam groups are constructed using the Beam and Line Tools and notehead symbols. Noteheads are the stemless half and quarter note symbols in the Symbol Palette. I've found that the best way to to get the stems to meet the beams is as follows:
1. Draw noteheads representing all the notes in the beam group.
2. Decide the angle of the beams based on the vertical distance between the first and last notes in the beam group. Horizontal beams look best.
3. Using the Line Tool, draw stems on the first and last notes in the beam group, making them long enough to reach the location where the beam will be drawn. This is the difficult part, since you're trying to intersect with a beam that hasn't been drawn yet. Don't worry, the stems can be fixed up later.
4. Using the Beam Tool, beam the stems together starting with the outermost beam.
5. Draw stems from the remaining noteheads to the outermost beam using the Line Tool.
You can select any symbol you're not happy with and delete and redraw it.
Tricks and Tips
To make score drawing faster and easier, ScoreST offers a few aids and shortcuts. First, holding down the [Control] key while dragging constrains the mouse to horizontal or vertical motion. Release the mouse button before the [Control] key or the symbol may snap to a different location. This feature also comes in handy when you want to squeeze notes on a staff together or spread them apart. Select the notes you want to move using the Selection Tool, then hold the [Control] key down as you move the selected objects horizontally. The symbols seem to slide along "rails" formed by the staff.
The arrow keys can also be used to move any selected symbols. The arrow keys alone move the selected symbols by a distance equal to one-half the space between lines on the staff. In musical terms, this means the up-and-down-arrow keys transpose the selected notes by a semitone. The [Shift] keys in combination with the arrow keys move selected symbols by the size of a pixel, 1/72-inch.
You can delete the last symbol created by pressing the [Delete] or [Backspace] keys. Bear in mind that this only works on the last symbol created; pressing [Delete] five times won't delete the last five symbols.
Use the clipboard to eliminate repetitive symbol drawing. When you begin a new score, draw a staff line and fill in the key signatures. Then copy the staff line you just created into the clipboard. Fill the page with staff lines from the clipboard, and you've got a custom page of blank sheet music, complete with key signatures. If you're scoring a long piece of music, you can paste a copy of the blank page just created onto a special page (with a page number of, say, 9999). Whenever you need to open a new page, copy the contents of page 9999 into the clipboard, then paste them onto the new page. (Don't forget to delete page 9999 after your score is finished.)
The best way to learn how to create attractive scores is to examine professionally typeset music for cues on layout, placement and spacing. Remember that the object is to produce scores that are attractive and easy to read.
Phil Comeau lives in the Ottawa, Ontario area where he works as a software engineer. He wrote the program Julia In the November issue of START.
|