Mac and PC On The ST
More on
Apple's HYPERCARD
BY DAVID PLOTKIN, START CONTRIBUTING EDITOR
This month, we'll continue our exploration of Apple's Hypercard. As I mentioned last month, there are several levels of use with Hypercard. Each level gives you more options (and more power) and presents additional menus from which to choose.
The Hypercard levels
The first two levels of Hypercard, Typing and Browsing, aren't very interesting because all you can do is type information into fields that someone else set up.
The third level of Hypercard is called Painting. Recall that a Hypercard stackis made up of individual cards.The Painting level lets you modify how a card looks. Although the Paint menu appears small at first glance, there is quite a bit of power here, because each selection can be used several ways. The tools include such common MacPaint-type commands as rectangles, circles, brushes, lines, pencils (sets and erases points), area fill, graphic text, polygons, an airbrush and selection tools. As with most Mac applications, you can cut and paste items to the clipboard, then bring them in and use them in Hypercard.
The tools themselves can be modified. For example, with the graphic text, you can choose the size, font and any special effects you want. The airbrush can be adjusted for density and spread, while a large menu enables you to select from a variety of fill patterns. The weight of a line can be set, as well as the size and shape of the paint brush.
As mentioned earlier, each tool is available in several different varieties. For example, the line tool is used "as is" to draw lines in black. Hold down the Option ([Alternate] on the ST) key to draw the line in the selected fill pattern. The brush can be used as a paint brush or an eraser-brush. Another good example is the Rectangle tool. It draws rectangles (surprise!) with a black border. If you select "Draw Filled" from the menu, it will be filled with the selected pattern, and holding down the [Alternate] while dragging draws the border of the rectangle in the selected fill pattern. Thus, to draw a filled rectangle with no border, select "Draw Filled" and hold down [Alternate] while drawing.
The Fill tool is quite versatile as well. Not only can it fill shapes, but graphic text as well. Most of the tools have a "Draw Multiple" option so that multiple copies of the shape are created as you drag. The separation of these copies can be set and graphics can be shaped or stretched. As you can see, there is a lot of power for customizing your cards in the rather innocuous looking Paint menu.
It is important to realize is that each card has a background (which is the same for the whole stack) and a "card," or foreground, which is unique to that card. You can paint just the card, in which case your artwork will appear on that card and not on any othercard in the stack. Or, you can select the background, in which case any modifications you make will affect every card in the stack. The "card" portion will take precedence over the background if the two overlap. Thus, you would want to set up the background graphics which are the same for all cards on the background, then switch to the individual card to make changes that affect just that card. This dichotomy between card and background holds for buttons and fields (see below).
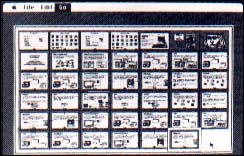 |
| Hypercard features a searchable Help facility that outlines all its functions. This facility is itself a Hypercard stack. From the "home card" shown here, you can go directly to any stack by simply clicking on the appropriate icon. |
The Authoring level
Although you can certainly make your cards look pretty using the Paint tools, the real power of Hypercard shows up when you engage the Authoring level. Here, you can place new fields and buttons on the card, and link those buttons to other cards or stacks.
As mentioned last issue, buttons are your way to retrieve other information. Clicking on the button tool in the menu gives you a default rectangular button called "New button." You can then resize it or select an entirely new "look" for your button from a stack called "Button Ideas" included with Hypercard. You can set many attributes of the button from a dialog box. You can change its name, decide whether to display the name and set its properties (transparent, opaque, shadowed, rectangular, check box, etc.). At any time you can modify a button, move it to another location or delete it entirely.
Buttons must be linked to something to be useful. They can be linked to another stack, a card within a stack or to a Hypertalk script. A good example of a button linked to a stack is when you create a new stack. To access the stack, create a button and place it in the Home stack, then link it to your new stack. Whenever you click on the button in the Home stack, it will open your new stack.
Linking a button to another card is useful to pull up additional information. Hypercard includes an example of a rolodex. The first card shows a series of lettered tabs (i.e., A, B, etc.). Click on one of these tabs to jump to the cards that contain information for people whose last names begin with those letters. To ensure that you will always get the first card for that letter, each letter of this supposedly single database is actually a different stack. The button is linked to that stack (rather than a specific card within the stack) so that it always jumps to the first card in the stack when you select the button. In fact, the first card (with the lettered tabs) is in a stack all by itself!
Linking a button to a Hypertalk script lets you build considerable power into a Hypercard application. Hypertalk is a complete programming language. Thus, many things can happen when you click on a button linked to a script. Whole games have been written within the framework of Hypercard by using Hypertalk.
Hypercard Fields
The last portion of the Authoring level are Fields. Fields are just what they sound like: fields for entering information. Creating a new field works just like creating a button--click on the Field tool and the field appears. You can resize it or move it or set various attributes. Among these are the size and font of anything you type into the field, whether lines will show, whether the text in the field will be locked and what size margins to set. As with buttons, you can set the field to be transparent, opaque, shadowed, etc.
You can even set a field to be a scrolling field--you can keep typing information into the field and it will scroll as you continue to type. A standard scroll bar appears to the right of the field, and you can access text anywhere in the field by clicking/dragging on the scroll bars. Fields are mini word processors and feature word wrap and basic edit features. Finally, fields can be linked to Hypertalk scripts, to expand the power of the application.
Hypercard is Fun
As you can see, there is considerable power in Hypertalk even without programming, and its easy to see how people can be sucked into playing with it for hours at a time. It's been a long while since I've found anything that's as much fun to play with as Hypercard--and that includes games.
David Plotkin is a contributing editor for START. He lives in Walnut Creek, California.