Mac and PC On The ST
HARD DISKS
AND SPECTRE
BY CHRISTOPHER ROBERTS
The Spectre 128/GCR manual, though amusing, can be confusing and unclear in several areas. How to safely install Spectre partitions on your hard disk is one of them. To make things easier, here's a step-by-step example installation.
1. Back Up Your Hard Drive
Back up all of the data that is on your hard disk. One of the best utilities for this is Turtle Backup, which can be found in the public domain on GEnie or CompuServe.
2. Establish Partition Sizes
Decide how much space on the hard disk you wish to dedicate to the Spectre. For the purposes of this tutorial, I'll assume that you have a 20MB hard drive or better and that you want to dedicate 10MB to the Spectre. (This is not an unreasonable amount when you consider that no Macintosh hard disk is under 20MB.)
Macintosh System files require considerable space to operate. To reduce confusion in the future, your first Spectre partition should contain your System files (System, Finder, printer drivers, etc.). This partition should be 2.5MB, because the System files are very large.
This will leave you with 7.5MB of free space. Now, divide this space into two equal-sized partitions of 3.75MB each. The standard 20MB hard-disk partition table, when formatted and partitioned in ST mode, will look like this:
C:5
D:5
E:2.5
F:3.75
G:3.75
Note that due to a bug in GEM, the three Spectre partitions must be last on this particular hard-disk configuration. When GEM reads a hard disk's partition table and encounters a partition without a GEM identification header, it stops looking for more GEM partitions. You can't have a logical unit (individual hard-disk mechanism) with a GEM partition followed by a Spectre partition, followed by another GEM partition because the last GEM partition will disappear from the ST Desktop.
 |
| On a spectre partition, the Macintosh Desktop ap- pears as it normally does. |
3. Format Your Hard Drive
Once you've backed up your harddisk data to floppy and have decided your new partition sizes, it's time to format your hard disk. Atari, ICD and Supra provide partitioning and formatting software for whatever drive you own.
If this is the first time you've ever formatted your hard disk, the three steps are:
A. Format the whole drive. This is done by telling the format program what kind of disk--drive controller, size and brand of drive mechanism you're using. All of this information is in your hard-disk manual.
B. Partition the drive. Partitioning is often part of the format program. It is a way to divide your hard disk into smaller disks. Note that TOS will not accept a partition larger than 16MB.
C. Install your hard-disk boot driver. This installation varies depending on the brand of software you use. ICD and Supra's boot software are very similar.
Both include a program that will have a menu of choices labeled BOOT, MAP, etc. Click on BOOT, then select the C drive and install the boot driver.
Copy all your backed-up GEM programs to C and D only and recreate your DESKTOP.INF file.
Now you're ready to reformat your last three GEM partitions for the Spectre. Simply run the SPECTRExxx.PRG, drop down the HARD DISK menu and click on FORMAT.
The Spectre software will ask you what SCSI address and LUN number you want to format. SCSI stands for small computer special interface (pronounced scuzzy). This is the interface format your ST host adapter converts the ST's DMA port to. Valid SCSI numbers are 0 to 7. If you have only one hard disk, the SCSI number will be 0.
The LUN is the logical unit number. This is the hard-disk mechanism that connects to the drive controller. Most drive controllers can handle two drive mechanisms. If you have a 20MB hard disk, you still may be able to connect a second mechanism of any size. LUN values are 0 or 1, LUN 1 being the second mechanism. With only one hard disk the LUN will be 0.
After setting the SCSI and LUN numbers, click on OK and the partition list will appear. The list will consist of partitions C through G. Click on the E partition and the format options will appear. Click on Format HFS. After formatting the E partition, continue with the same procedure on the F and G partitions.
Note that sometimes the harddisk boot driver has to be reinstalled. Repeat step C above to do this.
4. Install System Files On Your Spectre Partitions
Reboot your ST. Start the Spectre with a system floppy in the drive and the hard-disk option checked in the Spectre startup menu. The Automount option must be set to OFF (no check).
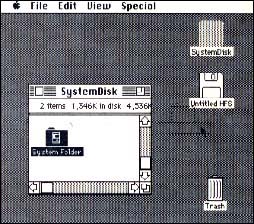
The Macintosh Desktop should appear as it normally does. Press [F3]. A disk icon named "Untitled HFS" should appear on the Desktop. Copy your system folder into the new disk by dragging it to this icon. With the copy of your system folder in your hard disk, you're ready to rename the "Untitled HFS" icon to whatever you want by clicking on the Icon once and typing the new name. Since this is your 2.5MB system disk, you might want to name it SystemDisk, as I did, to eliminate confusion.
Press [F4] then [F5] to get your other partition icons for renaming. After doing this, drag all your disk icons to the trash icon and turn off the computer. The function keys [F3] to [F5] have the same function as the [F1] and [F2] keys do with floppies. However, you will probably never use them except in installation.
Restart your computer and run your SPECTRExxx.PRG. Now put checks by the Hard Disk and Automount options and go to the File Menu to save the settings. Start the Spectre without a system floppy in the drive and watch your hard disk load the System and Finder!
Christopher Roberts is a freelance writer and science-fiction novelist who lives in Havre, Mont.