ON DISK
ANATOMY
DISCOVERING PARTS OF THE WHOLE
BY ROBERT GRUNBOK
anat - o - my (LL anatomia dissection ): the art of separating the parts of an organism in order to ascertain their position, relations, structure, and function.
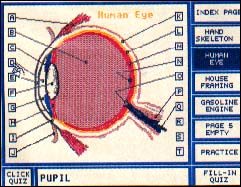
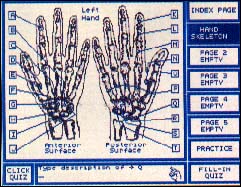
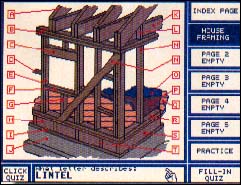
Anatomy (etc.) is an editable quiz program. It displays the picture of an object, with arrows pointing to its different parts, and asks you to name the parts. I wrote the program to help my boys in their science class, but you can use it to memorize the parts of anything.
|
|||||||
Getting Started
If you're ready for a pop quiz, double-click on the archive file ANAT_ETC.PRG and choose Extract when the dialog box appears. Select a destination disk and the files will be un-ARCed directly onto that disk. The only files Anatomy (etc.) requires to run are ANATOMY.PRG, PAGE_IDX.PI1, PAGE_IDX.TXT, TEMPLATE.PI1 and TITLESCR.PI1. Make sure they are all in the same folder.
To start the program, double-click on ANATOMY.PRG. After a few moments, the title screen will appear. Press any key to go to the Indexpage.
To view the four examples published on your START disk, make sure FOURCYCL.PI1 FOURCYCL.TXT, FRAMING.PI1, FRAMING.TXT, HANDSKEL.PI1, HANDSKEL.TXT, HUMANEYE.PI1 and HUMANEYE.TXT are in the folder with the other files.
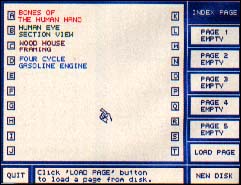
The Index Page
The Index page includes a large window with a list of files. Anatomy (etc.) checks your computer's available memory and gives you the number of picture files that will fit. A 520ST with 512K and no active desk accessories can load up to three pages; STs with 1MB of memory or more can load five.
Along the left side of the window are instruction buttons, and beneath them is the message box. Anatomy (etc.) communicates with the user through the message box.
To load a picture, first click on LOAD PAGE and then on one of the page buttons. If a picture has already been assigned to that page, it will be replaced. Next, click on the letter in the window that corresponds to your desired picture. Ready for a quiz? Click on the button that lists the title of your picture, and viola! You now have three quiz options.
Practice
The PRACTICE option lets you point at a letter corresponding to a picture's part and read its description. The description appears in the message box. You can leave a practice session at any time by clicking on INDEX PAGE, another loaded page or either of the other two quiz buttons.
Fill-In Quiz
The FILL-IN QUIZ is one of the quiz options. A letter is displayed in the message box and you must name its corresponding part. Remember, spelling counts! Use [Backspace] to correct errors before you press [Return].
Click Quiz
The CLICK QUIZ is an easier test than the fill-in. The name of an object's part is displayed in the message box; you must click on (or press the key of) the letter corresponding to that part.
|
|
||||||
|
|
Quitting
You can quit in the middle of either quiz by pressing [Escape]. At that time, your score is revealed in the message box. Each new score overwrites the previous one for that page. Clicking on the INDEX PAGE button takes you back to the main screen. To leave the program, choose QUIT from the Index page. When you quit the program, you'll see your total score for all quizzes.
Picture Pages
To create your own quizzes you need to make a Picture page with accompanying text and update the Index page. You'll need a paint program like DEGAS Elite or SEURAT (from the March 1989 issue of START), and a word processor that can save files in ASCII format. You can scan your pictures and save them in DEGAS uncompressed format (which is what I did), or draw them from scratch. I've provided a blank picture template, TEMPLATE.PI1, to get you started.
Load TEMPLATE.PI1 into your paint program and create your object. You should not use the first color (white) or the last three (shades of blue), since they are reserved for the program fills and text. Draw lines from the letter boxes on the template to the parts of your object. When you're satisfied with your art work, save the picture as an uncompressed file, under a filename different than TEMPLATE.PI1.
We're not done yet. Now you must create a text file that contains the descriptions of all the parts of your object that were pointed to in the picture. Use one of my text files (.TXT) as a template. Load it into your word processor and type over my descriptions.
Lines one through 20 are descriptions of the parts. Each line corresponds to one of the letter boxes, beginning with line one representing "A" and ending with line 20 representing "T."
You can use up to 23 characters in your description and they must be only uppercase. The letters following the description indicate that the Wetter box is active ("X") or unused ("E"). Change my descriptions and mark which lines are active.
Lines 21 and 22 are used to title your picture. Simply type over mine. You can use up to 10 characters (upper and lowercase) on each line. These titles will appear in the page buttons on the Index page when you load the picture.
When you're finished editing, save the file in ASCII format, using the same filename as its picture and a .TXT extender. You might want to save all your new files on a fresh disk. You'll be able to load it with the NEW DISK button on the Index page.
Creating an Index Page
The Index page is easier to construct than the Picture page. Load my file PAGE_IDX.PI1 into your drawing program and, using the text mode, add the descriptions of your pictures. Using the smallest text lets you enter up to two lines of 16 characters each. You can use different colors to group similar pictures, or even make small icons for a special effect.
When you're finished, save the new Index page under the same filename, PAGE_IDX.PI1. Each data disk must have its own PAGE_IDX.PI1 in order for the program to recognize the pictures. Since you are using the same filename, make sure you save the correct Index page on the correct disk.
Now load PAGE_IDX.TXT into your word processor. Typing over the filler (i.e., PICTURE04.PI1) and PICTURE04.TXT), add the filenames of your picture (in the first column) and text (in the second). Again, change the E to an X, to indicate the line is active. There are 20 lines available for files. Save PAGE_IDX.TXT with its companion PAGE_IDX.PI1 on the appropriate disk.
Wrap Up
One thing I never considered is that when you use pictures in an educational program, you have to be conscious of content. My wife pointed out that the original sketch of Da Vinci's man on my title page was too graphic in a certain area, and that I should blur it somewhat. Censoring Da Vinci's masterpiece is not my favorite activity, but I had to agree with my wife. It's something to keep in mind when you're writing for children.
Admitted ST addict Bob Grunbak has been programming on Ataris since early 1981. This is his first program for START.