Soundtracks
and
Synchronization
Scoring Videos With Your Home MIDI Studio
BY RICHARD VIARD AND JIM PIERSON-PERRY
If you're like most musicians, you know that your art won't pay the rent. Until you're catapulted into fame and fortune, why not put your talent to work? Scoring for film and video is an effective compromise for musicians searching for ways to pay their bills while keeping the creative juices flowing. With an ST and MIDI and recording equipment, anyone can do the job at home.
Film scoring may seem like a lot of work, but you'll soon see how many short videos can be scored in just a few nights - and for a rather fair salary. Producers on shoestring music budgets look for low-cost, professional scoring. You'll find them (and your opportunity to advertise) at local television stations and cable companies, university film classes, advertising agencies and video production houses.
In A Nutshell
To get started, you must first decide on a service to offer and advertise. Creating a music score and dubbing sound effects are very different processes, although both require similar steps in preparing the final soundtrack. To offer either service, you need a sequencer that locks to SMPTE timecode (see the sidebar, "What is SMPTE?"), a SMPTE synch box to read/write timecode and a VCR with audio dub (to record sound independent of the video). Many professionals use 3/4-inch video tape that holds separate tracks for video, stereo audio and timecode. You can go far, however, with a 1/2-inch VHS tape (preferably with stereo audio tracks), and simply use one audio track for the SMPTE timecode. You will also need a monitor to view the video and assorted synth and sound effects gear (i.e., reverb and echo).
You may need more equipment, depending on the project, such as a second VCR, a camcorder, a multitrack tape deck (if you're adding non-MIDI instrument sounds or voices) and a two-track tape deck for the final master (see Figure 1).
Hit Me With Your Best Spots
Initially, you'll meet with your client to run through the film. Keep in mind that producers are not musicians and may only have impressions and vague descriptions of the type of music they want. Try to give their suggestions feedback and propose your own ideas, expressing them in non-technical terms. Suggesting instrument sounds for particular cues is a good way to start.
Your next meetings will be spotting sessions. You and your client should look for ways to divide the film into coherent subsections (cues). This is when you should list the video hits to musically highlight and what (if any) sound effects your client wants. Sound effects are easy to spot; music hits to correspond with screen actions are more subjective. These include such actions as changes in a character's facial expression, location changes, sudden actions, or characters entering or leaving a scene. Start a hit list for each cue, including hit names and the SMPTE times that they occur (see Figure 2). These hit lists will continually evolve and eventually serve as your bible.
Make sure the format of your video copy of the film matches the format of your VCR. Most production facilities copy film. Ideally, you want the SMPTE timecode with the frame rate and starting time striped onto an audio track. You also want SMPTE "burned in" (which puts a small window in each frame to hold the SMPTE time address) as a visual time reference. If you have a stereo VCR, copy any pre-existing dialog or sound from the film onto a second audio track. Otherwise, you'll need two video copies: one for dialogue and sound, the other for SMPTE.
If your video copy doesn't include timecode, you can use a second VCR to transfer the video signal as you stripe SMPTE onto the audio tracks. In this case, lead with about 20 seconds of tape so that your sequencer has time to synchronize. This timecode becomes the master timing signal for all your work.
Back in your home Studio, connect your VCR's audio output to your SMPTE box input, and find the SMPTE time for each music and sound effects cue. If a SMPTE Window is burned into your film, use slow motion and pause/still on the VCR. Otherwise, pause the sequencer when you see the visual hit and note the readout from the computer's SMPTE display.
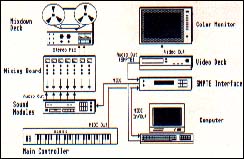 |
| Figure 1: A typical professional scoring system. |
The Creative Process
Now you can start composing music. A word of warning: Resist the inevitable temptation to turn on everything and play all the latest licks you've learned. Just relax, sit back and watch the film. Explore any feelings the film evokes and let musical ideas come to you. Question what role the music should play in the different cues. Can you use it to provoke sympathy for characters, foreshadow danger, emphasize action or serve as background source music (like a band playing in a bar)? Does it work to establish a sense of locality or time?
One approach is to create a theme that will develop throughout the film. If there are distinct parts to the film, create different themes for each part, integrating variations and mutations of the different themes in all parts. You can also create different themes for recurring characters, locations and ideas, or to bridge scenic transitions.
With SMPTE synchronization, you can literally compose and play in real-time as you watch the video. Try to find interesting textures, and experiment with tempos. Sometimes a subtle background texture is far more effective than a complex orchestration. Your music should complement and draw attention to the visuals, not overwhelm them.
Make sure your choice of instruments doesn't conflict with any preexisting dialogue or sound effects. The editor can then mix your music pretty hot without overpowering the audio tracks. Otherwise, they may have to mix it painfully low, and you'll wonder why you spent so much time on Subtle (now inaudible) nuances.
Now is the time to submit a midstream demo tape, which is usually just a cassette copy of your mix. The demo should be more finished than a rough cut, but still simple enough to let the client make suggestions. And be prepared to make changes, if not recreate the entire score.
And The Beat Goes On
If you've been watching the video while composing, your musical hits are probably matching the visuals pretty closely. Now it's time to tighten the match by adjusting the tempo and meter. If you find a single tempo to match all hits, you're a musical god; generally, however, you must vary the tempo and meter throughout your cues to get a close fit. How close is close enough? An audience can pick up mis-matches of sound and sight hits by two or three frames. Figure about a tenth of a second for acceptable error tolerance.
In prehistoric days (just a few years ago), a combination of trial and error with click books and printed listings of times were the tools of the matching trade. Fortunately, there are several sophisticated public-domain programs and desk accessories today, such as TMONDY and SMPTECALC, which convert between SMPTE time and musical measures/ beats. Some sequencers include a fit-time function, which automatically adjusts the length of a sequence to match a specified play time.
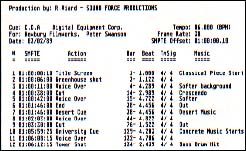 |
| Figure 2: Each cue should have a hit list. |
There are even programs designed to directly manipulate hit lists and seek optimum tempos for matching. At this writing, Hitman, from Dr. T's Music Software, is the only such program available for the ST/Mega.
Sometimes there's not enough time between hits for full measures at a certain meter and tempo. For example, a cue lasting 40 seconds at a tempo of 90 beats/minute would contain 61 beats, 15 full measures plus an orphan beat using a 4/4 meter. Using Hitman, you can insert a meter change for the last measure, with 14 measures of 4/4 and one measure of 5/4, then reset the meter to 4/4 at the cue end. You can save the tempo map as a standard MIDI file and import it into your sequencer as the conductor track. All pro-level Atari sequencers can read and write standard MIDI files.
Hitman is an elaborate and extremely useful program. Q-Factor, written for Hybrid Arts by the Pointer Sister's Greg Whelchel, is a similar program, scheduled for release later this year.
Crash, Bam, Vroom
As a film composer, you're not usually expected to create the sound-effects for the film. With today's inexpensive samplers, however, you might want to offer the service to producers.
You can import sound-effects MIDI files into your sequencer. The problem with sound effects, however, is that you need such a large library of them to do a decent job. Fortunately, a cottage industry has grown up that provides literally thousands of sound-effect samples on tape or CD, so you don't have to record them yourself.
Sometimes, a real-world sound is simply not convincing, and needs to be modified (i.e., a watermelon dropped from a second story window sounds more like a punch than a fist hitting flesh). These can be real challenges to your creativity. Try coming up with sounds for aliens, dinosaurs, light sabers or any other sound effects that you can't capture with a microphone!
Final Mixdown
Now we're in the home stretch. The music is written, the tempos and visuals are wedded, any sound-effect MIDI triggers are in sequence and your client has approved your last demo. It's time for the final mixdown.
Producers commonly request a mixdown on a 1/4-inch, stereo tape deck at 15ips speed, with a mono mix on one track and SMPTE timecode on the other. Don't just copy the SMPTE signal from your video; reshape it as you stripe the mixdown tape track to prevent distortion.
Some clients may request a stereo mixdown on a 1/2-inch, four-track tape deck - decidedly pro-level equipment. Record your audio onto tracks 1 and 2, with the reshaped SMPTE timecode on track 4. Leave track 3 empty to prevent the SMPTE signal from bleeding into the stereo mix.
At the most basic level (i.e., scoring a home video), you can get by with two VCRs. Using the mixdown that is synched to the original video (the one containing a SMPTE timecode audio track), dub the video from the original along with the mixdown soundtrack (either mono or stereo) onto a second VCR tape. If you don't have adequate mixdown capabilities in your home studio, you might consider mixing at a local recording studio. Just bring your MIDI gear and (at about $300/hour) record everything direct-to-two-track - unless you're adding live (acoustic) tracks. Always back up your final mix!
Scoring Big
The amount of equipment you own is not as important as what you do with what you have. It's true that you need a basic studio, but if your equipment is in good condition, and properly set up, you can work quickly and efficiently.
Richard Ward is a MIDI specialist at Dr. T's Music Software. He has also scored several training and industrial films and commercials for Lotus, Digital Agfa and Ford. Jim Pierson-Perry is a research chemist for Du Pont by day, the MIDI/Music Editor for START by night and a semi-professional musician when nobody's looking.
|
|
