KWIK DUMP
by JERRY ALLENThe screendump you've been waiting for
Kwik Dump is a fast screen dump BASIC program that works with most graphics disk file formats, including MicroPainter, Graphics Master, uncompacted Micro Illustrator and your own Graphics 24 (8 +16)files. It will run on any Atari computer with a disk drive. Memory requirements vary depending on the graphics program. Most graphics capable printers can use Kwik Dump including.- Epson, Gemini, NEC 8023, Prowriter 8510, KXP-1090, HP Thinkjet and DMP-80.
Antic receives many letters requesting a good screen dump for one printer
or another. So we got the job done by a top pro in Atari printing
software, Jerry Allen of Allen Microware. We figured that if the
creator of PRINTWIZ couldn't come up with something outstanding
for Antic readers, nobody could.
Jerry did not disappoint us! He provided an article that
explains the programming of printer graphics dumps, plus two programs.
Kwik Dump is listing 1, which loads your picture into memory and then dumps
it to your printer. Listing 2 adapts the Kwik Dump loading routine
for saving your own screens. Type in both listings. Check them
with TYPO II, then save them to disk. Listing I will work with all
the printers named in the synopsis above. If you're using any of
the various Micro Illustrator programs out there, including the Koala Pad
or Atari Touch Tablet versions, you must use uncompacted files which can
be created by pressing [INSERT] while the picture is on the screen. (See
... Easy Graphics Converter", Antic, September, 1984.)
NOTE: Even if you're an Atari programmer who doesn't own a disk drive or a dot matrix printer, Kwik Dump is well worth your close study. It's an example of clean, elegant, professional programming that you'll rarely see printed in a magazine-ANTIC ED
Probably the easiest screen dump to program
is a vertical dump for Graphics 16 files. This is because all of
the screen data can be used directly. Horizontal and mixed mode screens
require much more complicated programming in order to achieve similar (though
often more useful) results.
The only important criteria you need to know for a Graphics
8 + 16 dump is where to start retrieving the data in memory, and the specific
printer set-up codes.
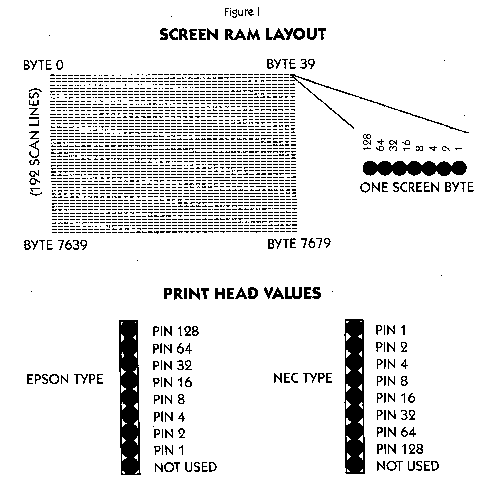
Epson/Gemini type printers and NEC/Prowriter type printers have
9 vertical pins in their print heads. They both use only the top
8 pins for graphics modes. The similarity stops here. The values
for the top 8 pins are exactly opposite. The Epson top pin has the
value 128, the bottom pin is value 1. NEC types have the top pin as value
1, the bottom pin is value 128.
Screen RAM bytes for graphics 8 are arranged in horizontal value
with the leftmost bit of the byte equaling 128 and the rightmost bit equal
to 1. When a bit is on, the dot is lit. These are the dots
we wish to print.
A byte with the value of 129 would print a dot, 6 blank dot-size
spaces, and another dot. If the screen is turned 90 degrees, you
see that these bytes can be used directly by the printer. The only
problem is that if you don't start in the right place, the picture may
come out backwards or upside-down.
So, by studying the screen layout, we can deduce that Epson
compatible printers should start retrieving data in columns from the lower
left corner of the picture, bottom to top and left to right across the
screen.
NECs and compatibles should start at the upper right corner
in columns from top to bottom and right to left across the screen.
Figure 1 illustrates this. The rest is simply using the proper initialization
codes from the printer manual and some relatively simple BASIC.
SPEED FACTORS
The two factors that affect printing speed the most are retrieval of
data from screen RAM or memory, and sending the data to the printer.
Since a printer operates much slower than data can be sent, even by BASIC,
the only critical time element which can be changed is data retrieval.
In screen RAM the bytes are not stacked as in Figure 1. Therefore
to fmd each byte BASIC must add or subtract 40 bytes, times 192 scan lines,
times 40 columns. FOR-NEXT loops and BASIC math routines make this
a very long-drawn proposition.
In Listing 1, A$ on line 140 is the machine language code to
minimize the data retieval time, Unlike a FOR-NEXT loop, its relative location
in the program is not very critical due to its speed. Similarly,
LOD$ on line 130 speeds the byte data retrieval process from the disk and
into RAM.
In listing 1, LOD$ takes over after the file is opened and the
screen is set to Graphics 24 (8+16). It then uses CIO, Atari's Central
In-Out machine language interface, to load the 7680 bytes. A$ contains
the math routines for both Epson and NEC type printers to move a vertical
stack of bytes to the temporary buffer which is PRNT$.
CHOOSE A LINE
When typing in listing 1, lines 130 and 140 may be difficult to enter
correctly. The reason they are written this way is to make the program
load and run faster than by using data statements each time. Lines
120 and 1000-1100 were put into the program to make typing easier.
If you can type lines 130 and 140 with no problem, then don't type in 120
and 1000-1100. If you feel insecure about typing in the special characters
directly, type in 120, skip lines 130 and 140, and type in 1000-1100.
If you choose the latter, the first time the program is RUN
fines 130 and 140 will automatically be formed as characters on the screen.
Also, the lines to be deleted will be placed on the screen. Move
the cursor over number 120 and press [RETURN] continuously until all of
the line numbers are entered or deleted. SAVE your program again
at this point. When you RUN the program again, the above procedure
will not be necessary
CHANGING IT AROUND
When typing in the listings, all REM statements may be omitted.
For your own purposes the disk load routine could easily be replaced with
a graphics drawing program. The printer codes at line 600 could also
be modified to set up codes for slightly different printers or to modify
aspect ratios.
As a suggestion you might set up the print routine to send a
string of spaces at line 420 prior to the graphics code and graphics data,
thereby centering your picture. Try to avoid breaking up line 420
if you try the above. Keeping the FOR-NEXT loop on one line makes
it run faster. You can accomplish this by defining a string variable,
with a short name such as C$, to a line of spaces during the program initialization.
When RUN, listing 1 will ask you which type of printer you are
using. Then it prompts you to insert your picture file disk into
drive 1. Press [RETURN] when ready After the directory is up, type in the
name of the file you want to dump. Entering the "D:' or "DI:' is
unnecessary. 'D2:' may be used, but you will not be viewing its directory.
At this time the picture will load onto the screen and be dumped
to the printer. Make sure the printer is online prior to calling
up the drawing. Input and device errors are briefly announced and
the program will restart if an error occurs. If not, after the dump
the screen remains up until you touch any key. Then the program goes
back to the directory routine.
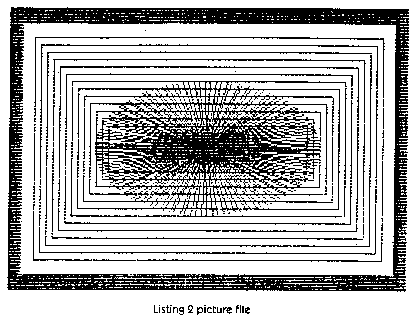
LISTING 2
Listing 2 is included to provide a quick and dirty (but interesting)
picture file to dump. It also demonstrates SAVS, which is the same
as LOD$ in listing 1 except for the third character (byte).
In SAV$ the third character is a [CTRL] [K] instead of [CTRL]
[G] in LOD$. If you already have listing 1 running, LOAD it.
Clear the screen and LIST 130. Type NEW [RETURN]. Move the
cursor over the line and change the third character to a [CTRL] [K].
Press [RETURN]. LIST or SAVE that line. Or continue to type
in the rest of Program 2 and then SAVE it.
When RUN, listing 2 draws a fairly quick Graphics 24 picture
and SAVES it to disk. The file can then be dumped using listing 1.
Since no error checking is done, make sure to have an unprotected disk
in drive I with at least 62 free sectors prior to running the program.
The file it saves to will be named PIC.DAT. You may then dump PIC.DAT using
listing 1.
SAV$ can be used as-is in many of your home-brew programs. just
ENTER it making sure that you DIMension it and that line numbers don't
conflict. The other routines from listing 1 can be used in much the
same way. Just LIST the needed lines to disk. Change the lines
in the LISTed file prior to ENTERing them into your already loaded new
program. Then SAVE or LIST the whole conglomeration.
Jerry Allen lives in Southern California where be is an engineer
at TRW and operates Allen Macroware software publishing (PO. Box
2205, Redondo Beach, CA 902 78). Allen's PRINTWIZ ($29.95,
16K disk) is a 100 % machine language dump for all graphics modes and mixed
modes. Its horizontal format allows large continuous text.
You can change widths and heights, center automatically, invert, make partial
dumps and more. It works with BASIC, assembler, Logo and PILOT and
is configured for most popular printers with a parallel interface.
Included is a text lister for dumping Atari special characters.
Program Listings:
1. KWIKDUMP.BAS Download
2. KWIKSAVE.BAS Download