New Owners Column
Lesson 11: ATASCI, PEEK And POKE
This series teaches beginners how to program in BASIC on all Atari 8-bit computers, such as the 800XL and the 130XE. The column began in Marcrb 1986 and, despite a lesson number inconconsistency in Nov-Dec. 1986, all lessons have appeared in proper order.
In lesson 11 we'll cover several topics which just about finish the nitty-gritty components of BASIC programming. These include further information on the relationship between characters and numbers within your Atari, plus how to access the computer's memory directly. Next month we'll start on the fun stuff--color sound, graphics and animation.
ASC AND CHR$
In Lesson 8 (November 1986), we discussed OPENing the keyboard and GETting a character:
10 OPEN #1,4,0,"K:":GET #1,A
This statement will wait until you press a key, then place the value of the key pressed into variable A. In this statement, A may only hold a numeric value. If you type PRINT A, you'll see that A does indeed contain a number, even if you pressed a letter on your keyboard. In fact, your computer treats all characters, including letters, numbers and the special (CONTROL) symbols as numbers.
The number the computer associates with each character is known as the ATASCII code (ATari American Standard Code for Information Interchange). You can find a table of these codes in Appendix D of Your Atari Computer by Lon Poole, Osborne/ McGraw-Hill ($19.95). It's also in most other manuals.
For example, the ATASCII code for B is 66. Atari BASIC contains two commands for converting characters to their ATASCII code and back again. The first command is CHR$, which converts from the ATASCII code to the equivalent CHaRacter. This statement will print a capital B on the screen:
20 DIM A$(1):A$=CHR$(66):PRINT A$
CHR$ is important for several reasons. First, some numbers represent characters which can't be easily printed on the screen. For example, if you PRINT CHR$(125), the screen will be cleared. Besides clearing the screen, you can also move the cursor around on the screen under program control by PRINTing the CHR$ code corresponding to the cursor arrows, or even insert or delete Iines and characters on the screen by PRINTing the CHR$ code corresponding to [SHIFT] [INSERT] (for insert line) or other key sequences which perform these functions.
Furthermore, you probably also know how various printer options (such as double-strike, italics, etc.) can be activated by sending the printer [CONTROL] characters or a string of characters beginning with the ESCape character. Press the [ESC] key twice to get the ESCape character to print on the screen--it looks like a squiggle. You can put these characters directly into your program to be sent to the printer by using the LPRINT command.
But it's usually better to use the ATASCII code instead, especially if you want to dump a program Listing to the printer. That's because most printers can't print the ESCape character--they just print a space. And the [CONTROL] characters, instead of printing out as part of the program listing, may activate the appropriate feature of your printer, inserting italics, underline, page feeds and other unwanted effects into the middle of your listing. For example, to send ESCape N to your printer, you could use:
10 LPRINT CHR$(27);CHR$(78)
The ATASCII code for ESCape is 27. Your printed listing of the program won't be affected and the statement will print out perfectly.
The opposite of the CHR$ command is ASC (from ASCII). It converts characters back to their ATASCII code:
10 A=ASC("C"):PRINT A
This prints 67, the ATASCII code for C. Quotes " " are needed with the ASC command, because ASC operates on a string. You will remember from Lesson 10 (January 1987) that "C" is considered a string constant. If you use a string variable like A$, the quotes are not needed:
10 DIM A$(1):A$= CHR$(67):B=ASC(A$)
A string like A$ can be defined in terms of CHR$. If you type PRINT A$, you would get the letter C, because 67 is the ATASCiI code for C. You can define a string which has more than one element using CHR$:
10 DIM A$(4)
20 FOR LOOP=1 TO 4:READ Q
30 A$(LOOP,LOOP)= CHR$(Q)
40 NEXT LOOP
50 DATA 65,66,67,68
60 PRINT A$:REM Prints "ABCD"
If you PRINT ASC(A$), you will get 65, which is the ATASCII code for the first letter in string A$. ASC ignores the rest of the string.
PEEK AND POKE
There's 64K memory contained in the most widely used Atari 8-bit computer models--such as the 800, 800XL, 1200XL and 65XE models. (The Atari 400 and 600XL 16K, the 130XE is rated at 128K.) This 64K memory actually consists of 65,536 memory location "boxes" numbered from 0 to 65535.
Each memory location can contain a number between 0 and 255. Often the value of the number in a particular memory location is important because it can give you valuable information. You use the PEEK command to tell you that number (0-255) is stored in a particular memory location:
10 A=PEEK(710)
In this statement, the value of the number stored in memory location 710 is placed into variable A.
An example of this process can be seen in this month's listing. Your Atari screen displays a particular section of computer memory known as screen memory. Each character you see (including blanks) represents a number stored in one of the screen memory locations. Your Atari translates the number to a character and puts it on the screen.
By using PEEK, as in line 3010 of this month's Listing 1, NEWOWN11.BAS, we can see what number is stored in any memory location. PEEK will work with any memory location in your computer.
The number in screen memory, however, is not necessarily the ATASCII value of the character you see on the screen. Your Atari uses another set of codes for this purpose which are related to the ATASCII codes. The subroutine at line 3100 converts these values returned by the PEEK statement to ATASCII values so they can be sent to your printer.
The opposite of reading a number from a memory location is placing your own number there--using the POKE command:
10 POKE 710,66
This puts 66 into memory location 710. POKE is a very powerful and dangerous statement. You can do wonderful things like change screen colors, control sound, or display different portions of memory on your screen. (The above statement, for example, will change your screen color from blue to red.) But if you put the wrong number into the wrong memory location, your program may lock up!
You can tell you're suffering from a lock-up when the keyboard refuses to respond--and sometimes even pressing [RESET] doesn't bring it back. Then you'll have to turn off the computer, losing everything in memory. This is why you should always SAVE your latest version of a program before you RUN it.
You may POKE any number between 0 and 255 into a memory location. Attempting to POKE a number outside that range causes an error. Some memory locations will not accept the value you POKE into them. Typically, these are locations in the computer's ROM (Read Only Memory) which cannot be modified. No error occurs if you do this, but the number you put into location simply won't be there when you PEEK it.
TYPE-IN CALENDAR
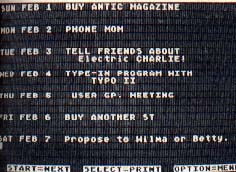
This month's listing is a Weekly Calendar Planner. Type in Listing 1, NEWOWN11.BAS, check it with TYPO II and SAVE a copy before you RUN it.
From the main menu, you can choose any month of any year. You'll be presented with each week, so you can jot down appointments and other things-to-do for each day. Note that you cannot over-write the month and day/date appearing every three lines.
You can save the month's data to disk, or recall data you saved during an earlier session. You can erase old months from the disk. From the screen you can dump any week to the printer--two weeks will fit on each sheet of paper. You can also proceed to the next week without printing. When you reach the end of the month, you'll cycle around to the first week again. The prompts are self-explanatory in the main menu and the data screens.
This program makes extensive use of CHR$ (and string manipulation, which was covered in last month's lesson). It also uses PEEK as a fast way to read the screen. I stayed away from fancy graphics in the printer output, so just about any printer should be able to use the program, including letter-quality printers which have no graphics at all.
Listing:NEWOWN11.BAS Download