First-Time Atari Users Handbook
What to do after you unpack the box
By Gregg Pearlman,
Antic Assistant Editor
You just bought your first personal computer. You didn't want to spend a lot of money, and your eyes lit up when you saw the Atari 130XE in the store doing the same things as the brands that cost so much more.
Your start-up 130XE computer system requires a disk drive-an Atari 1050 is a reliable and widely available choice. A video monitor would be nice, but for now your backup television set will suffice. And you decided to put off buying additional peripherals-such as a printer or a modem -until after you learn the fundamentals of operating your new computer.
UNPACKING
Here's what you'll see when you open your two Atari packages:
1. Atari 130XE computer: It looks like a typewriter keyboard, but all the microchip brains are inside.
2. Computer power Supply: A small, heavy box with two electrical cords attached to it.
3. Television switchbox and cable: Connects your television set to the computer.
4. Atari 1050 disk drive.
5. DOS 2.5 disk: DOS is the abbreviation for disk operating system.
(If you buy another brand of disk drive such as Astra, you'll want to get a copy of DOS 2.5 or 2.0 from an Atari users group, or from the monthly Antic Disk, or from Atari customer service. You also want to obtain DOS 2.5 or 2.0 if your system came with the incompatible DOS 3.)
6. Disk drive power supply: A bit smaller than the computer power supply, but otherwise not much different
8. Serial cable: Thick cable with ends that look alike. Connects the disk drive to the computer.
9. Various booklets and manuals that you may have trouble understanding at first.
At home, you'll need the following:
1. Electrical outlets (or extensions) for the television and two power supplies.
2. Blank floppy disks: They're inexpensive and normally sold in packages of 10.
Other useful options:
1. Video monitor: If you use a high-resolution monitor instead of a standard television set, you'll need to connect it to the computer via a monitor cable from an electronics store.
2. Power strip: Usually these have six electrical outlets, a surge protector, and an on/off switch.
3. Joystick: Not just for games-some word processors and other productivity programs allow convenient joystick operation too.
4. Disk box: You can start with a shoebox, but it's nice to have a box that is actually built for storing disks safely.
5. Disk labels: This is really more of a necessity, imagine if all your music cassettes had no labels. However, blank labels are usually provided when you buy new disks.
HOOKING UP
1. Carefully remove all your equipment from the boxes and put it on
a table or desk. Make sure nothing from the above list is missing.
2. Make sure your computer is off. The on/off switch is in back, at the left end. Plug the computer power supply cord's jack into the POWER port on the back of the computer. Plug the other cord into an electrical outlet.
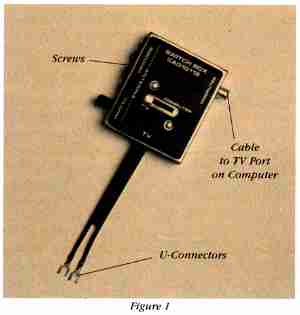
3. Hook the TV switchbox U-connectors to the VHF antenna screws on your TV. Hook the incoming antenna's U-connectors to the screws on the switchbox. (See Figure 1.) If your TV does not have these screws, you can buy adaptors at Radio Shack or other electronics stores.
4. Plug one end of the switchbox cable into the port in the TV box and plug the other end into the TELEVISION port on the back of the computer-right next to the CHANNEL switch. Make sure the TV is plugged into a power outlet. (NOTE: You only need the TV switchbox if you are using a television set. Video monitors, as explained previously, require different cables that connect to the MONITOR port on the back of the computer.)
5. Push the computer's CHANNEL switch to either 2 or 3-whichever TV channel does not transmit in your area. You'll tune your TV to the same channel.
6. Carefully remove any protective cardboard or disks from the slot in front of the disk drive. Plug one disk drive power supply cord into the POWER port on the back of the disk drive. Plug the other cord into an electrical outlet.
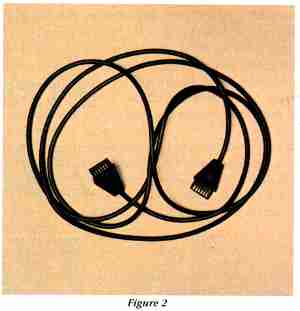
7. Plug one end of the black serial cable (Figure 2) into one of the two I/O CONNECTORS ports on the back of the disk drive. Plug the other end into the PERIPHERAL port on the back of the computer.
8. On the back of the 1050 disk drive, push both DRIVE SELECT switches to the left. This tells the computer that this particular disk drive is "drive 1." (If your drive is not an Atari 1050, check the manual for correct settings.) Later on, you may wish to "piggyback" additional disk drives by connecting them to each other via additional Atari-compatible serial cables.
TURNING IT ON
1. Make sure your computer is turned off. The on/off switch is in back,
next to the POWER port. Turn on your TV. Move the TV/COMPUTER switch on
the switchbox to COMPUTER. Tune the TV to whichever channel the computer's
channel switch is on-either channel 2 or 3.
2. Turn on the disk drive switch. The lower of the two red lights is the power light, which should now go on. You'll hear some clicking and whirring while the other red light, the busy light, goes on. Wait until the busy light goes off.
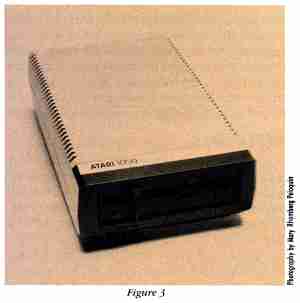
3. Take the DOS 2.5 Master Disk out of its protective sleeve. Holding the top of the disk, put it into the drive, label side up. Push it in until it clicks. (Never touch the magnetic disk material itself, only the paper packaging.) Flip down the door (retainer arm). (See Figure 3.)
4. Finally, turn on the computer. This is always the last step in the process. (That on/off switch is in back, on the left.) On a color TV set, the screen will turn blue. The disk drive noises and busy light will go into action again. If you have the volume turned up, you'll hear rapid beeping. This is the sound of DOS 2.5 being loaded into the computer.
5. When the word READY appears on the screen, you know you've done everything right up to this point.
However, if you made a mistake in booting up (starting) your computer system, you will see your first BOOT ERROR message flashing on the screen. Re-read the previous instructions and try again.
Always remove your disk before turning the drive on or off. If you see the SELF-TEST screen, double-check the cables leading to the disk drive.
DISK OPERATION
For your first disk operation, you'll duplicate your DOS disk onto
a blank disk.
1. From the READY prompt, type DOS-and then press the [RETURN] key. In fact, you might as well get used to pressing the [RETURN] key after every DOS and BASIC command, even if it is not specified in the instructions.
The disk drive whirrs and turns on the busy light again, bringing up the DOS 2.5 menu.
     DISK OPERATING SYSTEM II VERSION 2.5
          COPYRIGHT 1984 ATARI CORP.
A. DISK DIRECTORY     I. FORMAT DISK
B. RUN CARTRIDGE      J. DUPLICATE DISK
C. COPY FILE          K. BINARY SAVE
D. DELETE FILE(S)     L. BINARY LOAD
E. RENAME FILE        M. RUN AT ADDRESS
F. LOCK FILE          N. CREATE MEM.SAV
G. UNLOCK FILE        O. DUPLICATE FILE
H. WRITE DOS FILES    P. FORMAT SINGLE

  SELECT ITEM OR RETURN FOR MENU
2. Press [J] on the DOS 2.5 menu-and don't forget to press [RETURN]
afterward.
3. When the menu says DUP DISK-SOURCE, DEST DRIVES, type 1,1 and press [RETURN].
4. At the prompt INSERT SOURCE DISK, TYPE RETURN, insert the DOS 2.5 Master disk you want to copy. Press [RETURN]. Your source disk is always the original you are copying from-your destination disk is the one you are copying information to.
5. You'll hear the disk drive go into action again, reading the information on the disk. At the prompt INSERT DESTINATION DISK, TYPE RETURN, remove the source disk, put the destination disk into the drive, and press [RETURN]. You'll hear 40 loud clicks, then 40 quiet clicks- your destination disk is being "formatted" (set up to be used by the computer). Then you'll hear the computer writing information to the disk. At any onscreen prompts, insert whichever disk you're told to insert. When the program is done copying, you'll have an exact duplicate of your DOS 2.5 Master Disk.
6. Put your DOS 2.5 Master Disk back into its protective sleeve and put it in a safe place. Use the copy as your main DOS disk. If your copy ever gets damaged, just use your master disk to make a fresh copy.
FILE PROTECTION
To see a directory of the files on a disk, choose option [A], Disk
Directory, and press [RETURN] twice. When you're done reading the directory,
press [RETURN] to go back to the DOS menu.
Sometimes, after copying a disk this way, you'll want to make sure the information can't be changed or erased. There are several ways to do this:
From the DOS menu you can choose option [F], Lock File, for each file you want protected. You can tell that a file is locked, if the filename in the directory is preceded by an asterisk (*). To unlock a file, choose DOS option [G].
Lock File prevents anyone from changing or erasing that file. But if you accidentally format the whole disk, you're out of luck. To prevent formatting or deleting of any kind, you can put a "write-protect tab" on the disk notch. (See Figure 4.) Write-protect tabs look like small, narrow pieces of colored tape, and they're usually included with new disks
DISK FORMATTING
If you put an unformatted disk into your drive, the drive will make
strange noises and the screen will display an error number. Think of your
disk as an electronic blank wall. You can't keep electronic books on that
wall without electronic shelves.
The computer looks for information arranged neatly on the electronic shelves. Atari 8-bit computers use "soft-sector" disks, which must be formatted into 40 circular "tracks" of 18 sectors each. Formatting doesn't only set up a disk for use, it completely erases all previous information stored on the disk. In effect, formatting creates a fresh disk.
So, with the DOS 2.5 menu on the screen, put a blank disk into your drive and choose option [I], Format Disk, or option [P], Format Single. Option I formats the disk in Atari's "Enhanced Density" which holds 50% more information than option [P] ,the normal "Single Density" format. A disadvantage of option [I] is that some programs can't use disks formatted in Enhanced Density (sometimes also called Dual Density).
SIMPLE BASIC
XL and XE computers have Atari's version of the BASIC programming language
built in. (For example, the l30XE has Atari BASIC, Revision C.) Each line
of a BASIC program requires a line number between 0 and 32767. The computer
will do exactly what you tell it. For instance, type:
10 PRINT "HELLO"
Press [RETURN]. Type RUN to start the program. The computer will indeed print HELLO on the screen. However, if you type:
10 PRIMT "HELLO"
and press [RETURN], you'll see an error number on the screen. As they say, garbage in, garbage out.
Believe it or not, 10 PRINT "HELLO" is a program. Here's another program for you to type:
10 PRINT "TYPE A NUMBER"
20 INPUT A
30 PRINT "TYPE ANOTHER ONE"
40 INPUT B
50 PRINT "YOU TYPED"
60 PRINT A
70 PRINT "AND"
80 PRINT B
90 END
Type RUN and the program will begin operating. At the question mark (?) prompt, type any number and press [RETURN]. Almost immediately the program will print that number to the screen.
If you want to see what your program looks like, first make sure the program isn't actually running. (If it is running, press the [BREAK] key.) Type LIST and the program lines will be LISTed on the screen.
If you want to keep that program and use it later, you must SAVE it on a disk. First, think of a file name of no more than eight characters, like FILENAME. File names must be alphanumeric-no special characters (#, %, etc., or punctuation marks like commas or spaces) are allowed. Also, filenames may not use lowercase letters, or begin with numbers. You can also include a three-character "extender." So you could call this file FILENAME.123, or FIRST.BAS, or even HENRY
Type SAVE "D:FILENAME.123" (be sure to include those quotation marks at each end) and press [RETURN]. The disk drive will start and soon your program is SAVEd on the disk. The "D: stands for disk drive. If you have more than one drive, you'd use "Dl:, "D2:, etc.
Just for fun, press [SHIFT] [CLEAR], which clears your screen. Now type NEW and press [RETURN]. The NEW command erases FILENAME. 123 from the computer's memory, but not from the disk where you SAVEd it. To get your program back, type LOAD "D:FILENAME.123" and press [RETURN]. When READY reappears on the screen, you know your program has been loaded. To check it, just type LIST.
What if you want to RUN Diamond Dave,some issue's Game of the Month? First, type DOS. The disk drive will start spinning again, and the DOS 2.5 menu will appear. Remove the DOS disk, put the Antic Monthly Disk into the drive and choose option [A], Disk Directory, then press [RETURN]. At the prompt DIRECTORY-SEARCH SPEC,LIST FILE, just press [RETURN] twice. The resulting disk directory shows a file called DIMNDAVE.BAS.
Choose option [B], Run Cartridge, which returns you to BASIC. (BASIC is built into the 130XE, but not into the earlier Atari 800 or l200XL-users of either computer needed to install a BASIC cartridge. Thus RUN CARTRIDGE returns you to BASIC on the l30XE despite the absence of an actual cartridge.)
When you see the familiar READY, type LOAD "D:DIMNDAVE.BAS" and you'll get another READY Now type RUN-you're playing the game of the month. In fact, you can even LOAD and RUN the game in one fell swoop by typing RUN "D:DIMNDAVE.BAS".
If you're not interested in games, there's plenty of serious software on the market: word processors, spreadsheets, databases, graphic art, music. (Software and programs mean the same thing.) However, most commercial software is not written in BASIC, because other programming languages are faster and require less memory.
If you have a piece of commercial software-say, a word processor-turn off your computer, remove any disk from your disk drive and insert the word processor disk. Now, hold down the [OPTION] key and turn on your computer. The program will proceed to load and run automatically. Holding down [OPTION] turns off BASIC and lets the computer run programs written in another programming language.
OTHER DOS FUNCTIONS
With option [C], you can copy a file to another disk (if you have another
drive), to another filename on the same disk, to the printer, the screen
or the editor-which is almost the same as copying to the screen.
Option [D] lets you delete any, all or selected files (except locked files) from a disk.
Option [E], renaming files, is especially important when you have several versions of a file. Let's say that on July 4 you wrote up a short program, CHRCOUNT, to count the characters in a file. On July 10 you make some minor changes and instead of just writing the file back to CHRCOUNT, you call it CHRCOUNT.710 (the extender is that current date). If you want to add a date on the original CHRCOUNT, choose option [E] from the DOS menu. At the prompt RENAME-GIVE OLD NAME, NEW, type D:CHRCOUNT, CHRCOUNT.704-and press [RETURN]
Options [K], [L] and [M] are for machine language files, so you can learn about them later on.
If you use option [N], create MEM.SAV, you can go to DOS from BASIC, perform whatever DOS functions you need and return to BASIC. Your BASIC program will still be in memory If you don't have a MEM.SAVE file, your program is erased from memory every time you use DOS.
Duplicate file, option [O], is like option [C], except that [O] lets you switch disks in a single disk drive. At the prompt NAME OF FILE TO MOVE?, type the name of the file to be copied. Then insert source or destination disks as instructed by the onscreen prompts.
RECOMMENDED READING
The following sources will be very helpful as you learn how to use
your Atari:
Your Atari Computer by Lon Poole. Osborne/McGraw-Hill, 2600 Tenth Street, Berkeley, CA 94710. (415) 548-2805. $17.95, 474 pages.
Mapping the Atari by Ian Chadwick. Compute! Publications, Inc. (ABC), 825 Seventh Avenue, New York, NY 10019. (212) 887-5928. $16.95, 272 pages.
Atari BASIC (XL edition) by Albrecht, Finkel and Brown. John Wiley and Sons, 1530 South Redwood Road, Salt Like City, UT 84104. (801) 972-5828. $16.95, 388 pages.