Atari Animation
Lesson 1: Character Graphics
Move into intermediate Atari BASIC programming with this in-depth series about how to make 8-bit graphics move-and how to combine your moving graphics into complete game designs. To take full advantage of these Atari Animation lessons, you should be at least an experienced BASIC beginner-and keep a good BASIC reference manual close at hand. However, any 8-bit Atari user-with minimum 32K memory disk or cassette- can enjoy using the short BASIC graphics demonstration type-in programs that accompany each lesson.
 Animation-graphics
that move-has always been one of the 8-bit Atari's greatest strengths.
In this new Antic series, we'll assemble a complete animated picture
with all the trimmings. And then we'll go on to create a complete, working
game in Atari BASIC that looks and plays like the classic Space Invaders.
Animation-graphics
that move-has always been one of the 8-bit Atari's greatest strengths.
In this new Antic series, we'll assemble a complete animated picture
with all the trimmings. And then we'll go on to create a complete, working
game in Atari BASIC that looks and plays like the classic Space Invaders.
CHARACTER GRAPHICS
The basis of most Atari animation is character graphics, a simple
and efficient way of creating customized shapes, called characters, on
the television (or video monitor) display screen by manipulating the computer
numbers that control the shapes. Letters of the alphabet are characters.
So are numbers and punctuation marks such as-?, /, ", etc.
Atari also provides some "special" characters that can be used to draw forms. When cleverly combined, they can create other interesting shapes, like a house or robot. These shapes are all built into the keyboard.
You can program character graphics using PRINT and POSITION statements, the same way as text. Text can be kept in strings, which BASIC handles quickly and automatically. Character graphics is very memory-efficient. For example, a high resolution Graphics 8 screen takes about 8,000 memory locations to store all the "bit-mapped" numbers needed for a single screen. Using characters in the regular text mode, we can duplicate the same screen in 960 bytes of memory (40 columns times 24 rows)-and less memory also means faster execution.
You may think you are limited by having only 128 characters, but even that can be overcome by using advanced methods such as "display list interrupts," which you'll be learning about later in this series. You don't have to rework entire characters either. Often a few changes will be enough to create the graphic image you want.
As a BASIC programming beginner, you already know that a bit-the smallest unit of computer memory- can represent a dot on your display screen. These dots are called pixels-short for "picture elements." An "8-bit" computer like your Atari simultaneously processes groups of eight bits-called bytes. Therefore, a single byte can draw eight pixels on your screen. (You can look at the memory locations of any of the more than 64,000 bytes in today's 8-bit Ataris with a simple PEEK command from BASIC.)
Every Atari character actually consists of a grid that's eight pixels wide and eight pixels high-or 64 (8 x 8) pixels. By varying the pixel-dot pattern of each byte and stacking them, we form an image. Figure 1 shows the 64-pixel character grid for the letter A. To create this character, you would add up the binary value of each bit, as shown in the diagram, and POKE those numbers into memory.

Do we need 960 bytes of memory (40 x 24) to store a screen in the computer-or do we actually need 960 characters at eight bytes apiece (7,680 bytes)? The answer is 960 bytes. Here's the secret: Within the computer a whole letter can be stored as just one number. Then every time we need a letter, we just use that number instead. We don't have to describe how to draw a letter every time we want to use it.
The memory area that holds data for the screen display is called screen RAM, or screen memory, or screen data. Use whichever term you like best. We can place letters on the screen by placing single numbers into this area. We just have to tell the computer we want an 'A" printed at a particular location and also where the computer should look in ROM to find those bytes that make up the letter A.
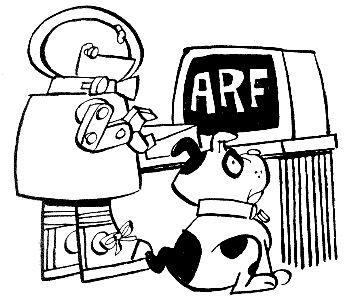
Suppose we print the word ARF! (known to many dogs) at the upper left corner of the screen and leave the rest of the screen blank. If we look into screen RAM we see that the first four bytes had decimal equivalents of 33, 50, 38, 1. Every BASIC manual will have a table containing numbers called screen display codes. These are the decimal values for character shapes.
PAGE MEMORY
Memory is addressed in pages (also called the high order address,
or "high byte") and free bytes (called low order address, or "low
byte"). A page is 256 bytes of memory and free bytes is anything less than
a page. We will be doing many things requiring us to work in pages of memory,
just like reading a book.
A memory location called the character base pointer contains the high order address byte which points to the beginning of the character set in ROM. It's location 756 of system RAM, which is reserved for the computer's own use.
When you're in BASIC you can execute a PRINT PEEK(756) statement and see the location's contents. Since it's the high order address byte (representing 224 pages of memory), we must multiply it by 256 (bytes per page) to arrive at the address in memory where the character set resides. 224 multiplied by 256 is 57344. The following BASIC program will let you look at the bytes forming the first three characters in the Atari ROM character set.
10 REM SEE3CHAR
100 FOR I=0 TO 2
105 PRINT
110 PRINT
120 FORJ=0 TO 7
130 PRINT PEEK(57344+I*8+J); :PRINT" ";
140 NEXT J
150 NEXT I
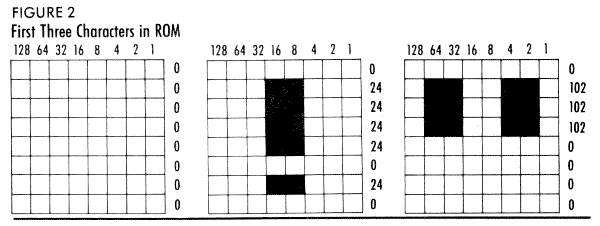
In Figure 2, if we look at the bytes that make the first character we notice they are all zero. You've probably guessed that they produce a blank space. The next two characters are the exclamation point and quotation mark.
If you look at the ATASCII table in your Atari BASIC manual, you'll see the characters listed in decimal order. (See list of recommended books at end of article.) However, ATASCII decimal order is not how characters are arranged in ROM. Atari chose a different order to make life easier for themselves when they set up their method of selecting both upper and lower case letters in GRAPHICS modes 1 and 2. However, this makes it harder on us.
ATASCII decimal values 32-95 are the first 64 characters in ROM. ATASCII decimal values 0-31 occur in positions 64-95-but decimal values 96-127 represent their true positions in ROM. A simple statement in BASIC will compensate for this weird arrangement:
1040 N=C-(C>31 AND C<96)*32+(C<32)*64
Here C is the ASCII value of the character. The expession (C>31 AND C<96) will return a value of 1 if true, or 0 if false. This gives a result of either 32 or 0 (32*1 or 32*0). The same logic applies to the second expresson. The first and second expressions are mutually exclusive. Only one or the other can be true. If neither is true, then the result of both expressions is 0 and N will equal C.
To find the position of the first byte of a character, multiply N by eight bytes and add the result to the beginning address of your character set.
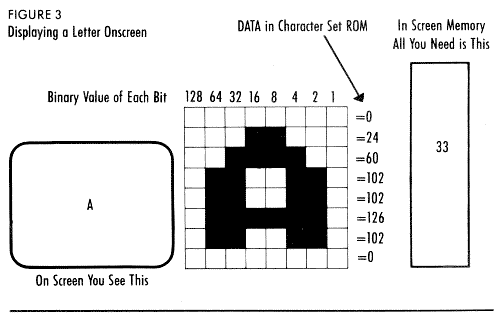
Figure 3 shows the whole process. This example uses the character A, which is the thirty-third character in the set. What you see is the binary pattern of the bits. The decimal equivalent is obtained by adding the "on" bits in each horizontal row, starting from the first number of the character set's description in memory (located at CHBAS or PEEK(756) * 256).
Since we need 8 numbers per character, and "A" is the thirty-third character in our sequence, we must go down 33*8 numbers to find the eight numbers which make up an 'A".
Placing the A on the screen, we end up with just the number 33 in screen memory and we see the A onscreen. We're using one byte instead of 8!
Character graphics is not strictly limited to letters and numbers. If we change the eight values which tell your Atari what an "A" looks like, we can turn the "A" into a "V", a box,a face, the head of a robot, or anything we like.
There's one trick, though. We can't change your Atari's internal character set-it's permanently etched in ROM. Instead, we copy the ROM character set into RAM and make our changes to this copied set. Finally, we give your Atari the address of your new character set, and POKE the high byte of that value into location 756. (For reasons we will discuss later, this address must be evenly divisible by 512!)
Try POKEing different values into 756. The screen will look strange as your character set tries to look like various areas of memory. When you're done, press [RESET] or POKE 756,224 to restore things to normal.
Now we can look at ways to place characters on the screen. Try this first:
10 PRINT "A"
If you didn't already know how to do this, then the entire article is too advanced for you. For colored letters a little larger than normal:
10 GRAPHICS 120:PRINT #6; "Aa"
(Try substituting inverse and lower-
animator can
form almost any
image with the
Atari's special
characters
case-inverse letters into the above line, and watch the colors change.)
POKE THE SCREEN
Sometimes you might want to POKE the screen codes for each character
directly into screen memory Here's one way to find the beginning address
of screen memory Type NEW, then type:
10 SCRMEM=PEEK(88)+ 256 * PEEK(89)
Now that we've found the beginning address of screen memory, let's POKE a letter there. Add this line and RUN the program:
20 POKE SCRMEM, 33
Bingo! An A in the upper left corner of the screen. The internal code for an A placed in the right place in memory gives you an A on the screen. When POKEing memory, you use the internal code. Let's look at the whole character set. Overlay these program lines and RUN the program:
5 GRAPHICS 0
20 POSITION 2,15:PRINT "POKEing"
30 FOR X=0 TO 255
40 POKE SCRMEM+X,X
50 NEXT X
This gives you all 128 characters on-screen and then the inverse of each. You can place characters anywhere in memory directly.
Another way to put characters on-screen is to PLOT them there in a text mode:
10 GRAPHICS 1
20 COLOR(33 +160)
30 PLOT 5,7
This places a blue A in position 5,7. The method is discussed on pages 276-278 of YourAtari Computer. (See list of recommended books at end of article.)
ANIMATION
You are now ready to animate some characters. Just use one of the above
techniques to change characters in the same place on the screen. This little
program example will animate ABC. Type NEW and then type:
10 GRAPHICS 0
20 POSITION l0,l0
30 PRINT 'A"
40 POSITION 10,10
50 PRINT "B"
60 POSITION 10,10
70 PRINT "C"
80 GOTO 20
This will go pretty fast. We can control the speed with a delay loop. A simple FOR-NEXT loop will do. Add these lines:
5 DELAY= 100
35 GOSUB 100
55 GOSUB 100
75 GOSUB 100
100 FOR 1=1 TO DELAY:NEXT I:RETURN
To control the speed, change the value of DELAY in line 5. Now the effect isn't too exciting with ABCs, so let's begin learning how to animate a complete picture. In the next few lessons, we will gradually assemble an animated sequence with a little robot walking through a haunted house, complete with sound effects. This first module simply uses the PRINT statement to place characters around the screen and form the basic picture.
Type in Listing 1, HAUNT01.BAS, check it with TYPO II and SAVE a copy before you RUN it. Antic Disk owners will also find the complete animated sequence on their monthly disk as HAUNT.BAS.
Feel free to change any characters you want. All the pictures in these lessons are yours to experiment with and improve.
Robin Sherer co-authored the well-known Atari programming books Tricky
Tutorials, Master Memory Map for the Atari, BASIC Arcade Graphics Design
and Atari Game Design. He is currently a programmer at Boeing Aircraft
in Seattle.
RECOMMENDED BOOKS:
Your Atari Computer by Lon Poole, Osborne/McGraw-Hill.
Mapping The Atari by Ian Chadwick, Compute! Publications, Inc.
IF YOU'D ENJOY SEEING MORE ARTICLES LIKE THIS ONE, CIRCLE 202 ON THE READER SERVICE CARD.