Printer Power Without the Price
Exhilarating embellishments for your dot-matrix
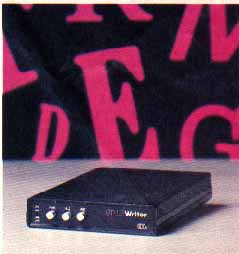
STYLEWRITER
Carolina Engineering Laboratories
818 Tyvola Road, #109
Charlotte, NC 28210
(704) 525-4423
$199 (Includes 128K and 3 fonts)
Reviewed by Charles Cherry
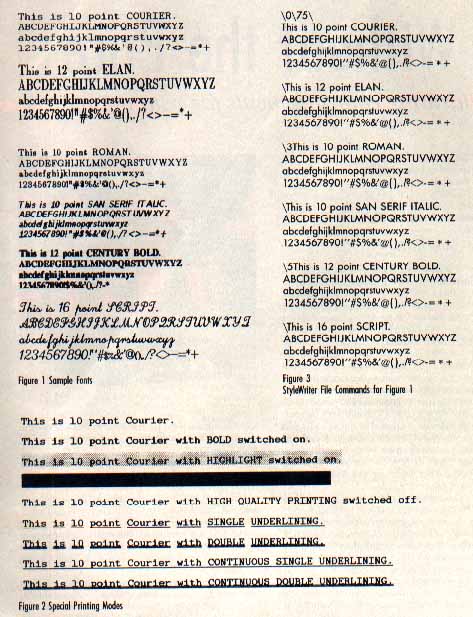
The impressive StyleWriter is a box about the size of a Hayes modem that gives your dot matrix printer a variety of very high quality fonts. The $199 model also provides a printer buffer of 128K. (You can get smaller-memory units with 8K for $99 or 64K for $169.) Figure 1 shows the six fonts which came with our review sample. Eleven other fonts are currently available and we can expect more in the future. Font chips cost $13.95 apiece and StyleWriter can hold six chips at a time. The font styles come in several sizes, but each chip can only contain one font in one size.
StyleWriter is actually very easy to use. It comes preconfigured for your specific computer and printer, so all you need to do is hook it up and it should work immediately. The print styles are controlled by simple codes that you type into your word processor text. In addition to changing fonts, you can also use a variety of special printing modes (see Figure 2). Note that the inverse printing (white on black) did not work very well with the Epson FX-80 I used for this review.
StyleWriter's font chips are proportional typefaces, so your word processor will not be able to control the spacing properly. To overcome this, StyleWriter provides its own commands that control the margins, tabs, centering and justification. There is no command for aligning text from the right margin. All control codes are a simple backslash (\) followed by letters or numbers.
Althaugh it is not mentioned in the generally very good manual, DIP switch three inside the StyleWriter box will change the control character from \ to @. DIP switch four controls the line feed for the printer. You will need to change that if you move your StyleWriter from an 8-bit Atari to an ST.
StyleWriter achieves its excellent results by taking control of your printer in its graphic mode. Six passes of the printer head are required to print each line. There is a high quality mode which takes 12 passes. All this is obviously time-consuming. However, there is a bypass button which turns StyleWriter into a plain-vanilla buffer, so your printer can work at its normal speed. This makes it a snap to print out draft copies until everything is perfect and then punch in the StyleWriter and go get a sandwich while it prints the final copy.
If you do much printing and a good-looking output is important to you, you should definitely consider investing in a StyleWriter. It is reasonably priced and will greatly enhance your pages. For most people it will eliminate the need for a daisywheel printer. If you change printers in the future, you can have your StyleWriter reconfigured at the factory. There is currently no charge for this.
It is obvious that a lot of thought, care, and an awful lot of work has gone into developing StyleWriter. My only quibble is wanting even more of what is already there-- more fonts built into the box, larger memory buffer, bigger and smaller font sizes, etc. Although the review period is over, I don't want to give back my StyleWriter. I like it a lot.
QUIK PIX White Lion Software
P.O. Box 357
Ridge, NY 11961
(516) 924-6071
$29.95, 48K disk
Users of AtariWriter, AtariWriter Plus and PaperClip word processors can use Quik Pix to put Broderbund's Print Shop Graphics Library pictures into their text printouts. Pictures can be saved as "pix," letterhead--or labels that use the Mail Merge features of these word processors. There are also 12 choices of horizontal borders. Text, graphics and borders are printed in one pass.
But the great thing about Quik Pix is that you can convert any picture--if you convert it to Print Shop format first. And virtually any graphic format for 8-bit Ataris can be converted with Graphics Shop ($19.95, The Catalog, AP0157). Also, if you want to use graphics from the original Print Shop program disk as well as the Print Shop Graphics Library disks, see the simple DESIGNING LABLES fix in this issue's I/O letters.
Quik Pix is menu-driven and has drop-down windows and single-keystroke commands. The manual is thorough, but not exactly easy to read. If you make a mistake you can't correct, you must press the [ESC] key and start the operation over. The Quik Pix basic process is easy enough to do. But the fancier you want your file to be, the harder you must work.
Quik Pix comes in two separate versions that work slightly differently, depending on which word processor they were written for. The remainder of this review will cover each version individually.
QUIK PIX PC
Quik Pix PC uses PaperClip's Include File and Verbatim File commands. Include File lets you chain as many as three files so that they'll print as one. For instance, here are the steps you might take if you were writing a 12,000- word paper:
1. Since 12,000 words works out to about 48 double-spaced pages and PaperClip's maximum file length is approximately 20 pages, write the document in three sections, saving them as D:DOC.1, D:DOC.2 and D:DOC.3
2. Read DOC.1 to the screen.
3. Instead of having to append the other two files (which won't work anyway), include them by adding the following to the end of the document:
[CONTROL] [Z] ID:DOC.2
[CONTROL] [Z] ID:DOC.3
4. If you want to print it later, write DOC.1 back to disk. To do so now, however, simultaneously press [CONTROL] [SHIFT] [ESCAPE] to print. When the printer reaches the end of the document and sees those include commands, DOC.2 and DOC.3 will be read directly from the disk to the printer.

The Verbatim File command does the same thing, but for PaperClip-compatible graphics. It takes data from the disk file--such as B/Graph charts and Micro Illustrator pictures--and prints this verbatim.
Here's where Quik Pix PC comes in. It converts Print Shop Library graphics to PaperClip format so that they can be included in text files.
To get the desired effects, however, you must read the converted file into PaperClip and fiddle around. All PaperClip users know that the underlined, crooked arrow pointing left is the carriage return symbol. Few users know that the inverse carriage return is the escape symbol--which you can't create by typing in PaperClip. True, you can duplicate this with the block copy function, [CONTROL] [M]-- but why would you?
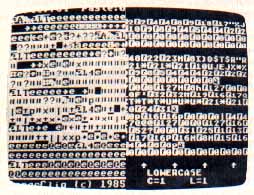
A PaperClip representation of a graphics file looks like so many garbage characters. (See Figure I.) But there is a pattern--each logical line begins with an escape symbol and ends with a carriage return. And there's only one of each per logical line.
Unless you change the file, the graphic will be printed in column 1 on your paper. However, if you put 35 spaces before each escape symbol, the printer will center the picture, as it did with the clown in the sample letter.
PC MULTI-PIX
If you want more than one graphic on one line, you really have your work cut out for you, although PaperClip's two windows make it easier. In Figure 1, to get the frog, butterfly and text on the same line, call the frog file into window 1 and the butterfly file into window 2. Then:
1. Number each line, adding the numbers before the escape symbol. In the top window you might number the lines 111, 222, etc., using 1111, 2222, etc. in the bottom. The lines with three digits would come before the ones with four, making things easier.
2. Go to line 1111 in window 2 [SHIFT][DELETE] to put each screen line of that logical line into the paste buffer.
3. Hop back up to window 1, put the cursor on 222 and simultaneously press [CONTROL] [SHIFT] [P] to put line 1111 under line 111.
4. Delete the carriage return in line 111 and add 10 spaces.
5. Press [CONTROL] [SHIFT] [I] to get into the overwrite mode and center the word "put" in those 10 spaces.
6. Delete the 111 and 1111. Now the first logical line is complete.
7. Repeat steps 2-6, adding words where appropriate. The new picture file is ready, so save it to disk.
If this sounds like a hassle, that's because it is. But it's easy to get used to, although plenty challenging at first. Expect a lot of trial and error before you get what you want.
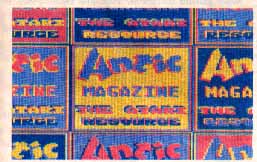
The Antic Magazine graphic in Figure 1 came from the Picture Plus disk ($19.95, The Catalog, APO173) and was in Micro Illustrator format. Graphics Shop was needed to convert the picture to Print Shop format. However, since the graphic was directly in the center of the screen on a white background, we didn't want to convert the entire Screen.
Converting part of a picture entails putting a frame around the area to be captured. While this feature works well, it isn't terribly flexible--you can't shrink or expand the frame to fit the graphic--so we had to make two files. It wasn't easy to place the frame so as not to duplicate parts of the picture. Then these files had to be converted to PaperClip format with Quik Pix PC.
The name and address at the top of Figure 1 were made with the letterhead option. A label would look about the same.
ATARIWRITER QUIK PIX
Neither AtariWriter nor AtariWriter + has a verbatim command, but you can load and print a converted graphics file right away. Graphics can be converted in either normal or compressed mode in this version of Quik Pix.
The compressed mode is used if a picture is too wide for AtariWriter Plus. Quik Pix documentation points out that AtariWriter Plus is slightly more limiting than AtariWriter in terms of graphics, and if you try to print a non-compressed picture the computer might lock up. If this happens, just press [RESET]--everything in memory will remain there.
PaperClip graphics files are easier to interpret than AtariWriter files--where the escape character is just represented by a 27. The other codes are also represented in decimal form. This may sound easier to deal with than those odd PaperClip symbols, but AtariWriter files are longer, and it's harder to see where one logical line ends and another begins.
With the Merge File command, [OPTION] [L], you can get several pictures into one file, but trying to put more than one on a line is even harder than with the PaperClip version.
However, Quik Pix is fun to experiment with. Try putting one graphic directly next to another. That's easy--after you figure out how. But now try putting one directly above another. It's extremely satisfying to get your text, graphics and borders looking just stright.--GREGG PEARLMAN
YEMACYB
Electronical Software
P.O. Box 8035
Rochester, MI 48063
$21.95, 48K disk
YEMACYB prints microscreens in color on Epson MX/80, Star IOX/SG-10 and C.Itoh Prowriter printers and compatibles. The program requires four colored ribbons, yellow, cyan, magenta and black. Printing takes four passes, and you must change the ribbon for each pass. You can order the program with the ribbons for $18 to $26 more, depending on your printer.
YEMACYB does its job well. I tested it with Star's Gemini 10X and the results were better than with most color printers. YEMACYB maintains a palette that defines the blend for each of the Atari's 128 colors. A separate program lets you change the palette if the printout doesn't match your screen exactly.
YEMACYB supports Graphics 7 and Graphics 7 1/2 (ANTIC mode E) screens in uncompressed 62-sector format. It also supports display list interrupts (DLIs). You can change any or all colors at every scan line. The resulting picture can be printed in only one size--my printer printed it sideways, G 3/8x8 1/4 inches.
On the downside, the program is not easy to use. The process of backing up the printer and aligning the page is inefficient even at the best of times. This program does nothing to help and there's a bug in the alignment routine. The DLI feature is user-hostile. You can't even see the picture as you are changing it. All of this aggravated by a poor manual.
On balance, YEMACYB is worth having. Nothing else does what it does, and the results are impressive. I just hope that future versions improve the user interface.-- CHARLES CHERRY
MAGNIPRINT II+
Alpha Systems
4435 Maplepark Road
Stow, Ohio 44224
(216) 374-7469
$24.95, 48K disk
Magniprint II + has been around for quite a while and won many satisfied users. Version 3 now adds four different text sizes and compatibility with Typesetter icons to an already impressive list of capabilities. Although it does not do everything (such as mirror images for T-shirts), Magniprint II+, Version 3 will fulfill most of your printing needs.
Magniprint II+ can take a microscreen in any mode and print it in several sizes, normal or sideways, with up to 16 gray levels. It can also produce gigantic multi-page poster printouts. Magniprint II+ produces the best quality picture your printer can deliver.
This program loads a picture in any format--even Print Shop--and lets you touch up the drawing, change the colors, assign a gray scale and add text using normal or custom fonts. Large text has vertical lines. Printing is in two full-screen sizes--three, if you count the convenient Quick Print previewer. Larger sizes can be printed in sections which you can designate, within limits.
Special features include a lister, which reproduces text files exactly as they appear on screen, including inverse and graphic characters--ideal for listing BASIC programs. You can also fine-tune the printer's line-feed to preserve the aspect ratio of your picture (so circles come out round instead of oval).
Magniprint II+ 's best features are its excellent GTIA 16- shade printouts and the remarkable (yet easy) gigantic, multi-page posters. Disappointments include the slow "multi-load" operation and the separate conversion process needed to use most picture formats.
Magniprint II+ supports Epson, Panasonic, C. Itoh, NEC, and Star dot-matrix printers and compatibles.-- CHARLES CHERRY
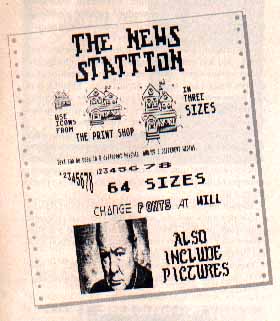
NEWS STATION
Reeve Software
29W150 Old Farm Lane
Warrenville, IL 60555
(312) 393-2317
$29.95, 48K disk
Here's another attempt to bring desktop publishing to the 8-bit Atari. As always, the problem is not enough memory. You can't put a whole page in the computer and still have room for a program.
News Station divides the page into eight "plate" which must each be composed and saved to disk individually. Once all eight are created and saved, the page is printed. The plates are printed in this arrangement:
PLATE 1 PLATE 2
PLATE 3 PLATE 4
PLATE 5 PLATE 6
PLATE 8 PLATE 7
This works fine for two-column printouts, but full-page composing is difficult. You can typeset your text with custom 8x8 character sets in 64 sizes. Five fonts are provided, but there is no font editor. You can draw freehand with a joystick or touch tablet, or load pictures, Print Shop icons and short text files.
But with 64 text sizes, News Station is an ideal tool for putting lettering into a picture. Also, the plate concept makes it easy to replicate an image eight times on a page. However, you might find it too restricted for serious typesetting and printing.--CHARLES CHERRY