FEATURES
Critical-Path Project Manager
Streamline your personal projects like the pros
by DAVID SCHWENER

Use advanced business techniques to plan any of your own personal projects for greatest efficiency, prioritizing tasks and managing time most effectively. Critical Path Project Manager uses the break-through concepts developed for major corporations. And it displays or prints easy-to-understand work analysis charts that will help keep your project moving towards successful completion. This elegantly written BASIC program works with Atari 8-bit computers with at least 48K memory and a disk drive.
As far as I know, Critical Path Project Manager is the first professional task-scheduling program for Atari computers. With advanced professional-level evaluation techniques and a graphic display of project information, Project Planner helps manage even the most complex projects efficiently.
But even if you don't need Project Manager to help you run your own business or job, this software can be used for any activity, from club picnics to weddings to your next programming effort .
A project consists of several tasks that must be completed to meet the final goal. Each task has its own name, length and relationship to the other tasks. The core of the Project Manager program is the Critical Path Method (CPM), which is widely used by large corporations to evaluate task relationships. Because some tasks cannot begin until others are done, a path, or series of related tasks, is formed.
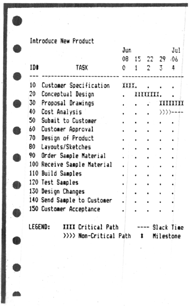
The critical path of a project is the longest series of tasks which must be done on time to finish the project before the deadline Other tasks are considered non-critical, since their start and finish can be delayed without affecting the final date. The maximum delay is called slack time. These tasks are then displayed on a “Gantt Chart,” which shows both critical and non-critical tasks.
PLANNING A PROJECT
- Define the objective and start date of the project.
- List each task required to complete the objective.
- List each tasks duration. Also, decide if it must wait for other tasks to finish before it can start. A task that must be finished before another task can begin is called a predecessor.
- Enter the data according to the following instructions, and view the Gantt chart. Look at the date of the final task to see when the project will be completed.
USING THE PROGRAM
Type in Listing 1, PROJPLNR.BAS, check it with TYPO II and SAVE a copy before you RUN it.
When you type a number or letter for menu selections, the characters do not appear onscreen and you don't have to press [RETURN]. However, when you type information for the program, these characters do appear onscreen and you must press [RETURN] to signal that you're done with a specific entry.
Pressing [ESCAPE] lets you exit, unless there’s a specific menu selection for doing so. Also, if the border color is not black, or if there’s a message indicating calculations in progress, user input is temporarily blocked.
MAIN MENU CHOICES
LOAD/SAVE A PROJECT: At the prompts, enter the drive number, then the filename with no extender. The directory only shows files with the . PRJ extender.
PROJECT INFORMATION: To select one of the following options, highlight it with the [LEFT ARROW] and [RIGHT ARROW], then press [RETURN].
PNAME: The Project Name can be 25 characters long and should adequately describe the project as a whole.
START The start date (mm/dd/yy) of the first task of the project. Warning: the program will not check for the validity of a date (for example, 02/31/88), so be accurate.
SCALE: This refers to the unit length of one duration-hours, days, weeks, months, etc. Change the scale based on the project length.
WDAYS: Valid only in the Day scale, Workdays lets you exclude weekends and holidays.
GANTT CHART Selecting this option without first loading a data file or entering a start date sends you to Project Information, where you must enter a start date before continuing.
ADD: Enter an identification (ID) number and press [RETURN]. IDs are like line numbers in BASIC programs: always increment them in steps of five or 10 to allow later additions. Entering an existing ID generates an error. The task is added to the schedule based on the ID. If you use an ID higher than any other task, the new task will be added as the last task in the schedule. If tasks 10 and 20 exist, adding task 15 will go in between them. When adding a task, no predecessors are changed automatically
After entering an ID, press [N] to name the task. If the task must start on a specific date, press [S] and enter the “time line” number underneath the corresponding date. The time line number is in inverse video and is merely a reference number for that date.
Press [D] to enter the tasks duration, which should relate to the scale selected. For example, if using the “week” scale, a task that takes 14 days should be entered as having a duration of 2. If you want to represent an event rather than a task, leave the duration at 0. Tasks with no duration are called “milestones” and are shown as asterisks on the Gantt chart.
If this task cannot start until other tasks are complete, press [P] for predecessors. Up to five predecessors (A-E) can be entered. To enter the first, press [A] and enter the ID of the preceding task. When all the predecessors have been added, press [RETURN]. When you're done, press [F] for finished.
INS: Insert is similar to Add, except that predecessors are shifted automatically. For example, if you insert task 15 between tasks 10 and 20, the predecessors for 15 will become whatever the predecessors for 20 were. Also, task 15 is added as a predecessor of task 20.
CHG: To change a task, you must enter an existing ID or else you'll get an error message. The CALC option may be required in order to see the change reflected on the Gantt Chart.
DEL: Again, an existing ID must be entered. The task information is displayed along with “Delete this task (Y/N)?“. Pressing [Y] deletes the task. Pressing anything else will abort.
SCR: This option lets you view various parts of the Gantt Chart. Pressing [H] displays the upper left-hand corner of the schedule, beginning with the first task at the project start date. Pressing [L]eft, [R]ight, [U]p or [D]own lets you enter how far you want to move in that direction. The move is based on the time scale If you press [5] and the scale is days, you will move five days in the direction selected.
CAL: To allow faster data entry, calculation of the critical path is not automatic. If on the last line of the display the word CALC appears, the chart might not be pictorially correct. To view the correct Gantt Chart, select this option to calculate and display the new critical path.
REPORT WRITING: The Gantt Chart can be printed either in normal or condensed print (if your printer supports it). Place your printer’s control codes for condensed print in line 4000.
PROGRAM TAKE-APART
Lines 20-310 calculate the critical path.
Lines 320-350 move screen 1 to screen 2 and lines 360-380 move screen 2 to screen 1.
Lines 390-410 are the GET key routine. Lines 420-480 get an alphanumeric string, lines 490-550 get a numeric string.
Lines 560-680 convert the standard date to Julian or vice versa.
Lines 690-760 draw a generic window. Lines 770-980 generate the main menu. Lines 990-1620 are the Load/ Save Data routine.
Lines 1630-2320 are the Project In-formation routine. Lines 2330-3660 are the Gantt Chart routine Lines 36704100 are the Report Writing routine. Lines 4110-4230 calculate calendar information. Lines 4240-4820 print the Gantt Chart to the screen or printer.
Lines 4830-5260 contain the initialization routine and lines 5270- 5290 display errors.
PROGRAMMING NOTES
Windows are achieved through the machine language routine MOVE, which moves the entire Graphics 0 screen from one address to another When a window is needed, the screen is first copied to another location. Then the window is printed to the screen using standard POSITION and PRINT statements, replacing the text “underneath’ it. When the window is removed, the copied screen is moved back to the display area and the text is restored intact.
David Schwener, a product engineer from Fayetteville, North Carolina, divides his computer time evenly between programming and business applications. This is his first publication in Antic.
Listing 1 PROJPLNR.BAS Download