Mutant Joysticks
Customized game controllers you can build
By Kevin Steele
Turn that broken-down old joysticks into a custom controller with these tips and instructions from an ace joystick dismantler.
As an avid video gamer, I am constantly annoyed by having to use a joystick to play a game that was never designed for a joystick. Pole Position comes to mind -- have you ever tried to drive a car with a joystick? Unfortunately, alternative controllers are hard to find. A few ill-fated attempts have been made, such as the Atari Trackball, but without software support, these controllers are worthless.
So why not just adapt an old joystick to suit your needs? It's a lot easier than you think, and can be done with a minimum of money and time. All it takes is a little creativity, elbow grease, and time. I've created several alternative controllers, some with a specific game in mind, such as Pole Position. Others were simply creative tinkerings, but could possibly be used in a game of your own design.
WHAT'S INSIDE
Before we start building that dream controller, let's take a look inside your standard Atari joystick. The joystick case can be easily opened by using a Phillips screwdriver to unscrew the four screws holding the case together. Once you've opened the case, what you will discover is a printed circuit board attached to the joystick cable by six wires.
Notice that each of the attached wires is a different color -- this will be important when you are wiring up your own creation. As the color of these wires sometimes changes from joystick to joystick, I'll identify them by location on the circuit board rather than color.
If you orient the board so that the fire button is in the upper left- hand corner, the third wire down on the right side should be the ground wire. Follow the copper traces on the board--- the copper tracings from the ground wire go to all "blisters" on the board, which are the switches that tell the computer which direction you are pushing the joystick.
If you follow the traces for the other five wires, you will note that they correspond to the other joystick functions -- up, down, left, right, and fire. These can be thought of as buttons or keys, and can be combined in any way you wish, unlike a standard joystick which is limited to pushing adjacent buttons together.
Make a note of what color wire corresponds to which joystick direction. By detaching these wires from-the board and attaching them to your own custom switches, you can create a variety of controllers.
ARCADE ADAPTATIONS
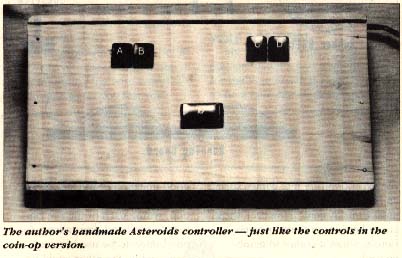
The accompanying photo shows the Asteroids keypad that was my first attempt at a new controller. This is a fairly simple project, and only requires a keypad and a case which are easily obtainable at a local Radio Shack (or by mail from Jameco Electronics).
Step one is to lay out a template on a piece of wood or the case top to indicate where you would like the keys placed. You may want to play around with the key placement a bit, and adjust the key placement to whatever feels comfortable for you. Once this is done, use a jigsaw to separate the keys from the keypad, and a drill to drill matching holes in the board or case top.
The keytops on my keypad were detachable, which helped in both the cutting and mounting of the keys. I used the larger "Zero" key off the keypad for the hyperspace key, to allow for a bigger panic target for my thumb.
Once you've drilled the holes and mounted the keys, you can then wire up the keys. The ground wire should go to one post on the back of all the keys, and the other post will be attached to the corresponding joystick wire. For example, the "down" wire will be attached to the second post on the Zero key, to allow for hyperspace when pressed.
Soldering the wires is best, but if the keys have long enough posts, simply wrapping the wire works well enough to let you test your wiring before committing to a solder job. Once the keys are wired, plug in the new controller and give it a brief test.
After you're sure all is well, you can build a case to match, or possibly find one that suits your needs. I built mine from wood, but you may find that a steel case from Radio Shack more suits your taste. The top surface of my case was designed to slope gently, like any normal keyboard would. This helps to relieve wrist stress during those long play sessions. Once you've played a game or two with your new controller, I'm certain you'll never use a joystick for Asteroids again.
This same technique could also be used to create a key-based controller for any game where a joystick is just too mushy for accurate control.
POLE POSITION
My next challenge, a controller that simulated a real steering wheel for the Pole Position game, proved to be a bit more challenging. True proportional steering was out, because the game worked only with "on" and "of" signals from the joystick. You push the joystick left, and the car pulls a hard left until you stop pushing left on the joystick. Nothing like "turn the car slightly left" was possible, except for flicking the joystick left in quick intervals, which was as close as you could get to a gradual left turn.
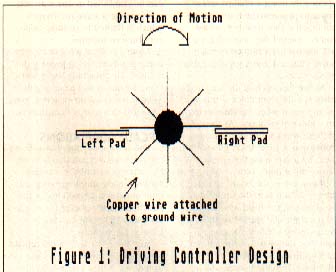
That was what got me thinking -- if I mounted a number of metal "leaves" around a 1/2" copper pipe, and placed two contact metal "pads" to the left and right of the pipe, (see Figure 1) I could simulate that pulsing joystick motion with a true steering wheel! As you turn the wheel left or right, the metal leaves touch the pads on the left or right, and the resulting contact accurately simulates joystick "pulsing."
I mounted this contraption on a board using two eye hooks, one mounted slightly lower than the other, and wired up one of the eye hooks to the ground wire. Two wood blocks held the metal contact steering wheel, and the fire button switch wired to a footswitch placed on the floor for the brake, I had my driving controller.
I kept the joystick wired in to use the up-down motion for the stick shift. The faster you turn the wheel, the faster the pulsing motion, and the more the car turns. While not perfect, it's a lot closer to real driving, and Pole Position's suddenly a lot more fun to play.
RUN FOR YOUR LIFE!
Several sports games have the player simulate running by toggling the joystick back and forth as fast as possible. This, to me, lacked the realism that I wanted while running for the gold. Besides, my joystick hand hurt. After one hand-cramp too many, I came up with a brilliant idea -- why not rig up a joystick that also included two pads that you could place on the floor for the running portions of the game?
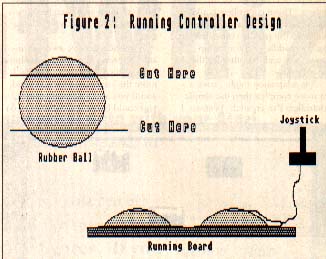
While the idea was simple, designing a good footpad was tough. Finding a material to simulate the blister switches on the circuit board, something large enough and tough enough to be stepped on vigorously, was a challenge. Then I hit upon the answer -- a rubber ball, in this case a medium-sized ball found in a toy store. I cut it so that I had a little less than half of the ball to work with, creating a rubber "dome" to be stepped on. I then epoxied a small circle of copper foil to the inner part of the dome, and a larger circle to a wooden board. After soldering wires to both copper pads, I then attached the dome to the board using a staple gun. The wires were attached to the contact points inside the joystick, and voila, I had a running board (see Figure 2).
Now all I had to do was hold the joystick in my hands. When the moment came in the game for the big race, I simply jumped on the board and started running. Not only had the game become a lot more fun, I was getting a much-needed workout in the process!
You'll probably have to experiment a bit on what kind of ball to use, and how thick to cut it, but once you've found a workable solution, I think you'll agree that this controller really adds that extra "something" to your Olympic competitions.
FANCIFUL PADDLES
Several of my controller designs weren't designed with any currently available game in mind. Rather, they are controllers that I would like to see utilized on the Atari. These are controllers I had seen in an arcade or simply ideas I came up with while working on other controllers. While these designs won't work with any of the commercial games currently available, they can be used as starting points for your own programming efforts. Who knows, perhaps one of these controllers will inspire you to create the next "Defender" or "Rescue on Fractalus"!
The Atari paddle controllers are hardly (if ever) used for games anymore. In fact, they were never extensiveiy used at all, with the possible exception of a few games such as Breakout and Kaboom! for the 2600 game system. However, these controllers are potential powerhouses when it comes to game control.
The paddles return a value between 0 and 255, depending on how far they are turned. This allows for smooth, gradual movement. The fact that there are two paddle controllers per joystick port allows for a highly complex controller to be created, using options such as proportional bi-directional movement and dual fire buttons. The first idea I had for applying the paddle controllers was imitating the controller used in the arcade "Star Wars" games. This controller looks siInilar to the flight control stick used in large aircraft. It allows for proportional left-right movement, as well as the ability to tilt the controller forward and back, to simulate dives and climbs.
With the Atari paddles, this controller is fairly simple to duplicate. Using one paddle for the left-right motion, and the other for the forward-back tilting motion, a good imitation of the Star Wars controller can be built. In addition, wiring each of the fire buttons to the hand grips allows for one button to be used for, say, lasers, while the other could be used for a bomb release! Now if only a game existed that could use this controller!
JOYSTICK FANTASIES
Another idea for a controller that uses an old paddle controller is a true proportional driving System. One paddle would be used for the steering wheel, while the other paddle could be adapted for use as a proportional gas pedal. Then, using one of the fire buttons as the brake, you could easily simulate an automobile. This simulation could even be taken a step further, adding a ioystick for use as a stick shift.
Another idea, one I've not yet tried, is to adapt a joystick from a Tandy Color Computer, Apple II, or an old 5200 game system. These joysticks are analog joysticks, which means they allow for proportional movements. I have always wanted this type of controller for my Atari system. These controllers could be adapted to work on a principle similar to the paddle controllers, using one paddle port for the up-down axis, and the other for the left-right axis.
This adaptation might prove a bit more complex than the simple controllers I've created. Even so, I mention it here as an inspiration to experiment on your own. If anyone has any success with adapting this type of joystick, let me know --- I'd love to hear how you did it.
The paddle controllers can be the starting point for a multitude of controllers -- anything that requires proportional movement, from turning a steering wheel, to swinging a bat or swiveling a tank turret. All these can be most accurately represented using a paddle. All that remains is to actually design a controller to fit the task, and perhaps write a program to use that controller.
The possibilities for joystick modification are endless. Since the joystick is simply a collection of switches, you can substitute your own switches in almost any possible combination. In fact, the number of possible key combinations is large enough to consider special projects, such as a detached keyboard or a "Twister" type playing mat.
A joystick has five switches inside, allowing 32 possible combinations of these switches. This is more than adequate for a keypad, and if you add a second joystick, you could boost that number to 64 or a mind-boggling 1,024 keys, depending on whether you keep the joystick switches separate between joysticks, or cross-wire the switches between joysticks for more possible combinations.
This allows for such projects as a pressure-sensitive chess board. For a game board based on the board game "Operation," each button could be used for an "organ" on a patient's body. The ground wire would be attached to the "scalpel" to detect a mishap. Combined with, appropriate sound effects, this could prove to be a wonderful computer game.
Your controllers don't have to be limited to game-based ideas. In fact, with a home-brewed software driver, a spare keyboard (available through some mail-order houses), and a little creativity, a detached keyboard could theoretically be created. I've yet to attempt this ambitious a project, but don't let that stop you -- joystick projects are relatively simple in comparison to other hardware projects. It is also very difficult, if not impossible to damage your computer with your joystick creations. Just don't add any additional voltage to the switches, and you should be fine.
Another avenue of thought for joystick projects is to substitute simple switches for more complicated ones. Light-activated, magnetic, velocity-sensitive -- the possibilities are endless. Sometimes, good ideas for joystick projects can be found simply by browsing electronics catalogs, and figuring out ways to adapt the electronic hardware you find into a joystick for your Atari system.
If there is one guideline for joystick projects, it is to be creative -- I've often found myself inspired to write software simply to support some new contraption I've wired up, as well as being inspired to design a controller to support game software already written. Armed with the basic knowledge of how joysticks and paddle controllers work, together with a little creativity and imagination, the sky's the limit.
(Please note that Antic Publishing, Inc. is not responsiblefor any damage that might result from your experiments with the methods described in this article. -- ANTIC ED)
Kevin Steele is a freelance technical writer in Cleveland, Ohio. He can often be found on GEnie -- his address is K.B.STEELE. His More Secrets of AtariWriter Plus appeared in the June, 1988 Antic.